Istio Troubleshooting
May 08, 2023 교육 v1.010장에서는 Istio 데이터플레인 트러블슈팅 에 대해 다룹니다
개요
- 실습 git: https://github.com/istioinaction/book-source-code
- 출처 : Istio in Action 챕터10
다루는 내용
- 데이터플레인의 문제를 확인하고 조치하는 과정을 실습해 봅니다
- Envoy 설정 오류 진단 및 조치
- 애플리케이션 문제 진단 및 조치
용어
실습환경
- minikube (k8s) 및 istio 설치. 참고: https://netpple.github.io/2023/Istio-Environment/
- 실습 네임스페이스 : istioinaction
- 실습 디렉토리 : book-source-code
실습초기화
반복 실습 등을 위해 초기화 후 사용하세요
istioinaction 네임스페이스 초기화
## 복잡한 설정 일괄 제거를 위해 istioinaction 네임스페이스를 삭제 후 다시 생성합니다
kubectl delete ns istioinaction &&
kubectl create ns istioinaction &&
kubectl label ns istioinaction istio-injection=enabled
istio-system 네임스페이스 초기화
## 9장 Securing 실습 설정 제거
kubectl delete authorizationpolicy,peerauthentication,requestauthentication -n istio-system
MeshConfig 에 external authz 설정을 확인해서 지워줍니다
## 9장의 ext-authz 외부 인가 서버 설정을 제거합니다
# kubectl edit cm istio -n istio-system

apiVersion: v1
data:
  mesh: |-
  ..
    extensionProviders:
  #### 삭제 시작 #####
    - envoyExtAuthzHttp:
        includeRequestHeadersInCheck:
        - x-ext-authz
        port: "8000"
        service: ext-authz.istioinaction.svc.cluster.local
      name: sample-ext-authz-http
  #### 삭제 끝 #####
  ..
default 네임스페이스 초기화
kubectl delete deploy/sleep -n default
kubectl delete svc/sleep -n default
10.1 흔히 하는 실수: 데이터플레인의 설정 오류 찾기
설정 오류가 포함된 실습환경을 배포해 보겠습니다
## catalog v1 배포
kubectl apply -f services/catalog/kubernetes/catalog.yaml -n istioinaction

## catalog v2 배포
kubectl apply -f ch10/catalog-deployment-v2.yaml -n istioinaction

## catalog-gateway 배포 - catalog.istioinaction.io:80
kubectl apply -f ch10/catalog-gateway.yaml -n istioinaction

##
kubectl apply -f ch10/catalog-virtualservice-subsets-v1-v2.yaml -n istioinaction
- catalog.yaml
- catalog-deployment-v2.yaml
- catalog-gateway.yaml
- catalog-virtualservice-subsets-v1-v2.yaml
배포된 catalog 로 ingress gateway를 통해 요청을 보내봅니다
for i in {1..100}; do curl http://localhost/items \
-H "Host: catalog.istioinaction.io" \
-w "\nStatus Code %{http_code}\n"; sleep .5;  done
출력 결과는 ?
10.2 데이터플레인 이슈 식별하기
수사는 어떻게 할 것인가? (다양한 수사도구를 확인해 보아요)
proxy SYNC 상태 조회
데이터플레인의 설정을 살펴보기 이전에 배포한 설정이 잘 SYNC 되었는지 확인해봅시다
istioctl proxy-status

Kiali 조회 - Istio Config 오류 시 warning 제공
istioctl dashboard kiali

## or ##
# kubectl port-forward -n istio-system svc/kiali 20001
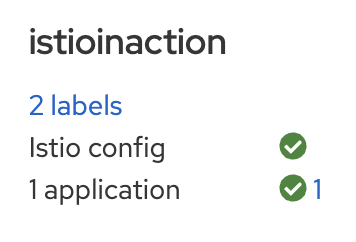
Kiali 대시보드 상에서 istioinaction 네임스페이스의 IstioConfig 경고가 확인됩니다
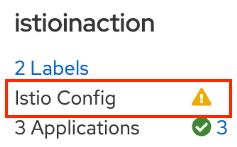
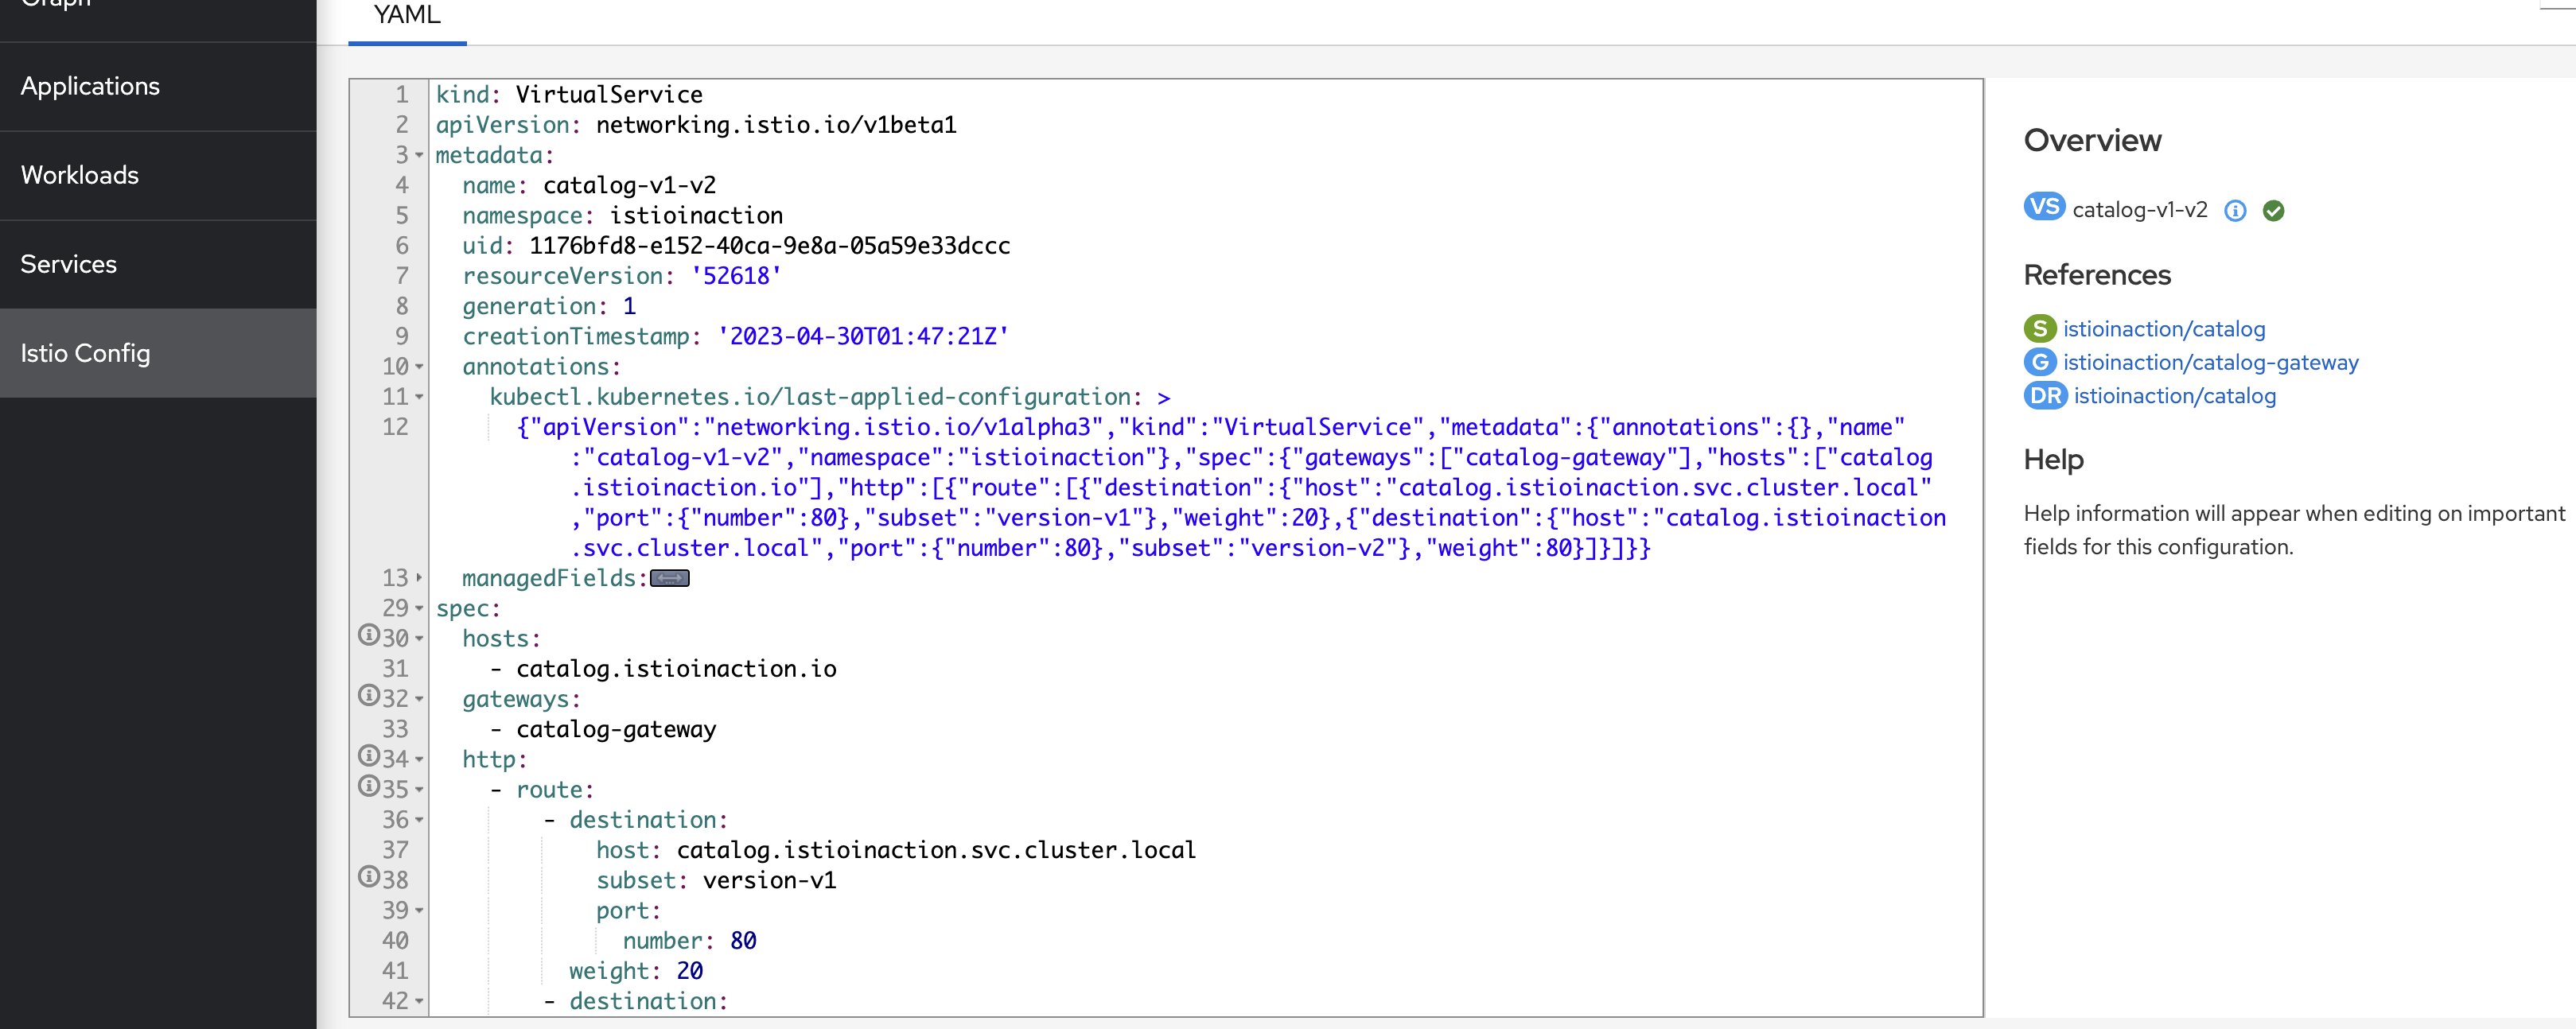
Istio Config 메뉴로 이동해서 Config 목록을 확인합니다 (경고가 뜬 catalog-v1-v2 클릭)

Config 상세화면에서 하이라이팅된 문제부분을 확인합니다
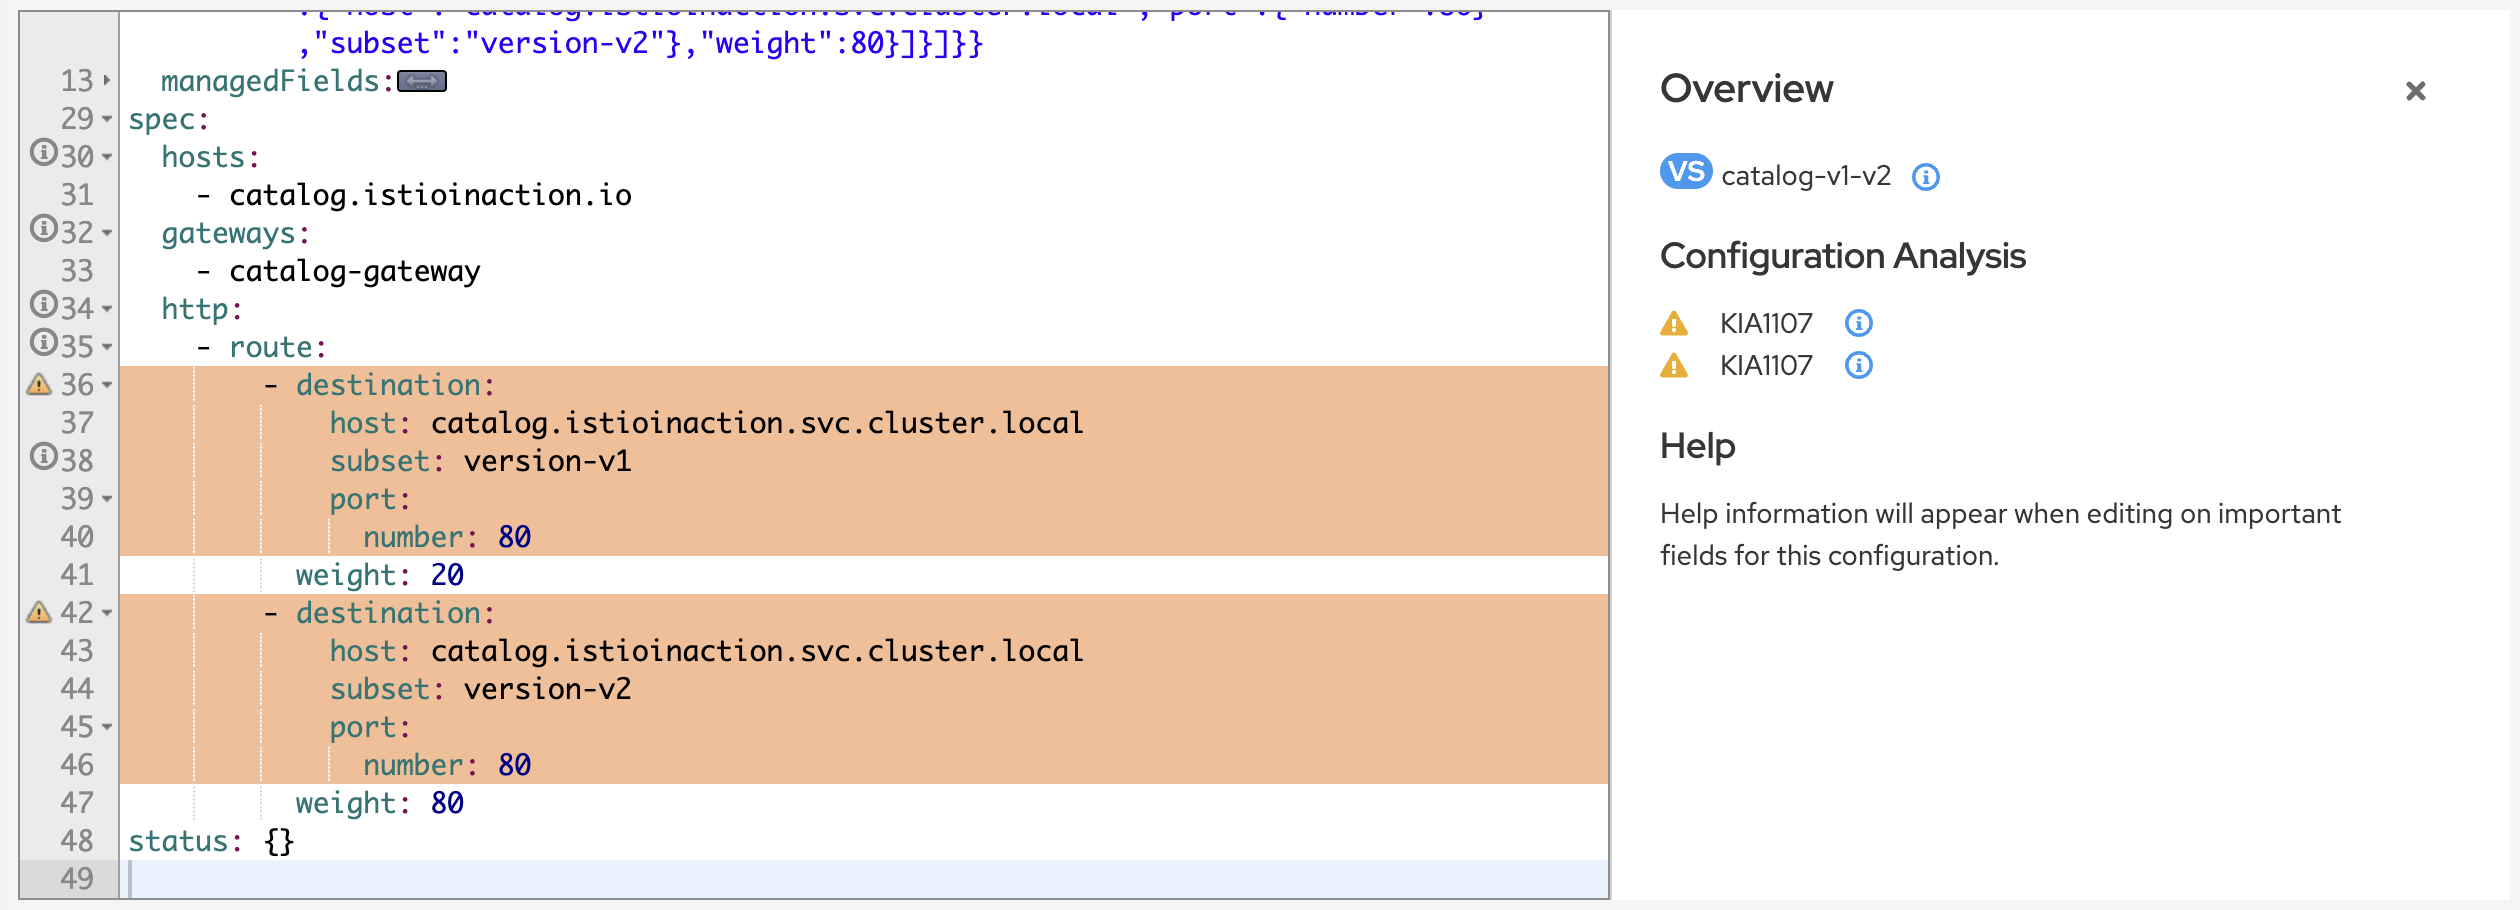
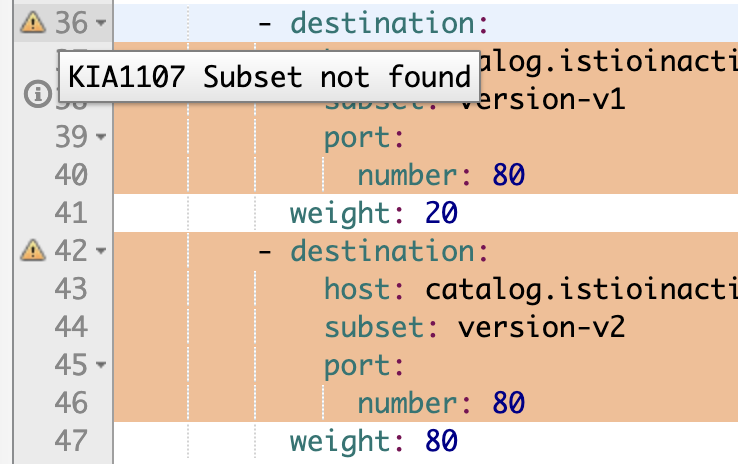
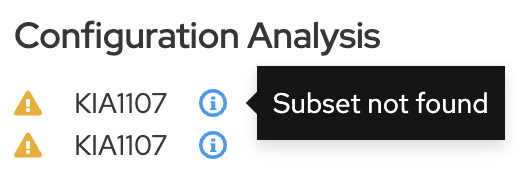
destination의 subset이 없다고 안내합니다
istioctl analyze
앞서 Kiali로 설정오류를 확인하였는데요. Kiali 외에도 설정오류를 확인할 수 있는 툴들이 있습니다.
istioctl 의 analyze 툴을 활용하면 설정 오류를 잡아내고 명세를 검증하는데 활용할 수 있습니다.
## analyze 로 검사할 네임스페이스를 지정합니다
istioctl analyze -n istioinaction
## 출력
Error [IST0101] (VirtualService istioinaction/catalog-v1-v2) Referenced host+subset in destinationrule not found: "catalog.istioinaction.svc.cluster.local+version-v1"
Error [IST0101] (VirtualService istioinaction/catalog-v1-v2) Referenced host+subset in destinationrule not found: "catalog.istioinaction.svc.cluster.local+version-v2"
Error: Analyzers found issues when analyzing namespace: istioinaction.
See https://istio.io/v1.16/docs/reference/config/analysis for more information about causes and resolutions
istioctl describe
앞에서 네임스페이스 설정을 검사해보았다면, 이번에는 catalog Pod 설정을 검사해서 문제를 확인해 봅시다
## catalog pod 확인
kubctl get pod -n istioinaction
## catalog pod 검사 ~ 앞서 확인한 pod name을 줍니다
istioctl x describe pod catalog-5c7f8f8447-f54sh
## 출력
Pod: catalog-5c7f8f8447-f54sh
   Pod Revision: default
   Pod Ports: 3000 (catalog), 15090 (istio-proxy)
--------------------
Service: catalog
   Port: http 80/HTTP targets pod port 3000
--------------------
Effective PeerAuthentication:
   Workload mTLS mode: PERMISSIVE

Exposed on Ingress Gateway http://127.0.0.1
VirtualService: catalog-v1-v2
   WARNING: No destinations match pod subsets (checked 1 HTTP routes)
      Warning: Route to subset version-v1 but NO DESTINATION RULE defining subsets!
      Warning: Route to subset version-v2 but NO DESTINATION RULE defining subsets!
Kiali 이외에도 istioctl 에서 제공하는 analyze, describe 툴로도 문제를 확인할 수 있었는데요
이러한 CLI 도구를 활용하면 설정오류를 감지하고, 명세를 사전에 검증하는 등 자동화 할 수 있습니다
지금까지 다양한 방법으로 데이터플레인의 설정오류를 확인해 보았는데요
데이터플레인 설정이란 결국 “Envoy Proxy” 설정을 의미합니다
(Istio는 모든게 Envoy 죠…)
이어서 Envoy 의 설정을 직접 살펴보는 방식으로 설정 문제를 확인해 보겠습니다
10.3 Envoy config 에서 설정 오류 찾기
10.3.1 Envoy 어드민 인터페이스
Envoy 어드민 인터페이스는 Envoy 컨피그 및 기타 로그레벨 변경 같은 다양한 프록시 측면의 수정 기능들을 노출합니다
아래와 같이 istioctl dashboard 명령으로 catalog Pod의 envoy 어드민 대시보드를 띄워보세요
Envoy 대시보드
istioctl dashboard envoy deploy/catalog -n istioinaction
config_dump 클릭

보기도 힘들정도로 많은 양의 설정입니다
## config_dump API 로 라인수를 확인해보세요
# curl -s localhost:15000/config_dump | wc -l

14478
(참고) Envoy Administration Interface
지금까지 Gateway, VirtualService, DestinationRule 등 Istio 의 다양한 명세들을 살펴보았는데요.
이러한 명세들 뿐만아니라 메시 내의 엔드포인트를 비롯한 다양한 리소스들의 변경사항들에 대해서
“Envoy 컨피그”를 동적으로 설정하는 방식으로 Istio는 서비스 메시의 네트워크를 제어합니다
10.3.2 istioctl 을 이용한 Envoy 컨피그 쿼리하기
istioctl proxy-config 명령으로 복잡한 Envoy 컨피그 설정들을 쉽게 검색하고 필터링 할 수 있습니다
istioctl proxy-config 는 Envoy 의 주요 컨피그(xDS) 항목별로 subcommand 를 제공합니다
- listener : 리스너 설정 검색
- route : 라우트 설정 검색
- cluster : 클러스터 설정 검색
- endpoint : 엔드포인트 설정 검색
- secret : 시크릿 설정 검색
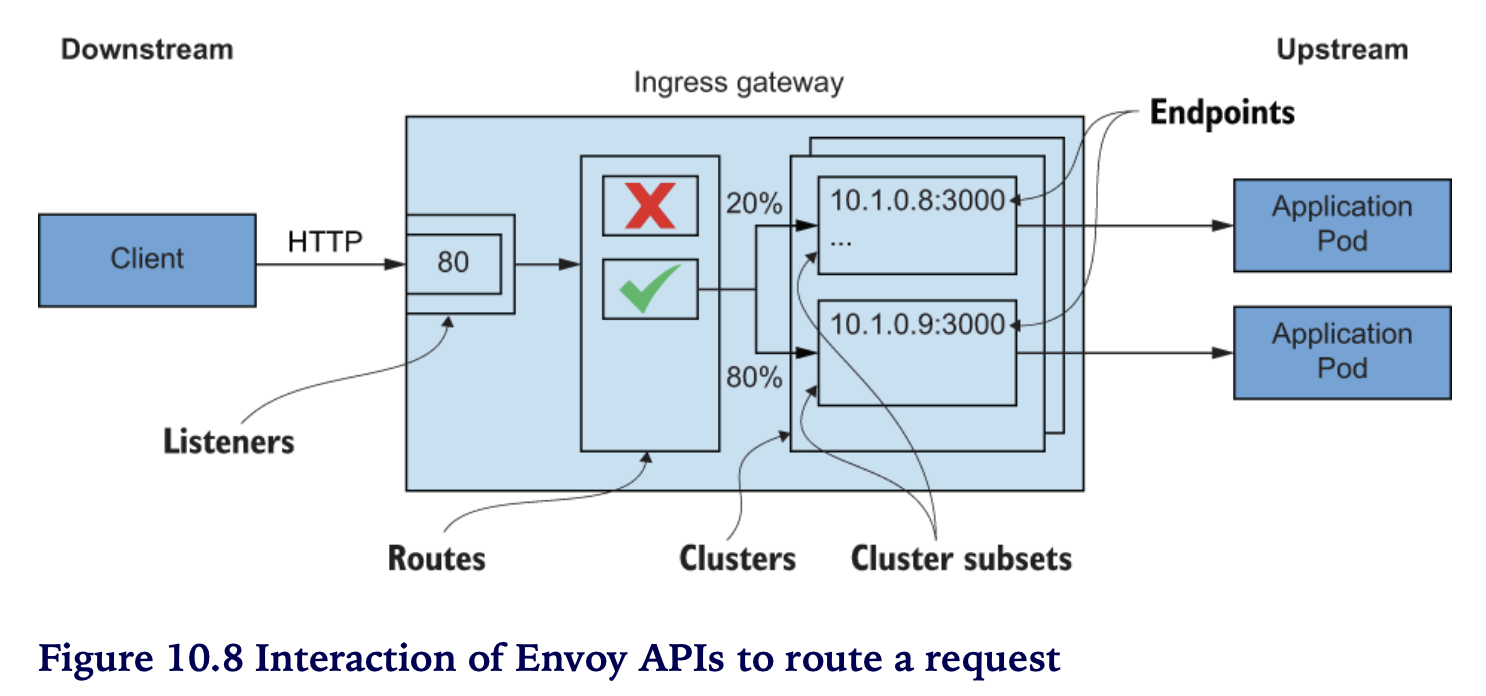
요청을 라우팅하기 위한 ENVOY API 간의 상호 작용
Envoy proxy의 핵심기능은 “Discovery” 입니다 (예: 트래픽을 전달할 타겟을 식별)
Envoy 에서 “Discovery” 를 위한 설정 대상에는 어떤 것들이 있을까요 ?
Envoy Proxy 의 Discovery 설정은 xDS API 를 이용합니다
xDS API 종류는 다음과 같습니다
- LDS : Listener DS (Discovery) API
외부 트래픽 유입을 위한 ingress gw의 진입 포트 설정 API - RDS : Route DS API
유입된 트래픽을 보낼 라우트 설정 API - CDS : Cluster DS API
라우트 대상 엔드포인트 그룹인 클러스터 및 클러스터의 서브셋 설정 API - EDS : Endpoint DS API
최종 트래픽 전달 엔드포인트 설정 API - ADS : Aggregated xDS API
xDS 설정 중앙 관리서버와의 통신 API. Envoy 개별적으로는 다른 Envoy와의 관련 설정 처리 및 순서 문제를 해결하기 어렵기 때문에 중앙서버를 두고 처리하는 방식도 제공함 - 기타
- SDS : Secret DS API
- ECDS : Extension Config DS API
- RTDS : RunTime DS API
- Delta gRPC xDS
- xDS TTL
다음 그림은 트래픽이 애플리케이션까지 전달되는 라우트 과정을 보여줍니다
[LDS] Envoy 리스너 컨피그 쿼리하기
# istioctl pc listeners deploy/istio-ingressgateway -n istio-system

ADDRESS PORT  MATCH DESTINATION
0.0.0.0 8080  ALL   Route: http.8080
0.0.0.0 15021 ALL   Inline Route: /healthz/ready*
0.0.0.0 15090 ALL   Inline Route: /stats/prometheus*
[RDS] ENVOY 라우트 컨피그 쿼리하기
# istioctl pc routes deploy/istio-ingressgateway -n istio-system --name http.8080

NAME          DOMAINS                         MATCH     VIRTUAL SERVICE
http.8080     catalog.istioinaction.io        /*        catalog-v1-v2.istioinaction
# istioctl pc routes deploy/istio-ingressgateway -n istio-system --name http.8080 -o json

..
"route": {
  "weightedClusters": {
    "clusters": [
      {
        "name": "outbound|80|version-v1|catalog.istioinaction.svc.cluster.local",
        "weight": 20
      },
      {
        "name": "outbound|80|version-v2|catalog.istioinaction.svc.cluster.local",
        "weight": 80
      }
    ],
    "totalWeight": 100
  },
..
위의 Route 출력 결과에서 클러스터 정보(clusters)를 확인할 수 있습니다
{DIRECTION} | {PORT} | {SUBSET} | {FQDN}
(출력 예시)
outbound|80|version-v1|catalog.istioinaction.svc.cluster.local
outbound|80|version-v2|catalog.istioinaction.svc.cluster.local
- DIRECTION : outbound
- PORT : 80
- SUBSET : version-v1 (or version-v2)
- FQDN : catalog.istioinaction.svc.cluster.local
[CDS] ENVOY 클러스터 컨피그 쿼리하기
앞에서 확인한 라우트 쿼리의 출력 정보를 이용해서 클러스터 정보를 쿼리해 보겠습니다.
istioctl pc clusters deploy/istio-ingressgateway -n istio-system \
--fqdn catalog.istioinaction.svc.cluster.local \
--port 80 \
--subset version-v1
출력 : (결과 없음)
아무 클러스터 정보도 출력되지 않는데요. –subset 정보만 제외하고 다시 쿼리해 봅니다
istioctl pc clusters deploy/istio-ingressgateway -n istio-system \
--fqdn catalog.istioinaction.svc.cluster.local \
--port 80
이번에는 출력 결과가 나옵니다 (단, SUBSET과 DESTINATION RULE은 비어있네요)
SERVICE FQDN                                PORT     SUBSET     DIRECTION     TYPE     DESTINATION RULE
catalog.istioinaction.svc.cluster.local     80       -          outbound      EDS
앞에서는 등록되지 않은 subset 정보로 쿼리를 시도했기 때문에 출력 결과가 나오지 않았습니다
DESTINATION RULE 설정
원인을 알았으니, DestinationRule 을 설정해서 정상적으로 컨피그 되도록 조치해 봅시다
## version-v1, version-v2 서브셋이 정의된 DestinationRule
# cat ch10/catalog-destinationrule-v1-v2.yaml
---
apiVersion: networking.istio.io/v1alpha3
kind: DestinationRule
metadata:
  name: catalog
  namespace: istioinaction
spec:
  host: catalog.istioinaction.svc.cluster.local
  subsets:
  - name: version-v1
    labels:
      version: v1
  - name: version-v2
    labels:
      version: v2
DestinationRule YAML validation
## 적용할 명세에 이상이 없는지 미리 검증해 봅니다
istioctl analyze ch10/catalog-destinationrule-v1-v2.yaml -n istioinaction

#✔ No validation issues found when analyzing ch10/catalog-destinationrule-v1-v2.yaml.
DestinationRule 적용
kubectl apply -f ch10/catalog-destinationrule-v1-v2.yaml
설정 적용 확인
istioctl pc clusters deploy/istio-ingressgateway -n istio-system \
--fqdn catalog.istioinaction.svc.cluster.local \
--port 80
SUBSET version-v1, version-v2 가 추가되었습니다

[CDS] 클러스터 컨피그 확인
--subset 플래그를 포함해서 클러스터 정보를 쿼리해 보겠습니다.
istioctl pc clusters deploy/istio-ingressgateway -n istio-system \
--fqdn catalog.istioinaction.svc.cluster.local \
--port 80 \
--subset version-v1 \
-o json
아래 출력 예시는 설명할 정보만 남기고 나머지는 생략하였습니다
{
  "name": "outbound|80|version-v1|catalog.istioinaction.svc.cluster.local",
  "type": "EDS",
  "edsClusterConfig": {
    "edsConfig": {
      "ads": {},
      "resourceApiVersion": "V3"
    },
    "serviceName": "outbound|80|version-v1|catalog.istioinaction.svc.cluster.local"
  }
}
edsConfig에 ads, Aggregated Discovery Service 가 설정돼 있습니다ADS는 envoy proxy 설정을 중앙에 “관리서버”를 두고 제어할 때 사용하는 API 입니다- Istio 에서는 pilot 이 ads 관리서버 역할을 하는데요 현재는 istiod 로 통합되었습니다
- serviceName
outbound|80|version -v1|catalog.istioinaction.svc.cluster.local값으로 ADS 쿼리로 부터 엔드포인트를 필터링합니다
(참고) ADS, Aggregated Discovery Service
[EDS] ENVOY 엔드포인트 컨피그 쿼리하기
serviceName 값으로 EDS 쿼리를 확인해 보세요
istioctl pc endpoints deploy/istio-ingressgateway -n istio-system \
--cluster "outbound|80|version-v1|catalog.istioinaction.svc.cluster.local"
## 출력 예시 ~ ENDPOINT(ip:port) 는 각 자 환경마다 다름
ENDPOINT            STATUS      OUTLIER CHECK     CLUSTER
172.17.0.6:3000     HEALTHY     OK                outbound|80|version-v1|catalog.istioinaction.svc.cluster.local
해당 엔드포인트를 가진 파드를 확인해 보세요
kubectl get pod -n istioinaction \
--field-selector status.podIP=172.17.0.6
## 출력 예시 ~ Pod Name은 각 자 환경마다 다름
NAME                       READY   STATUS    RESTARTS      AGE
catalog-5c7f8f8447-f54sh   2/2     Running   2 (16m ago)   3h56m
호출이 잘 되는지도 확인해 보세요
curl -H "Host: catalog.istioinaction.io" localhost/items
Kiali 대시보드도 처음과 비교해 보세요
istioctl analyze/describe 도 처음과 비교해 보세요
# istioctl analyze -n istioinaction

✔ No validation issues found when analyzing namespace: istioinaction.

# istioctl x describe pod catalog-5c7f8f8447-m7k2k

Pod: catalog-5c7f8f8447-m7k2k
   Pod Revision: default
   Pod Ports: 3000 (catalog), 15090 (istio-proxy)
--------------------
Service: catalog
   Port: http 80/HTTP targets pod port 3000
DestinationRule: catalog for "catalog.istioinaction.svc.cluster.local"
   Matching subsets: version-v1
      (Non-matching subsets version-v2)
   No Traffic Policy
--------------------
Effective PeerAuthentication:
   Workload mTLS mode: PERMISSIVE

Exposed on Ingress Gateway http://127.0.0.1
VirtualService: catalog-v1-v2
   Weight 20%
지금까지 istio data-plane 의 “misconfiguration 이슈” 진단하는 과정을 실습을 통해 살펴보았습니다
다음은 data-plane의 “애플리케이션 이슈”를 진단하고 해결해 나가보도록 하겠습니다
10.3.3 애플리케이션 이슈 트러블슈팅
이번에는 데이터플레인의 설정이슈가 아닌 “애플리케이션 이슈”를 다뤄보겠습니다
먼저, 실습을 위해서 아래와 같이 catalog 로 요청 트래픽을 발생시켜주세요
for in in {1..9999}; do curl http://localhost/items \
-H "Host: catalog.istioinaction.io" \
-w "\nStatus Code %{http_code}\n"; sleep 1; done
Status Code 200 (정상)으로 아래와 같이 응답이 출력됩니다
[
  {
    "id": 1,
    "color": "amber",
    "department": "Eyewear",
    "name": "Elinor Glasses",
    "price": "282.00"
  },
  {
    "id": 2,
    "color": "cyan",
    "department": "Clothing",
    "name": "Atlas Shirt",
    "price": "127.00"
  },
  {
    "id": 3,
    "color": "teal",
    "department": "Clothing",
    "name": "Small Metal Shoes",
    "price": "232.00"
  },
  {
    "id": 4,
    "color": "red",
    "department": "Watches",
    "name": "Red Dragon Watch",
    "price": "232.00"
  }
]
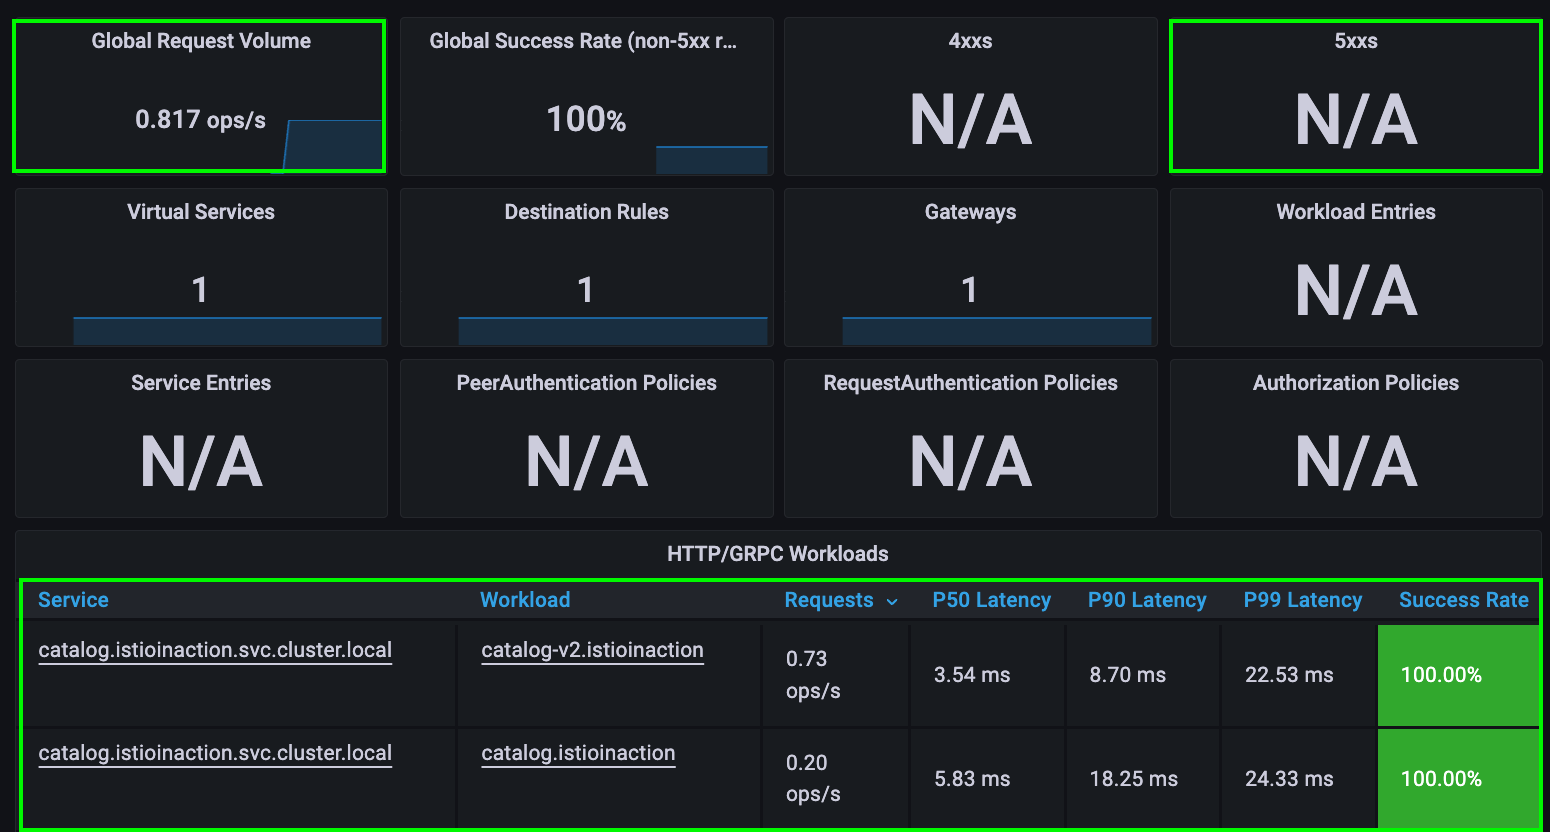
추후 SLOW POD와 비교를 위해서 Grafana와 Kiali 화면도 확인해 두세요
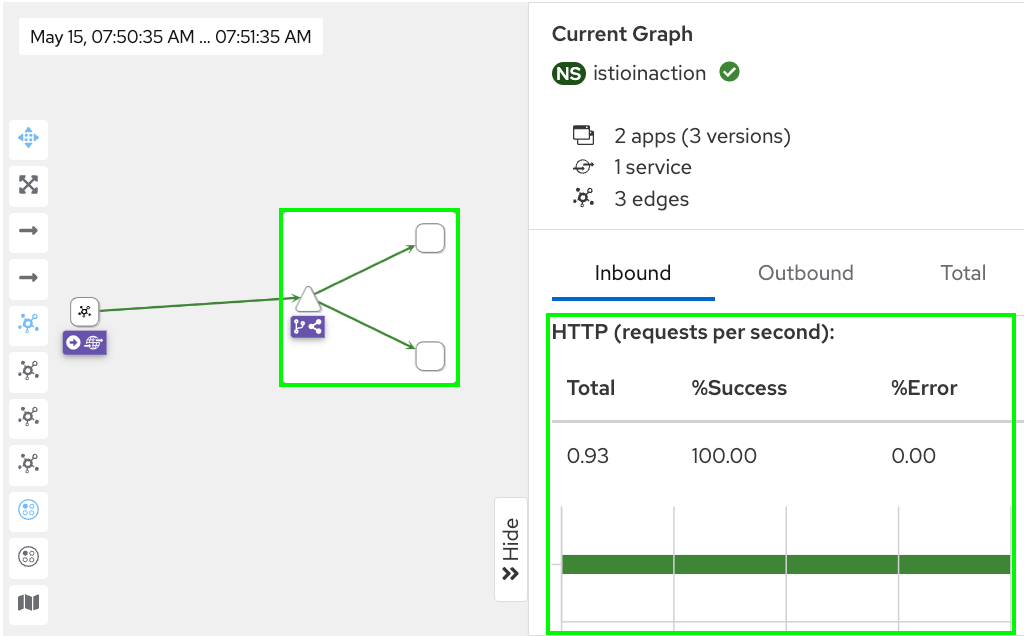
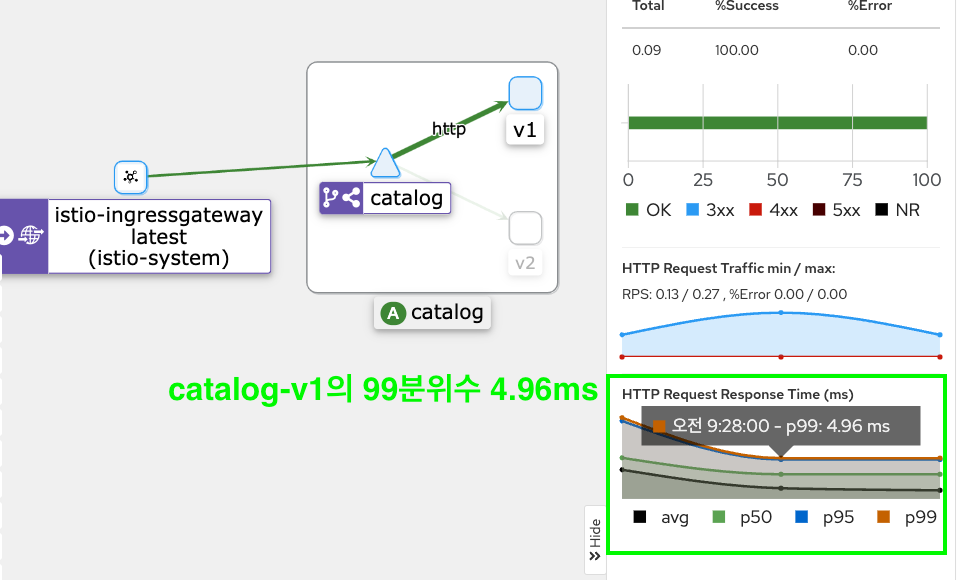
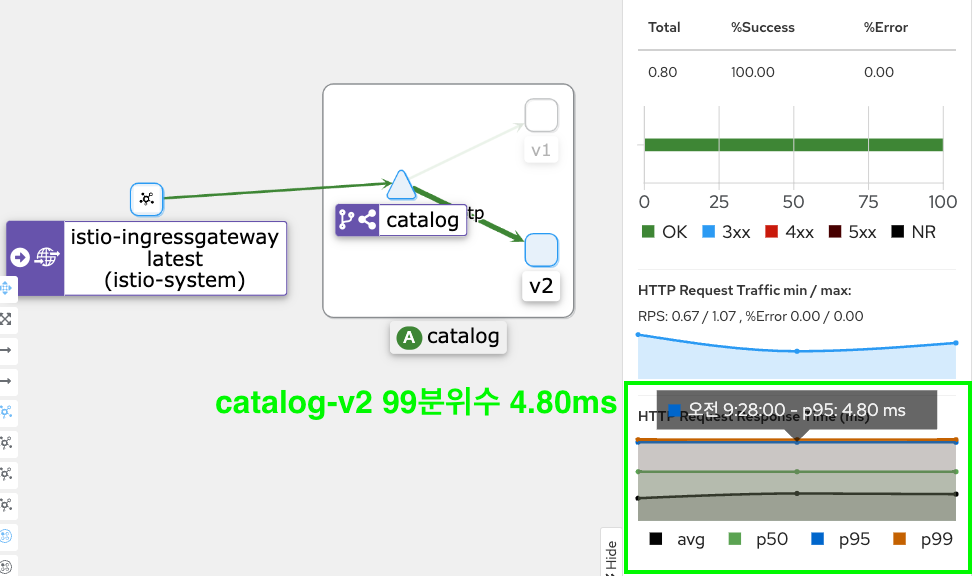
(참고)
## grfana 대시보드 실행
istioctl dashboard grafana

## kiali 대시보드 실행
istioctl dashboard kiali
Slow Pod 애플리케이션
지금부터 본격적으로 Slow Pod를 만들어 볼까요
1 - catalog-v2 앱 중 하나를 응답을 느리게 주도록 설정합니다
## kubectl get pods 목록에서 첫번째 version=v2 파드
CATALOG_POD=$(kubectl get pods -l version=v2 \
-n istioinaction \
-o jsonpath={.items..metadata.name} \
| cut -d ' ' -f1) ;

## CATALOG_POD 에서 latency (지연) 발생하도록 처리
kubectl -n istioinaction exec -c catalog $CATALOG_POD \
-- curl -s -X POST -H "Content-Type: application/json" \
-d '{"active": true, "type": "latency", "volatile": true}' \
localhost:3000/blowup ;

## CATALOG_POD 확인 (기억해두세요)
echo $CATALOG_POD
Slow Pod 적용 후 catalog-v2 레이턴시 변화를 살펴보세요
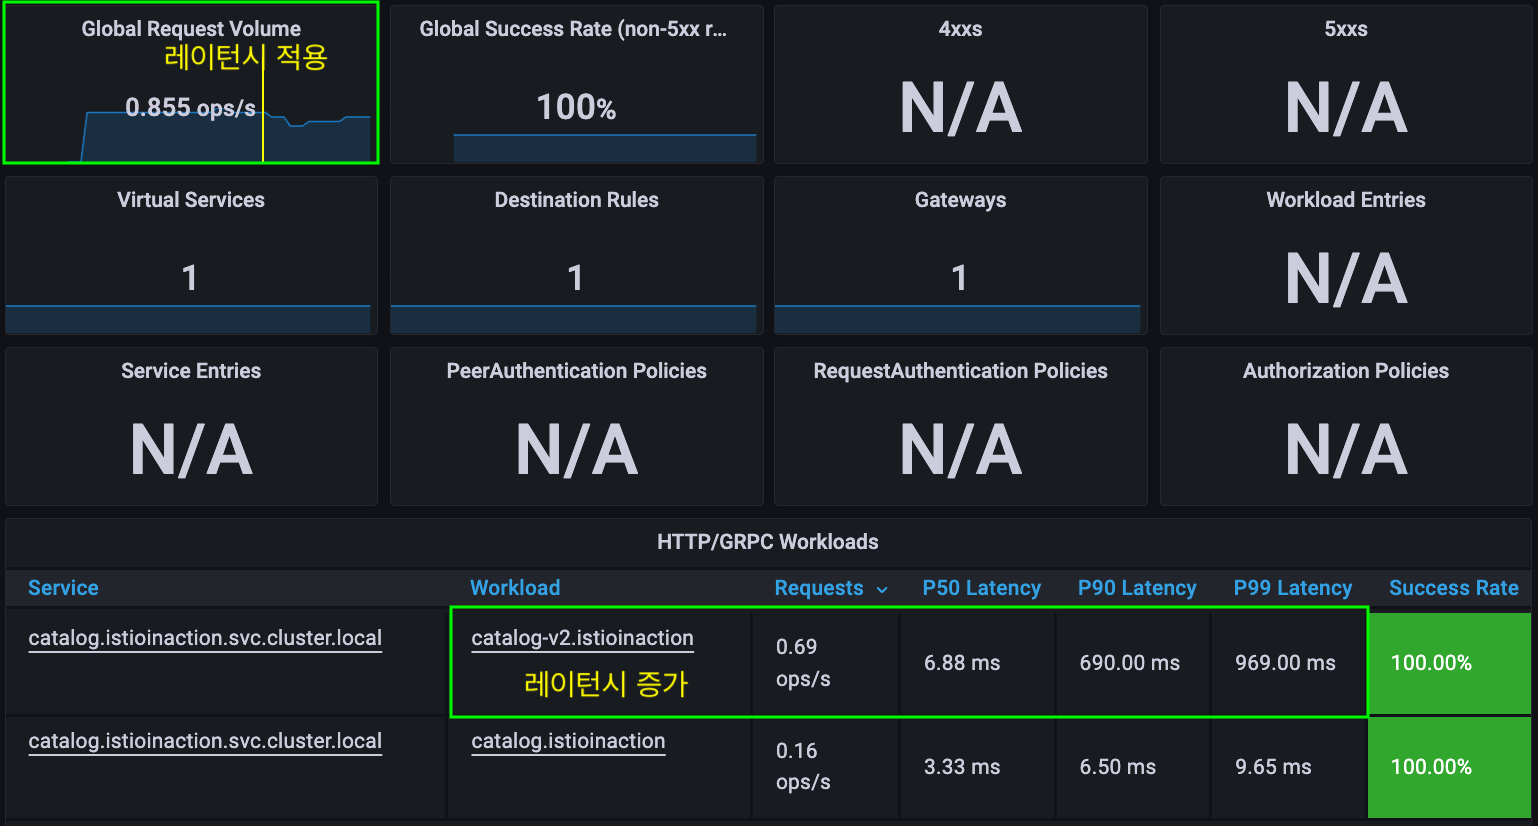
2 - VirtualService 타임아웃을 0.5s 로 설정합니다
## 타임아웃(0.5s) 적용
kubectl patch vs catalog-v1-v2 -n istioinaction --type json \
-p '[{"op": "add", "path": "/spec/http/0/timeout", "value": "0.5s"}]'

## 적용확인
kubectl get vs catalog-v1-v2 \
-o jsonpath='{.spec.http[?(@.timeout=="0.5s")]}'
아래와 같이 JSON 출력 하단에 timeout (0.5s)이 적용됐는지 확인하세요
{
  "route": [
    {
      "destination": {
        "host": "catalog.istioinaction.svc.cluster.local",
        "port": {
          "number": 80
        },
        "subset": "version-v1"
      },
      "weight": 20
    },
    {
      "destination": {
        "host": "catalog.istioinaction.svc.cluster.local",
        "port": {
          "number": 80
        },
        "subset": "version-v2"
      },
      "weight": 80
    }
  ],
  "timeout": "0.5s"
}
타임아웃 적용 후 Grafana와 Kiali 변화를 확인해 보세요
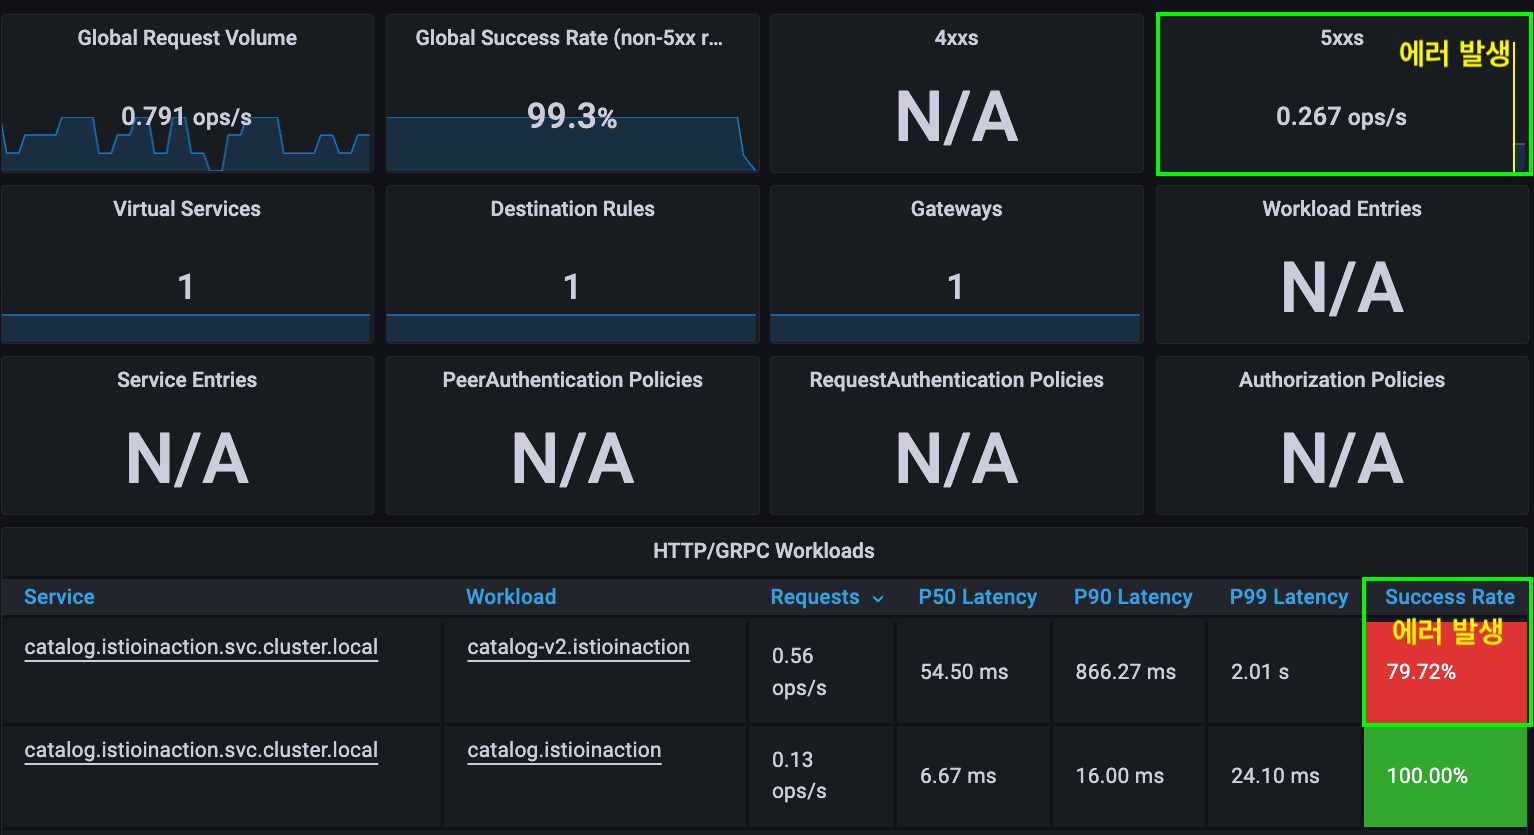
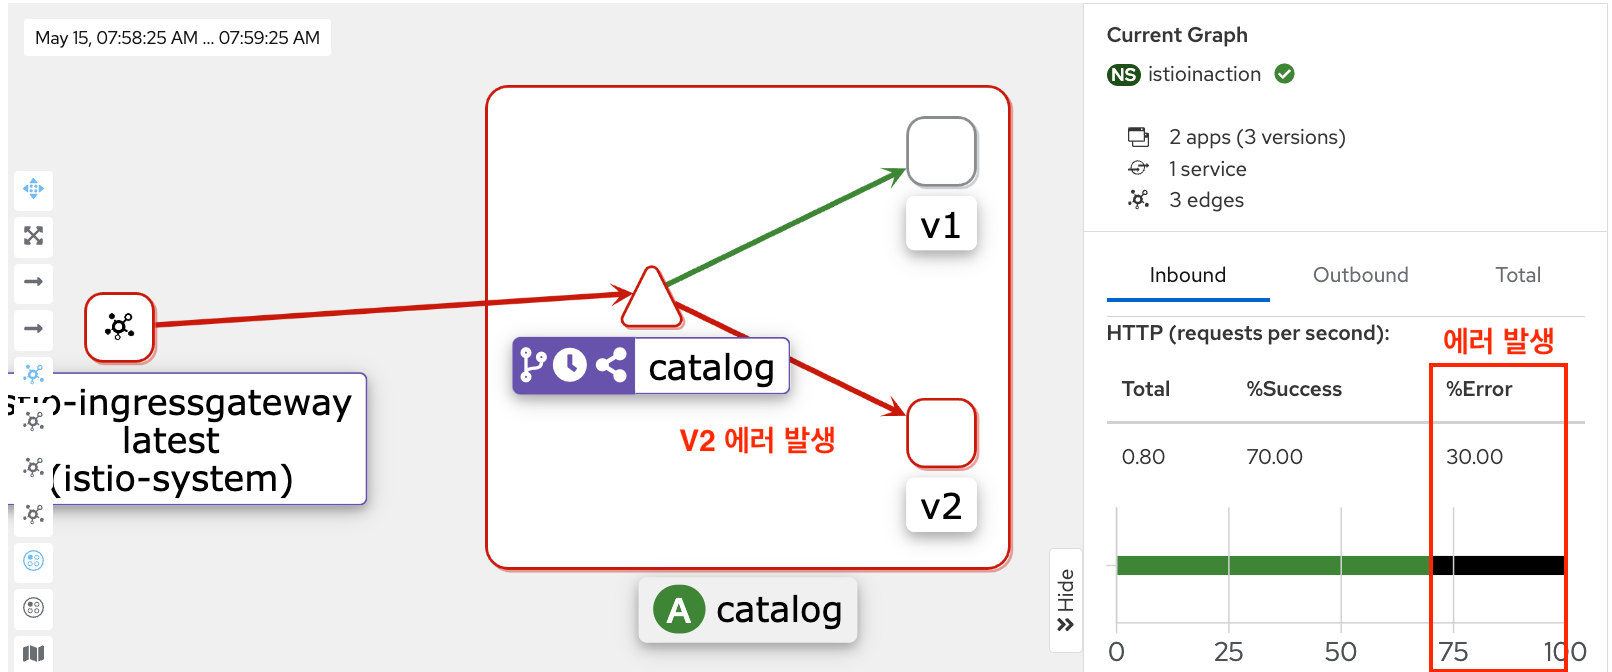
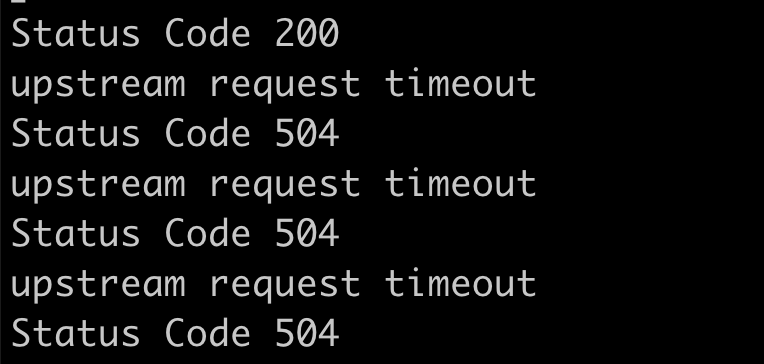
앞서 호출 루프를 걸어둔 터미널의 응답을 확인해 보세요
#for in in {1..9999}; do curl http://localhost/items \
#-H "Host: catalog.istioinaction.io" \
#-w "\nStatus Code %{http_code}\n"; sleep 1; done

..
## 간헐적으로 "504" 에러코드 발생 (slow response)
Status code 504
upstream request timeout
..
Status code 200
istio-ingressgateway 로그를 확인해 봅니다
# kubectl -n istio-system logs deploy/istio-ingressgateway | grep 504

..
[2023-03-23T03:53:08.335Z] "GET /items HTTP/1.1" 504 UT response_timeout - "-" 0 24 501 - "172.17.0.1" "curl/7.86.0" "d3bfca59-6327-9f24-a755-50d32a8782f2" "catalog.istioinaction.io" "172.17.0.17:3000" outbound|80|version-v2|catalog.istioinaction.svc.cluster.local 172.17.0.14:49258 172.17.0.14:8080 172.17.0.1:5221 - -
..
(값만 나열돼 있어서 알아보기 어렵습니다)
참고) 혹시, 로그가 보이지 않으면 아래와 같이 MeshConfig 설정을 확인해 보세요
#kubectl edit cm istio -n istio-system

apiVersion: v1
data:
  mesh: |-
    accessLogFile: /dev/stdout # <- "액세스 로그" 설정이 없으면 추가해주세요
..
Envoy 액세스 로그 포맷 변경: JSON
ENVOY 액세스 로그 포맷을 JSON으로 읽기 쉽게 바꿉니다 (MeshConfig 설정)
# kubectl edit cm istio -n istio-system

apiVersion: v1
data:
  mesh: |-
    accessLogEncoding: JSON # <-- 추가해주세요
    accessLogFile: /dev/stdout # <-- 없으면 얘도 추가
..
504 로그를 다시 확인해 보겠습니다 (설정이 반영되는 시간이 걸릴 수 있습니다)
## 가장 최근에 발생한 504 에러 로그 한개 출력
kubectl -n istio-system logs deploy/istio-ingressgateway \
| grep 504 | tail -n 1
출력 예시 (더 이해하기 편한가요?)
{
  "authority": "catalog.istioinaction.io",
  "request_id": "4a1fe131-7363-9a90-a18f-f5412f9ede67",
  "response_flags": "UT",  # <-- Envoy Response Flag
  "requested_server_name": null,
  "upstream_cluster": "outbound|80|version-v2|catalog.istioinaction.svc.cluster.local",
  "response_code": 504,
  "upstream_transport_failure_reason": null,
  "bytes_sent": 24,
  "duration": 500,
  "downstream_remote_address": "172.17.0.1:50956",
  "bytes_received": 0,
  "protocol": "HTTP/1.1",
  "response_code_details": "response_timeout",
  "downstream_local_address": "172.17.0.14:8080",
  "upstream_host": "172.17.0.17:3000",
  "path": "/items",
  "upstream_service_time": null,
  "user_agent": "curl/7.86.0",
  "upstream_local_address": "172.17.0.14:56280",
  "x_forwarded_for": "172.17.0.1",
  "method": "GET",
  "start_time": "2023-03-23T03:55:51.239Z",
  "route_name": null,
  "connection_termination_details": null
}
- 위 로그에서
"response_flags": "UT"는 요청이 UT (Upstream request Timeout) 로 중단됨을 알려줍니다 - 여기서 Upstream 은
"upstream_cluster": "outbound|80|version-v2|catalog.<생략>"클러스터 룰에 매칭되어 결정되는데 "upstream_host": "172.17.0.17:3000"가 Upstream 입니다 (각 자 환경마다 다릅니다!)- Slow Pod (CATALOG_POD)의 IP와 일치합니다 (확인해 보세요)
- Upstream (Slow Pod)이 타임아웃 (0.5s=500ms) 이내에 응답을 주지 않았기 때문에 연결을 끊었다고 생각할 수 있습니다
"duration": 500이 타임아웃 설정값과 일치합니다
- UT - Upstream request timeout
- UH - No healthy upstream hosts
- NR - No route configured
- UC - Upstream connection termination
- DC - Downstream connection termination
SLOW_POD 확인
SLOW_POD_IP=$(kubectl -n istio-system logs deploy/istio-ingressgateway \
| grep 504 | tail -n 1 | jq -r .upstream_host | cut -d ":" -f1) ;
SLOW_POD=$(kubectl get pods -n istioinaction \
--field-selector status.podIP=$SLOW_POD_IP \
-o jsonpath={.items..metadata.name})

echo $SLOW_POD
- slow reponse 설정했던 CATALOG_POD 와 비교해보세요
이어서, Slow Pod가 UT의 원인이 맞는지 보다 명확하게 밝혀보겠습니다
Ingress GW 로그레벨 변경
“504” 에러 코드만 가지고는 많은 정보를 얻을 수 없습니다
istio-ingressgateway의 로그레벨을 높여서 요청의 라우팅 과정을 상세히 살펴보겠습니다
로그 레벨 조회 ~ 다양한 logger를 제공하고 있습니다
# istioctl pc log deploy/istio-ingressgateway -n istio-system

..
connection: warning
..
http: warning
..
pool: warning
..
router: warning
..
로그 레벨 변경 ~ 필요한 logger 만 debug 레벨로 높입니다
istioctl pc log deploy/istio-ingressgateway -n istio-system \
--level http:debug,router:debug,connection:debug,pool:debug
- http : http 로그
- router : http 요청 라우팅 로그
- connection : TCP 커넥션 로그
- pool : upstream 커넥션풀 로그
로그 저장
kubectl logs -n istio-system deploy/istio-ingressgateway \
> /tmp/ingress-logs.txt
로그 확인
# vi /tmp/ingress-logs.txt
## find '504'
..
2023-03-23T04:09:47.825217Z     debug   envoy http      [C9446][S10916694052055293453] encoding headers via codec (end_stream=false):
':status', '504'
'content-length', '24'
'content-type', 'text/plain'
'date', 'Thu, 23 Mar 2023 04:09:47 GMT'
'server', 'istio-envoy'
..

## ------------- ##

## find 'C9446' (Connection ID)
[C9446] new stream   # <-- Start
## Stream ID 'S10916694052055293453' # <--
2023-03-23T04:09:47.323754Z     debug   envoy http      [C9446][S10916694052055293453] request headers complete (end_stream=true):
':authority', 'catalog.istioinaction.io'
':path', '/items'
':method', 'GET'
'user-agent', 'curl/7.86.0'
'accept', '*/*'

2023-03-23T04:09:47.323758Z     debug   envoy http      [C9446][S10916694052055293453] request end stream
2023-03-23T04:09:47.323766Z     debug   envoy connection        [C9446] current connecting state: false
## /items 요청이 cluster로 매칭됨
2023-03-23T04:09:47.323814Z     debug   envoy router    [C9446][S10916694052055293453] cluster 'outbound|80|version-v2|catalog.istioinaction.svc.cluster.local' match for URL '/items'
2023-03-23T04:09:47.323847Z     debug   envoy router    [C9446][S10916694052055293453] router decoding headers:
':authority', 'catalog.istioinaction.io'
':path', '/items'
':method', 'GET'
':scheme', 'http'
..
'x-envoy-expected-rq-timeout-ms', '500'
..
## C9386 커넥션 - 매칭된 cluster
2023-03-23T04:09:47.323855Z     debug   envoy pool      [C9386] using existing fully connected connection
2023-03-23T04:09:47.323857Z     debug   envoy pool      [C9386] creating stream
2023-03-23T04:09:47.323861Z     debug   envoy router    [C9446][S10916694052055293453] pool ready
{"response_code_details":"via_upstream","user_agent":"curl/7.86.0","request_id":"722ef34b-553e-9b82-8a73-a716de0b14fc","response_flags":"-","upstream_cluster":"outbound|80|version-v2|catalog.istioinaction.svc.cluster.local","downstream_remote_address":"172.17.0.1:48499","connection_termination_details":null,"upstream_transport_failure_reason":null,"bytes_received":0,"duration":420,"authority":"catalog.istioinaction.io","route_name":null,"response_code":200,"x_forwarded_for":"172.17.0.1","bytes_sent":502,"start_time":"2023-03-23T04:09:46.421Z","path":"/items","upstream_service_time":"420","downstream_local_address":"172.17.0.14:8080","method":"GET","requested_server_name":null,"upstream_host":"172.17.0.17:3000","protocol":"HTTP/1.1","upstream_local_address":"172.17.0.14:52046"}
..
## upstream timeout 으로 client 에서 끊음 (disconnect)
2023-03-23T04:09:47.**824655Z**     debug   envoy router    [C9446][S10916694052055293453] upstream timeout
2023-03-23T04:09:47.824784Z     debug   envoy router    [C9446][S10916694052055293453] resetting pool request
2023-03-23T04:09:47.824807Z     debug   envoy connection        [C9386] closing data_to_write=0 type=1
2023-03-23T04:09:47.824813Z     debug   envoy connection        [C9386] closing socket: 1
2023-03-23T04:09:47.824938Z     debug   envoy connection        [C9386] SSL shutdown: rc=0
## client disconnected
2023-03-23T04:09:47.**825031Z**     debug   envoy pool      [C9386] client disconnected, failure reason:
2023-03-23T04:09:47.825110Z     debug   envoy http      [C9446][S10916694052055293453] Sending local reply with details response_timeout
2023-03-23T04:09:47.825217Z     debug   envoy http      [C9446][S10916694052055293453] encoding headers via codec (end_stream=false):
':status', '504'
'content-length', '24'
'content-type', 'text/plain'
'date', 'Thu, 23 Mar 2023 04:09:47 GMT'
'server', 'istio-envoy'
2023-03-23T04:09:47.825686Z     debug   envoy pool      [C9386] destroying stream: 0 remaining
2023-03-23T04:09:47.831200Z     debug   envoy connection        [C9446] remote close
2023-03-23T04:09:47.831231Z     debug   envoy connection        [C9446] closing socket: 0
- SLOW_POD 의 지연으로 UT (Upstream Timeout) 으로 client 에서 disconnect 하여 504 가 발생함
지금까지 istio-ingressgateway 로그 분석을 통해 에러 원인을 확인해 보았습니다
istio-igressgateway (downstream) 입장에서 살펴보았을 때 upstream(
catalog-v2) 에서 타임아웃을 초과했기 때문에 연결을 istio-ingressgateway (Envoy)에서 끊었습니다 (UT)
이번에는 upstream (catalog-v2, Slow Pod) 입장에서 살펴보도록 하겠습니다
10.3.4 Pod 네트워크 트래픽 검사: ksniff
ksniff 와 wireshark 툴을 이용해서 Slow Pod 의 패킷 덤프를 확인해 봅시다
KREW, KSNIFF, WIRESHARK 설치
설치 (맥 M1)
- krew 설치 - https://krew.sigs.k8s.io/docs/user-guide/setup/install
-
ksniff 설치
kubectl krew install sniff - wireshark 설치 - https://www.wireshark.org/download.html
FAQ)- Error: exec: “wireshark” : executable file not found
조치: PATH 확인. wireshark 실행 경로 추가
- Error: exec: “wireshark” : executable file not found
주) M1 minikube, paralles 등 arm 환경의 클러스터에서 ksniff 로 pod tcpdump 출력이 안됨을 확인하였습니다
- 본 실습은 x86 환경의 쿠버네티스 클러스터에서 수행해 주세요
POD 네트워크 트래픽 검사
SLOW_POD에 tcpdump를 겁니다
kubectl sniff $SLOW_POD -n istioinaction -p -i lo
- kubeconfig가 여러개인 경우, 환경변수(KUBECONFIG)에 명시해야 함
- -p, –privileged : 대상 pod의 netns를 공유하는 ksniff pod (privileged) 를 띄움
- -i : 트래픽 감시할 인터페이스 지정. 여기서는 lo (loopback interface)
-
FAQ - vagrant-parallels ⇒ ksniff 실행 시 KUBECONFIG 환경변수를 지정할 것
Error: invalid configuration: [context was not found for specified context: vagrant-admin@vagrant, cluster has no server defined]
Wireshark 확인
-
http contains “GET /items”
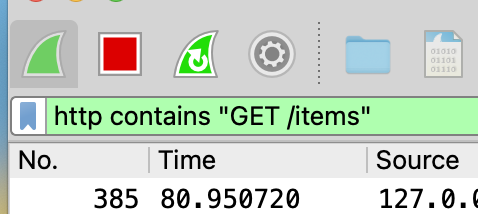
-
첫번째 아이템 > (right click menu) > “Follow” > “TCP Stream”
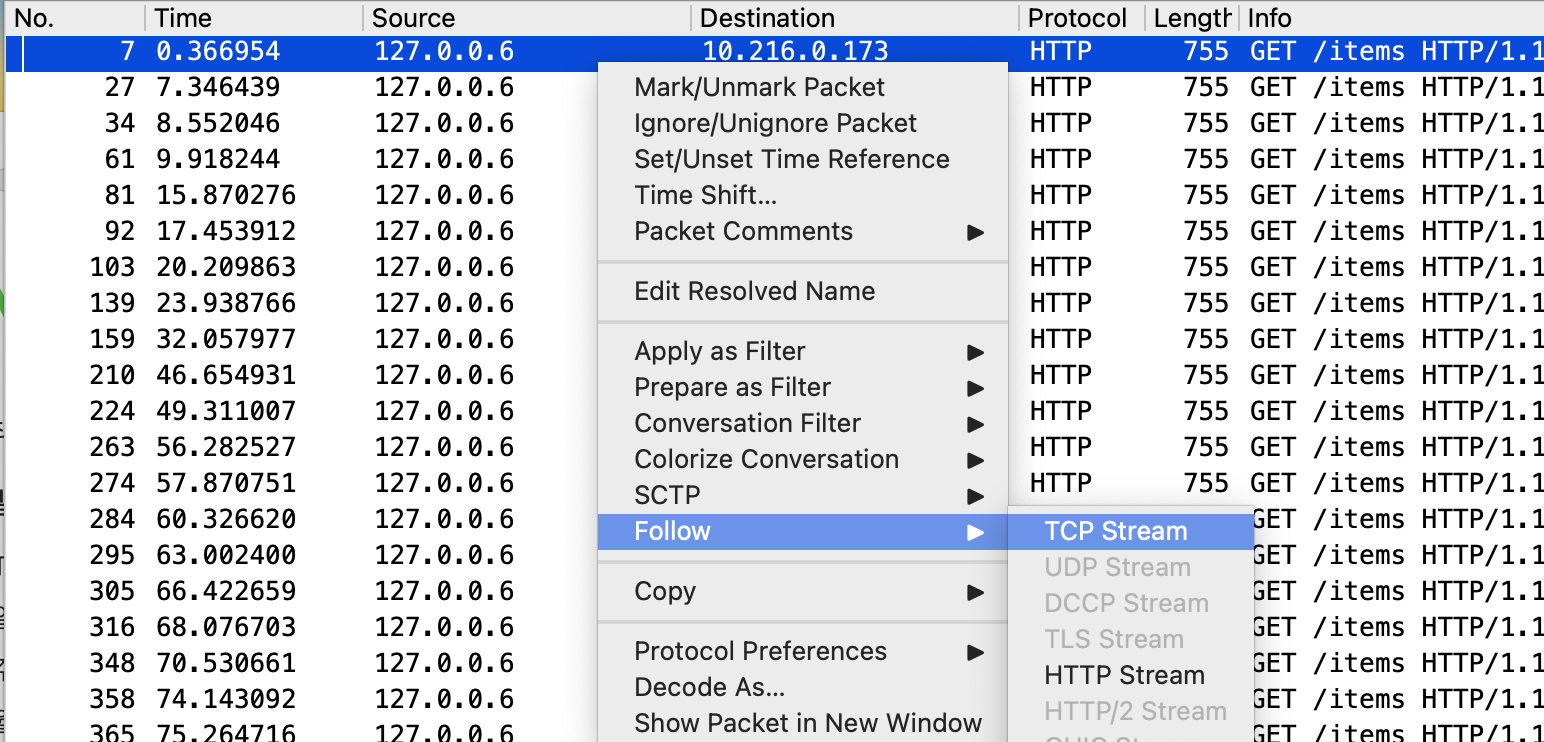
(아래) 창이 뜨면
close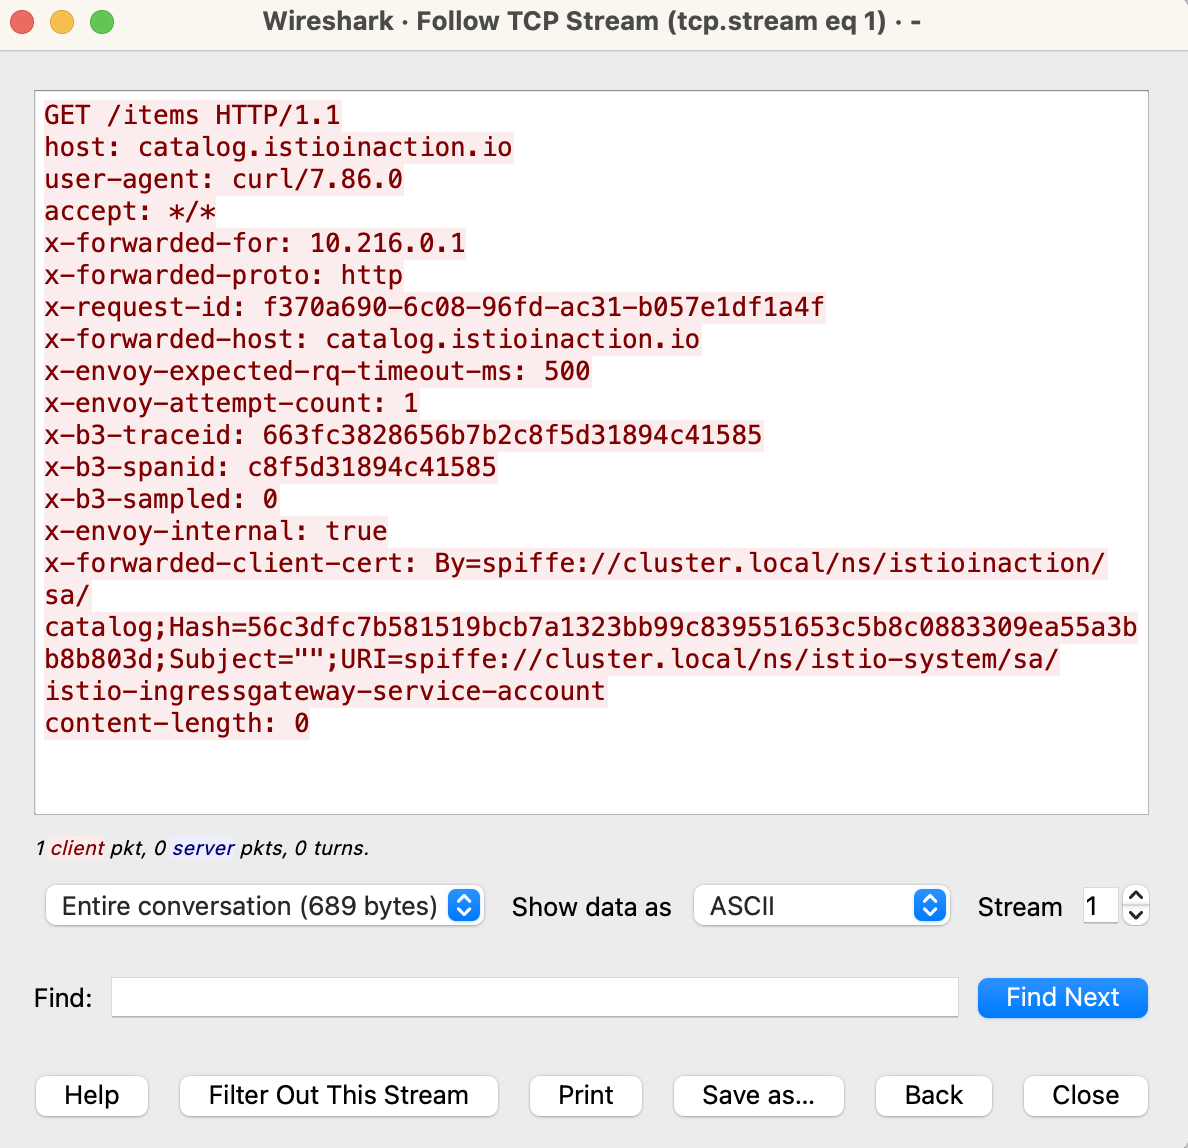
-
패킷 확인 (504 에러)

- 4185 패킷 - 요청 GET /items
- 4186 패킷 - 서버 측 ACK
- 4192 패킷 - 클라이언트에서 FIN, ACK (연결종료) 패킷 보냄 ⇒ Why? 4186과 4192의 Time Gap 이 약 500ms * 0.501683 = 91.020323 - 90.518640
(참고) 200 OK 경우

10.4 Understanding your application using Envoy Telemetry
Envoy Telemetry 를 사용하여 애플리케이션 이해하기
Istio Service Dashboard 를 살펴봅시다
Reporter > Source 로 설정합니다 ~ 송신(client) 측 envoy 에서 보고(report) 한 메트릭을 봅니다

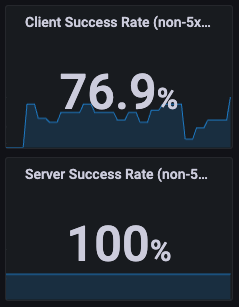
Client/Server Success Rate (non-5xx) 이 다름
- Client : 76.9%
- Server : 100%
어떤 의미일까요?
- Client 응답에는 5xx 가 있음 (23.1%)
- Server 응답에는 5xx 없음 (0%)
왜 그럴까요?
- Server 에서 수신한 데이터는 모두 성공임 ⇒ 서버 문제는 아님 (서버 문제였다면 서버의 Success Rate도 100%가 아니겠죠)
- 다만, Client 에서서버가 제한시간(500ms)을 넘기는 경우 UT, Upstream Terminate
서버 측 얘기도 들어봅시다
메트릭을 살펴 봅시다
prometheus 대시보드에서 다음과 같이 promQL을 조회합니다
sort_desc(sum(irate(istio_requests_total{reporter="destination", destination_service=~"catalog.istioinaction.svc.cluster.local",response_flags="DC"}[5m]))by(response_code, pod, version))
(참고)
sort_desc(
  sum(
    irate(
      istio_requests_total {
        reporter="destination",   # 서버 측에서 리포트
        destination_service=~"catalog.istioinaction.svc.cluster.local",   # 서버 측이 목적지
        response_flags="DC"       # DC - 클라이언트에서 커넥션을 끊음
      }[5m]
    )
  )by(response_code, pod, version)
)
서버 쪽에 5분간 발생한 DC가 있는지 쿼리한 결과입니다
이는 Server 입장에서 보면 Client가 일방적으로 (전화를 확~) 끊은 것이죠 ⇒ DC (Downstream Connection Terminate) “나는 대답해 줄라 카는데 갸가 확 끊어불써 ~”
서버오류로 발생한 5xx가 아닌 클라이언트의 UT, 즉 서버 입장에서 보면 DC에 의한 5xx 입니다
Summary
전체 스크립트
## 실습 경로에서 수행
# cd book-source-code

## 실습 환경 초기화
kubectl delete ns istioinaction &&
kubectl create ns istioinaction &&
kubectl label ns istioinaction istio-injection=enabled

kubectl delete authorizationpolicy,peerauthentication,requestauthentication -n istio-system

kubectl delete deploy/sleep -n default
kubectl delete svc/sleep -n default

## 실습 환경 셋업
## catalog v1 배포
kubectl apply -f services/catalog/kubernetes/catalog.yaml -n istioinaction
## catalog v2 배포
kubectl apply -f ch10/catalog-deployment-v2.yaml -n istioinaction
## catalog-gateway 배포 - catalog.istioinaction.io:80
kubectl apply -f ch10/catalog-gateway.yaml -n istioinaction
## catalog-virtualservice 배포 - destinationrule 명세 필요
kubectl apply -f ch10/catalog-virtualservice-subsets-v1-v2.yaml -n istioinaction

## misconfiguration 조치 - DestinationRule 적용
kubectl apply -f ch10/catalog-destinationrule-v1-v2.yaml

## Slow Pod
CATALOG_POD=$(kubectl get pods -l version=v2 -n istioinaction \-o jsonpath={.items..metadata.name} | cut -d ' ' -f1) ;

kubectl -n istioinaction exec -c catalog $CATALOG_POD \
-- curl -s -X POST -H "Content-Type: application/json" \
-d '{"active": true, "type": "latency", "volatile": true}' \
localhost:3000/blowup ;

## 타임아웃 설정
kubectl patch vs catalog-v1-v2 -n istioinaction --type json \
-p '[{"op": "add", "path": "/spec/http/0/timeout", "value": "0.5s"}]'