분산 시스템 환경은 예측하기 어려운 많은 문제들이 발생할 수 있는데요.
문제가 생기더라도 시스템이 원래의 상태로 돌아오는 회복력을 “Resilience”라고 합니다.
이번 장에서는 분산 환경에서의 Istio의 Resilience 전략에 대해 다룹니다.
개요
분산 시스템 환경은 복잡하고 예상하기 어려운 많은 문제들이 발생할 수 있습니다.
실패를 예측하기 힘들기 때문에 문제를 진단하고 대응하는 것 또한 쉽지 않습니다.
따라서 장애 발생을 시스템이 자동으로 감지하여 처리할 수 있도록 대비가 필요한데요.
애플리케이션에서 이러한 장애상황을 미리 대비하여 구현을 해두는 것은 쉬운 일이 아닙니다.
Istio 를 사용하면 애플리케이션에서 별도 구현을 하지 않고서도 timeouts, retries, circuit breaking 등 시스템 차원에서 이상상황을 감지하고 대응 (“Sensible behaviors”) 할 수 있는 다양한 장애 대비책을 마련 할 수 있습니다.
이번 장에서는 Istio의 Resilience fetures들을 살펴보고 나머지 시스템에 미치는 영향들에 대해서도 다뤄봅니다.
(참고) Resilience 의미 (chatGPT)
IT에서의 resilience는 시스템이나 네트워크가 하드웨어 오류, 소프트웨어 오류, 사이버 공격 또는 자연재해와 같은 중단 요인에 직면했을 때 빠르게 회복하고 계속 기능하는 능력을 말합니다. 탄력 있는 IT 시스템은 장애가 발생해도 계속 작동할 수 있는 신뢰성 있는 설계로 되어 있습니다. 또한 문제를 빨리 감지하고 격리하며, 백업 시스템이나 프로세스로 자동 전환하여 중단을 최소화합니다. IT에서의 resilience는 비즈니스 연속성 유지, 데이터 보안 및 개인 정보 보호 보장, 다운타임 및 생산성 손실 최소화에 중요합니다.
다루는 내용
- Resilience 중요성
- Client-side load balancing 잇점
- Request timeouts, retries 구현
- Circuit breaking 과 connection pooling
- App 구현으로 부터 Resilience 책임 분리
실습환경
- minikube (k8s) 및 istio 설치. 참고: https://netpple.github.io/docs/istio-in-action/Istio-Environment
- 실습 네임스페이스: istioinaction
- 실습 디렉토리 : book-source-code
6.1 Building resilience into the application
6.1.1 Building resilience into application libraries
- app 구현 복잡
- 락인 문제 ~ language, libraries, frameworks, …
- 운영 문제 ~ multi-language, multi-libraries, …
- 수정/배포 부담
6.1.2 Using Istio to solve these problems
6.1.3 Decentralized implementation of resilience
6.2 Client-side load balancing
Client-side 로드밸런싱
- 클라이언트에게 endpoints 정보를 알려주고
- 클라이언트가 LB 알고리즘을 선택하도록 한다
⇒ 이렇게 하면 뭐가 좋은가
- 탈중앙화 - (병목, SPoF 우려가 있는) 중앙집중적인 load balancing 을 피할 수 있고
- 홉 감소 - 불필요한 홉 없이 클라이언트가 직접 요청을 전달할 수 있다
⇒ 이렇게 함으로써 스케일링 하기도 좋고 topology 변경도 용이해진다
Istio는 “서비스-to-서비스” 통신에서 보다 정확하고 최신 정보를 바탕으로 client-side proxy를 사용하기 위해 서비스와 endpoint 디스커버리를 이용한다

Load balancing 알고리즘
- DestinationRule 에 설정
- 알고리즘 종류 (Envoy’s)
- Round robin (default)
- Random
- Weighted least request
6.2.1 Getting started with client-side load balancing
초기화
kubectl delete virtualservice,deployment,service,\
destinationrule,gateway,envoyfilter --all \
-n istioinaction

kubectl delete fortio -n default
배포
kubectl apply -f ch6/simple-backend.yaml -n istioinaction
kubectl apply -f ch6/simple-web.yaml -n istioinaction
kubectl apply -f ch6/simple-web-gateway.yaml -n istioinaction
## 확인1 - 설치확인
kubectl get deploy,svc,po,gateway,virtualservice -n istioinaction
Pod 확인 ~ web 1개, backend-1 한개, backend-2 두개
## 확인2 - 호출확인
curl -H "Host: simple-web.istioinaction.io" localhost
Client-side load balancing 알고리즘 설정 > RR (Round Robin)
Round Robin 알고리즘은 endpoint 결정을 “순서대로 돌아가며” 합니다.
# cat ch6/simple-backend-dr-rr.yaml

apiVersion: networking.istio.io/v1beta1
kind: DestinationRule
metadata:
  name: simple-backend-dr
spec:
  host: simple-backend.istioinaction.svc.cluster.local
  trafficPolicy:
    loadBalancer:
      simple: ROUND_ROBIN
kubectl apply -f ch6/simple-backend-dr-rr.yaml -n istioinaction

## 확인
kubectl get destinationrule simple-backend-dr \
 -n istioinaction \
 -o jsonpath='{.spec.trafficPolicy.loadBalancer.simple}{"\n"}'
호출테스트
curl -s -H "Host: simple-web.istioinaction.io" \
http://localhost | jq ".upstream_calls[0].body"
호출 반복 ~ 응답값이 돌아가며 바뀜 (Round Robin)
# 첫번째 호출
..
"Hello from simple-backend-1",
..
..
# N번째 호출
..
"Hello from simple-backend-2",
..
호출로그 (istio-proxy) ~ backend 요청을 하면 요청을 처리할 redirect 주소를 응답 (301), 전달 받은 redirect(endpoint)로 다시 요청
web 로그
# stern simple-web-*

## web -(요청)-> simple-backend (301) redirect 응답수신
simple-web-.. istio-proxy [2023-01-08T12:54:01.523Z] "GET // HTTP/1.1" 301 - via_upstream - "-" 0 36 4 3 "172.17.0.1" "curl/7.84.0" "3aed335d-c138-9f58-b176-465639fcb8e3" "simple-backend:80" "172.17.0.14:8080" outbound|80||simple-backend.istioinaction.svc.cluster.local 172.17.0.13:46010 10.104.237.6:80 172.17.0.1:0 - default

## web -(요청)-> simple-backend (200)
simple-web-.. istio-proxy [2023-01-08T12:54:01.532Z] "GET / HTTP/1.1" 200 - via_upstream - "-" 0 278 169 169 "172.17.0.1" "curl/7.84.0" "3aed335d-c138-9f58-b176-465639fcb8e3" "simple-backend:80" "172.17.0.7:8080" outbound|80||simple-backend.istioinaction.svc.cluster.local 172.17.0.13:40824 10.104.237.6:80 172.17.0.1:0 - default

## web -> curl (200)
simple-web-.. istio-proxy [2023-01-08T12:54:01.511Z] "GET / HTTP/1.1" 200 - via_upstream - "-" 0 890 197 196 "172.17.0.1" "curl/7.84.0" "3aed335d-c138-9f58-b176-465639fcb8e3" "simple-web.istioinaction.io" "172.17.0.13:8080" inbound|8080|| 127.0.0.6:39049 172.17.0.13:8080 172.17.0.1:0 outbound_.80_._.simple-web.istioinaction.svc.cluster.local default
backend 로그
# stern simple-backend-*

## simple-backend -(응답)-> web (301)
simple-backend-1-.. istio-proxy [2023-01-08T12:54:01.523Z] "GET // HTTP/1.1" 301 - via_upstream - "-" 0 36 2 2 "172.17.0.1" "curl/7.84.0" "3aed335d-c138-9f58-b176-465639fcb8e3" "simple-backend:80" "172.17.0.14:8080" inbound|8080|| 127.0.0.6:39061 172.17.0.14:8080 172.17.0.1:0 outbound_.80_._.simple-backend.istioinaction.svc.cluster.local default

## simple-backend -(응답)-> web (200)
simple-backend-2-.. istio-proxy [2023-01-08T12:54:01.532Z] "GET / HTTP/1.1" 200 - via_upstream - "-" 0 278 164 163 "172.17.0.1" "curl/7.84.0" "3aed335d-c138-9f58-b176-465639fcb8e3" "simple-backend:80" "172.17.0.7:8080" inbound|8080|| 127.0.0.6:36099 172.17.0.7:8080 172.17.0.1:0 outbound_.80_._.simple-backend.istioinaction.svc.cluster.local default
호출테스트 ~ 10회 호출 반복
for in in {1..10}; do \
curl -s -H "Host: simple-web.istioinaction.io" localhost \
| jq ".upstream_calls[0].body"; done
출력 ~ 설정(ROUND_ROBIN)대로 1과 2를 번갈아 가며 호출한다. (backend-2가 2개이므로 더 많이 찍힌다)
"Hello from simple-backend-1"
"Hello from simple-backend-2"
"Hello from simple-backend-1"
"Hello from simple-backend-2"
"Hello from simple-backend-2"
"Hello from simple-backend-2"
"Hello from simple-backend-1"
"Hello from simple-backend-1"
"Hello from simple-backend-2"
"Hello from simple-backend-1"
DestinationRule 설정을 통해 ROUND_ROBIN load balancing을 적용해 보았습니다. Istio service proxy의 load balancing 기본 설정값은 ROUND_ROBIN 입니다. 별도 DestinationRule을 명세하지 않아도 ROUND_ROBIN 으로 동작합니다.
Client-side load balancing 을 사용하면 서비스 resilience 에 도움이 될까요? 보다 realistic 한 테스트를 위해 load generator (Fortio)를 사용하고 simple-backend의 latency 를 조정해 보겠습니다. 본격적으로 optimization 을 위한 Istio의 load-balancing 전략을 사용해 보시죠 !
6.2.2 Setting up our scenario
총소요시간에 영향을 주는 다양한 원인들이 있어요
- Request size
- Process complexity
- Database usage
- Calling other services that take time
응답시간에 영향을 주는 서비스 외부적인 요인들도 있어요
- Unexpected, stop-the-world garbage collections (GC)
- Resource contention (CPU, N/W, …)
- Network congestion
응답시간에 영향을 끼치는 다양한 요인들이 존재하는 실제 서비스 상황과 유사하도록 실험에서 delays and variance (지연과 변인)을 response time 에 반영해 볼 것입니다.
실험에 앞서 다시한번 서비스를 호출하여 초기 응답시간을 측정해 봅시다
## 호출 3회 반복
time curl -s -o /dev/null -H \
"Host: simple-web.istioinaction.io" localhost

## 1st
real	0m0.211s
user	0m0.006s
sys	0m0.011s

## 2nd
real	0m0.192s
user	0m0.003s
sys	0m0.005s

## 3rd
real	0m0.202s
user	0m0.005s
sys	0m0.008s
Load balancing 은 enpoints의 예상치 못한 latency spikes 영향을 줄이는 효과적인 전략이 될 수 있습니다.
CLI load generation 도구인 Fortio 로 서비스를 호출해보고 client-side load balancing 알고리즘 간의 차이점들을 관찰해 봅시다.
Fortio 설치
istio 로드밸런싱 알고리즘의 성능비교를 위해 부하테스트툴인 Fortio를 설치합니다
(방법1) download release
- 서버에 설치할 경우 사용. 맥/윈도우는 방법2 또는 방법3 권장
(방법2) installation
brew install fortio
확인
# fortio curl -H "Host: simple-web.istioinaction.io" http://localhost

HTTP/1.1 200 OK
date: Mon, 09 Jan 2023 04:37:02 GMT
content-length: 890
content-type: text/plain; charset=utf-8
x-envoy-upstream-service-time: 167
server: istio-envoy

{
  "name": "simple-web",
  "uri": "/",
  "type": "HTTP",
  "ip_addresses": [
    "172.17.0.5"
  ],
  "start_time": "2023-01-09T04:37:01.877062",
  "end_time": "2023-01-09T04:37:02.041455",
  "duration": "164.394ms",
  "body": "Hello from simple-web!!!",
  "upstream_calls": [
    {
      "name": "simple-backend",
      "uri": "http://simple-backend:80/",
      "type": "HTTP",
      "ip_addresses": [
        "172.17.0.14"
      ],
      "start_time": "2023-01-09T04:37:01.886350",
      "end_time": "2023-01-09T04:37:02.036762",
      "duration": "150.413ms",
      "headers": {
        "Content-Length": "279",
        "Content-Type": "text/plain; charset=utf-8",
        "Date": "Mon, 09 Jan 2023 04:37:02 GMT",
        "Server": "envoy",
        "X-Envoy-Upstream-Service-Time": "153"
      },
      "body": "Hello from simple-backend-1",
      "code": 200
    }
  ],
  "code": 200
}
(방법3) run pod
kubectl -n default run fortio --image=fortio/fortio:1.6.8 \
--restart='Never' -- load -H "Host: simple-web.istioinaction.io" \
-jitter -t 60s -c 10 -qps 1000 \
http://istio-ingressgateway.istio-system/
출력
# stern fortio -n default
..
fortio fortio Ended after 1m0.147414s : 3599 calls. qps=59.836
fortio fortio Aggregated Sleep Time : count 3599 avg -28.19993 +/- 16.29 min -56.5460369 max -0.177150334 sum -101491.549
fortio fortio # range, mid point, percentile, count
fortio fortio >= -56.546 <= -0.17715 , -28.3616 , 100.00, 3599
fortio fortio # target 50% -28.3694
fortio fortio WARNING 100.00% of sleep were falling behind
fortio fortio Aggregated Function Time : count 3599 avg 0.16680827 +/- 0.006161 min 0.156933 max 0.217184 sum 600.342951
fortio fortio # range, mid point, percentile, count
fortio fortio >= 0.156933 <= 0.16 , 0.158467 , 3.20, 115
fortio fortio > 0.16 <= 0.18 , 0.17 , 96.39, 3354
fortio fortio > 0.18 <= 0.2 , 0.19 , 99.61, 116
fortio fortio > 0.2 <= 0.217184 , 0.208592 , 100.00, 14
fortio fortio # target 50% 0.170045
fortio fortio # target 75% 0.17541
fortio fortio # target 90% 0.178629
fortio fortio # target 99% 0.196209
fortio fortio # target 99.9% 0.212766
fortio fortio Sockets used: 10 (for perfect keepalive, would be 10)
fortio fortio Jitter: true
fortio fortio Code 200 : 3599 (100.0 %)
fortio fortio Response Header Sizes : count 3599 avg 175 +/- 0 min 175 max 175 sum 629825
fortio fortio Response Body/Total Sizes : count 3599 avg 1064.7747 +/- 0.5018 min 1060 max 1065 sum 3832124
fortio fortio All done 3599 calls (plus 10 warmup) 166.808 ms avg, 59.8 qps
6.2.3 Testing various client-side load-balancing strategies
테스트 환경
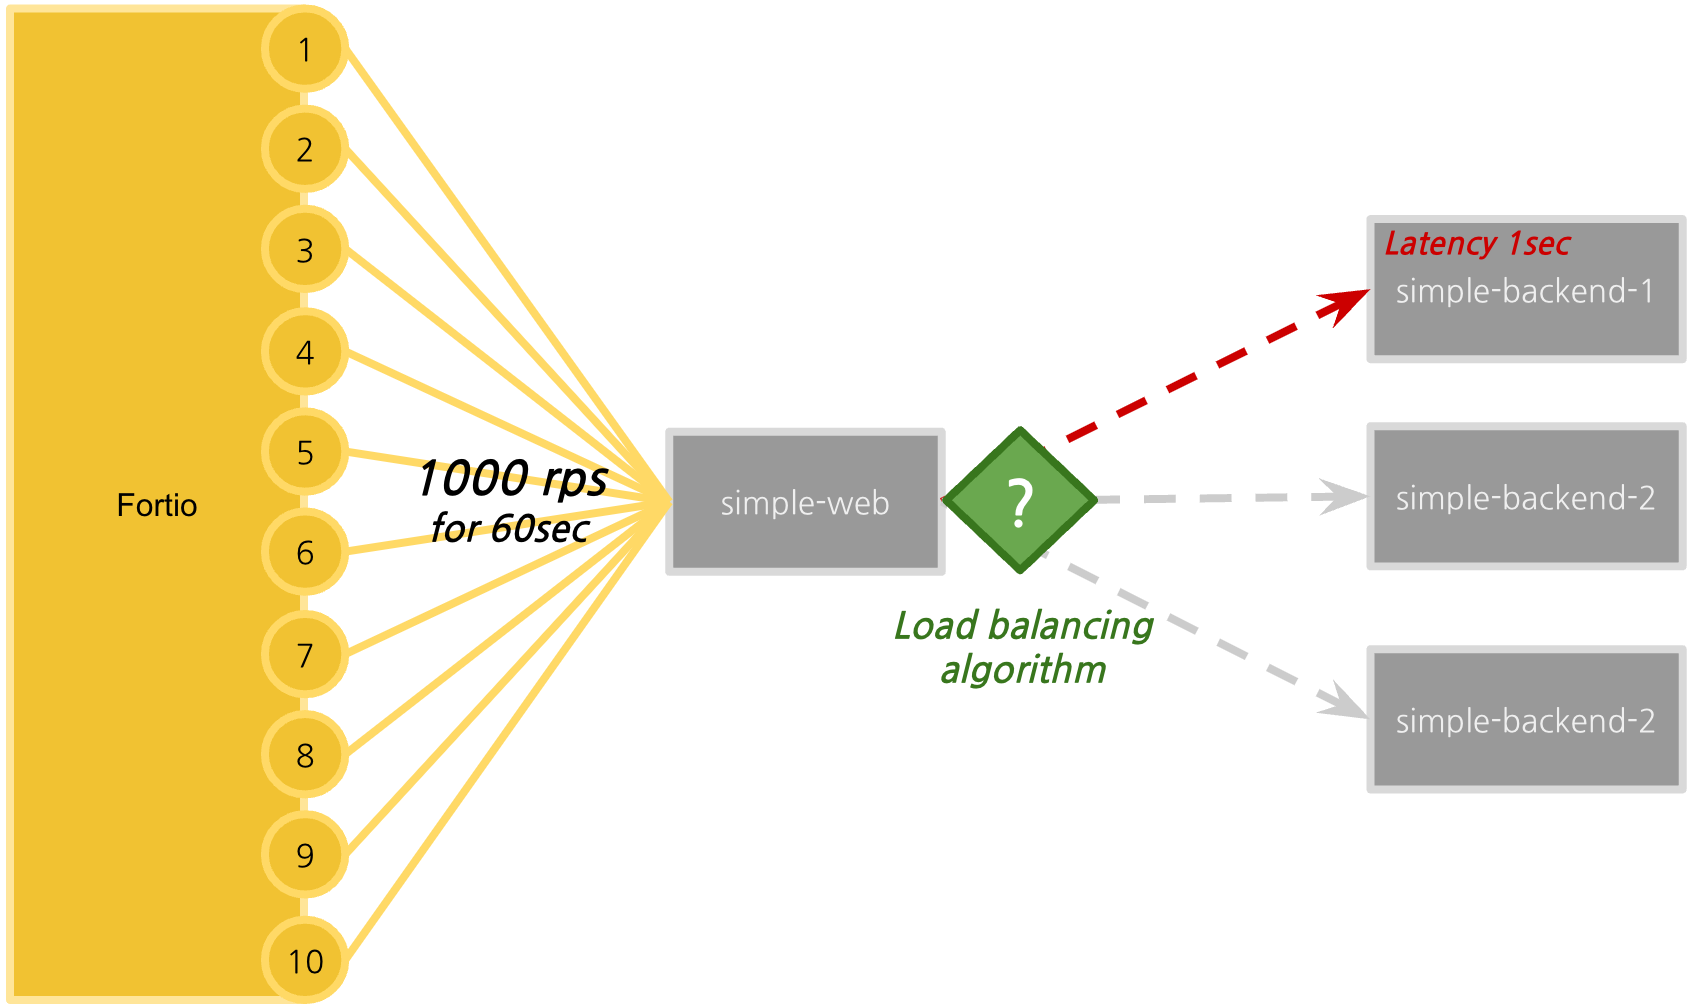
- 1,000 rps (requests per seconds) for 60 seconds through 10 connections
- simple-backend-1 : increase latency up to 1 sec. (GC 등의 상황을 가정)
- load-balancing strategy (algorithm) 비교 : round robin, random, least connection
Delayed simple-backend-1 배포 (latency : 150ms → 1000ms)
simple-backend-1로 요청이 들어오는 경우 의도적으로 1초 지연을 발생하도록 설정합니다
kapply -f ch6/simple-backend-delayed.yaml -n istioinaction

# kubectl get deploy simple-backend-1 -o yaml
..
- name: TIMING_50_PERCENTILE
  value: 1000ms
..
설정 전후 비교

설정 적용 여부를 확인합니다
## 호출 반복 - delay(1초)가 발생하는 응답을 확인합니다
time curl -s -o /dev/null -H \
"Host: simple-web.istioinaction.io" localhost

..
real	0m0.234s
user	0m0.003s
sys	0m0.005s

real	0m0.224s
user	0m0.004s
sys	0m0.008s
..

## delay 발생한 응답 확인
real	0m1.101s
user	0m0.003s
sys	0m0.006s
fortio 서버 기동
fortio server
fortio 대시보드 : browser > http://localhost:8080/fortio
- Title: roundrobin
- Url: http://localhost
- QPS: 1000 Duration: 60s
- connections: 10
-
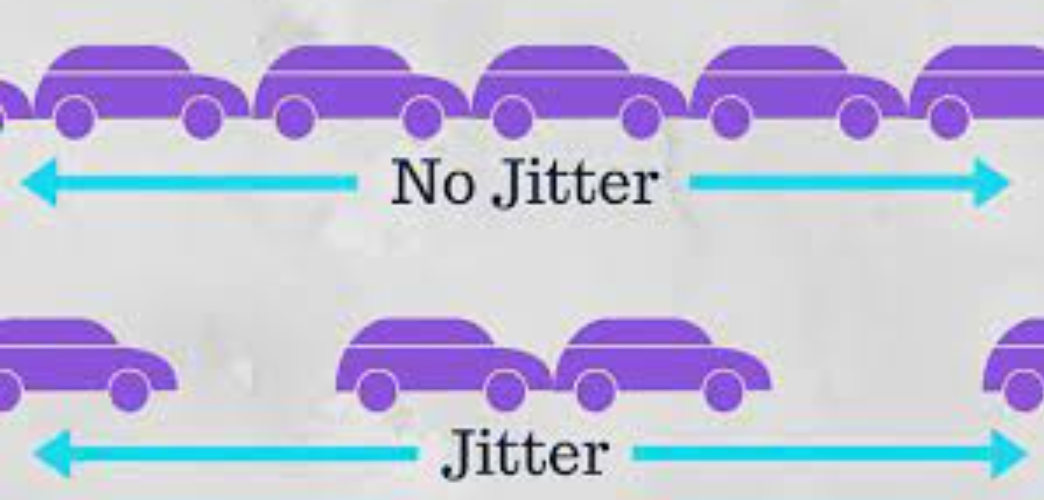
Jitter: check
The “jitter” option in Fortio allows to add random delay (in seconds) between requests. This can help to simulate more realistic traffic patterns and test the system’s ability to handle variable loads. The jitter value can be set to a specific value or to a range of values (e.g. “0.1-0.5” would add a random delay between 0.1 and 0.5 seconds between requests).
- Extra Headers: “Host: simple-web.istioinaction.io”
- Timeout: 2000 ms *기본 설정값 750ms 대로 실행하면 simple-backend-1 요청(latency 1000ms) 은 모두 실패함
-
click
start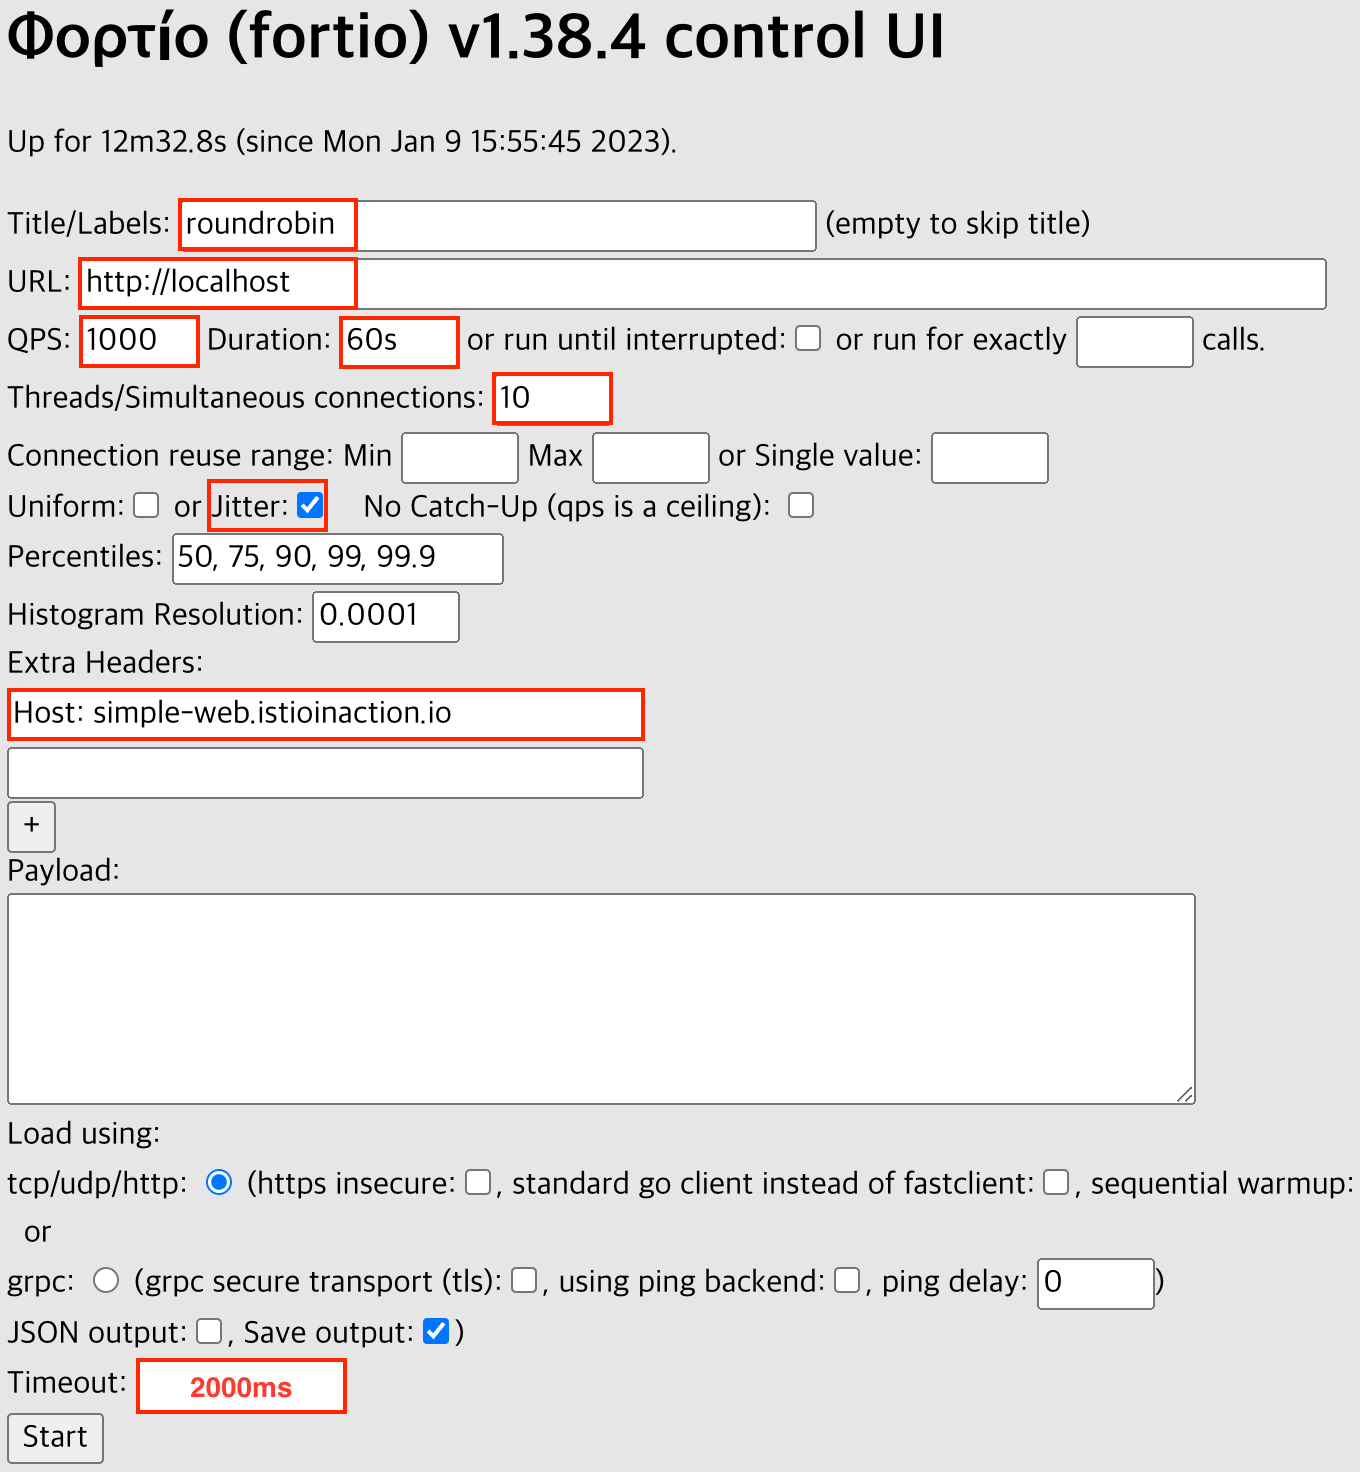
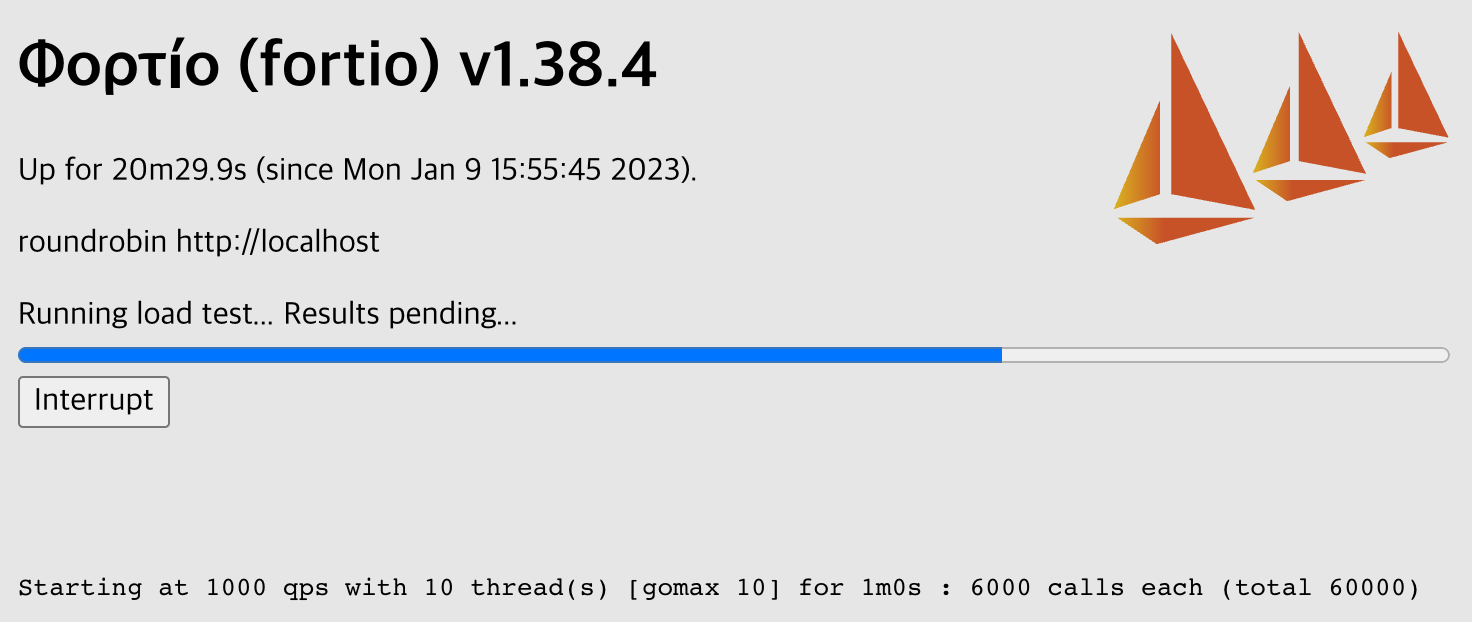
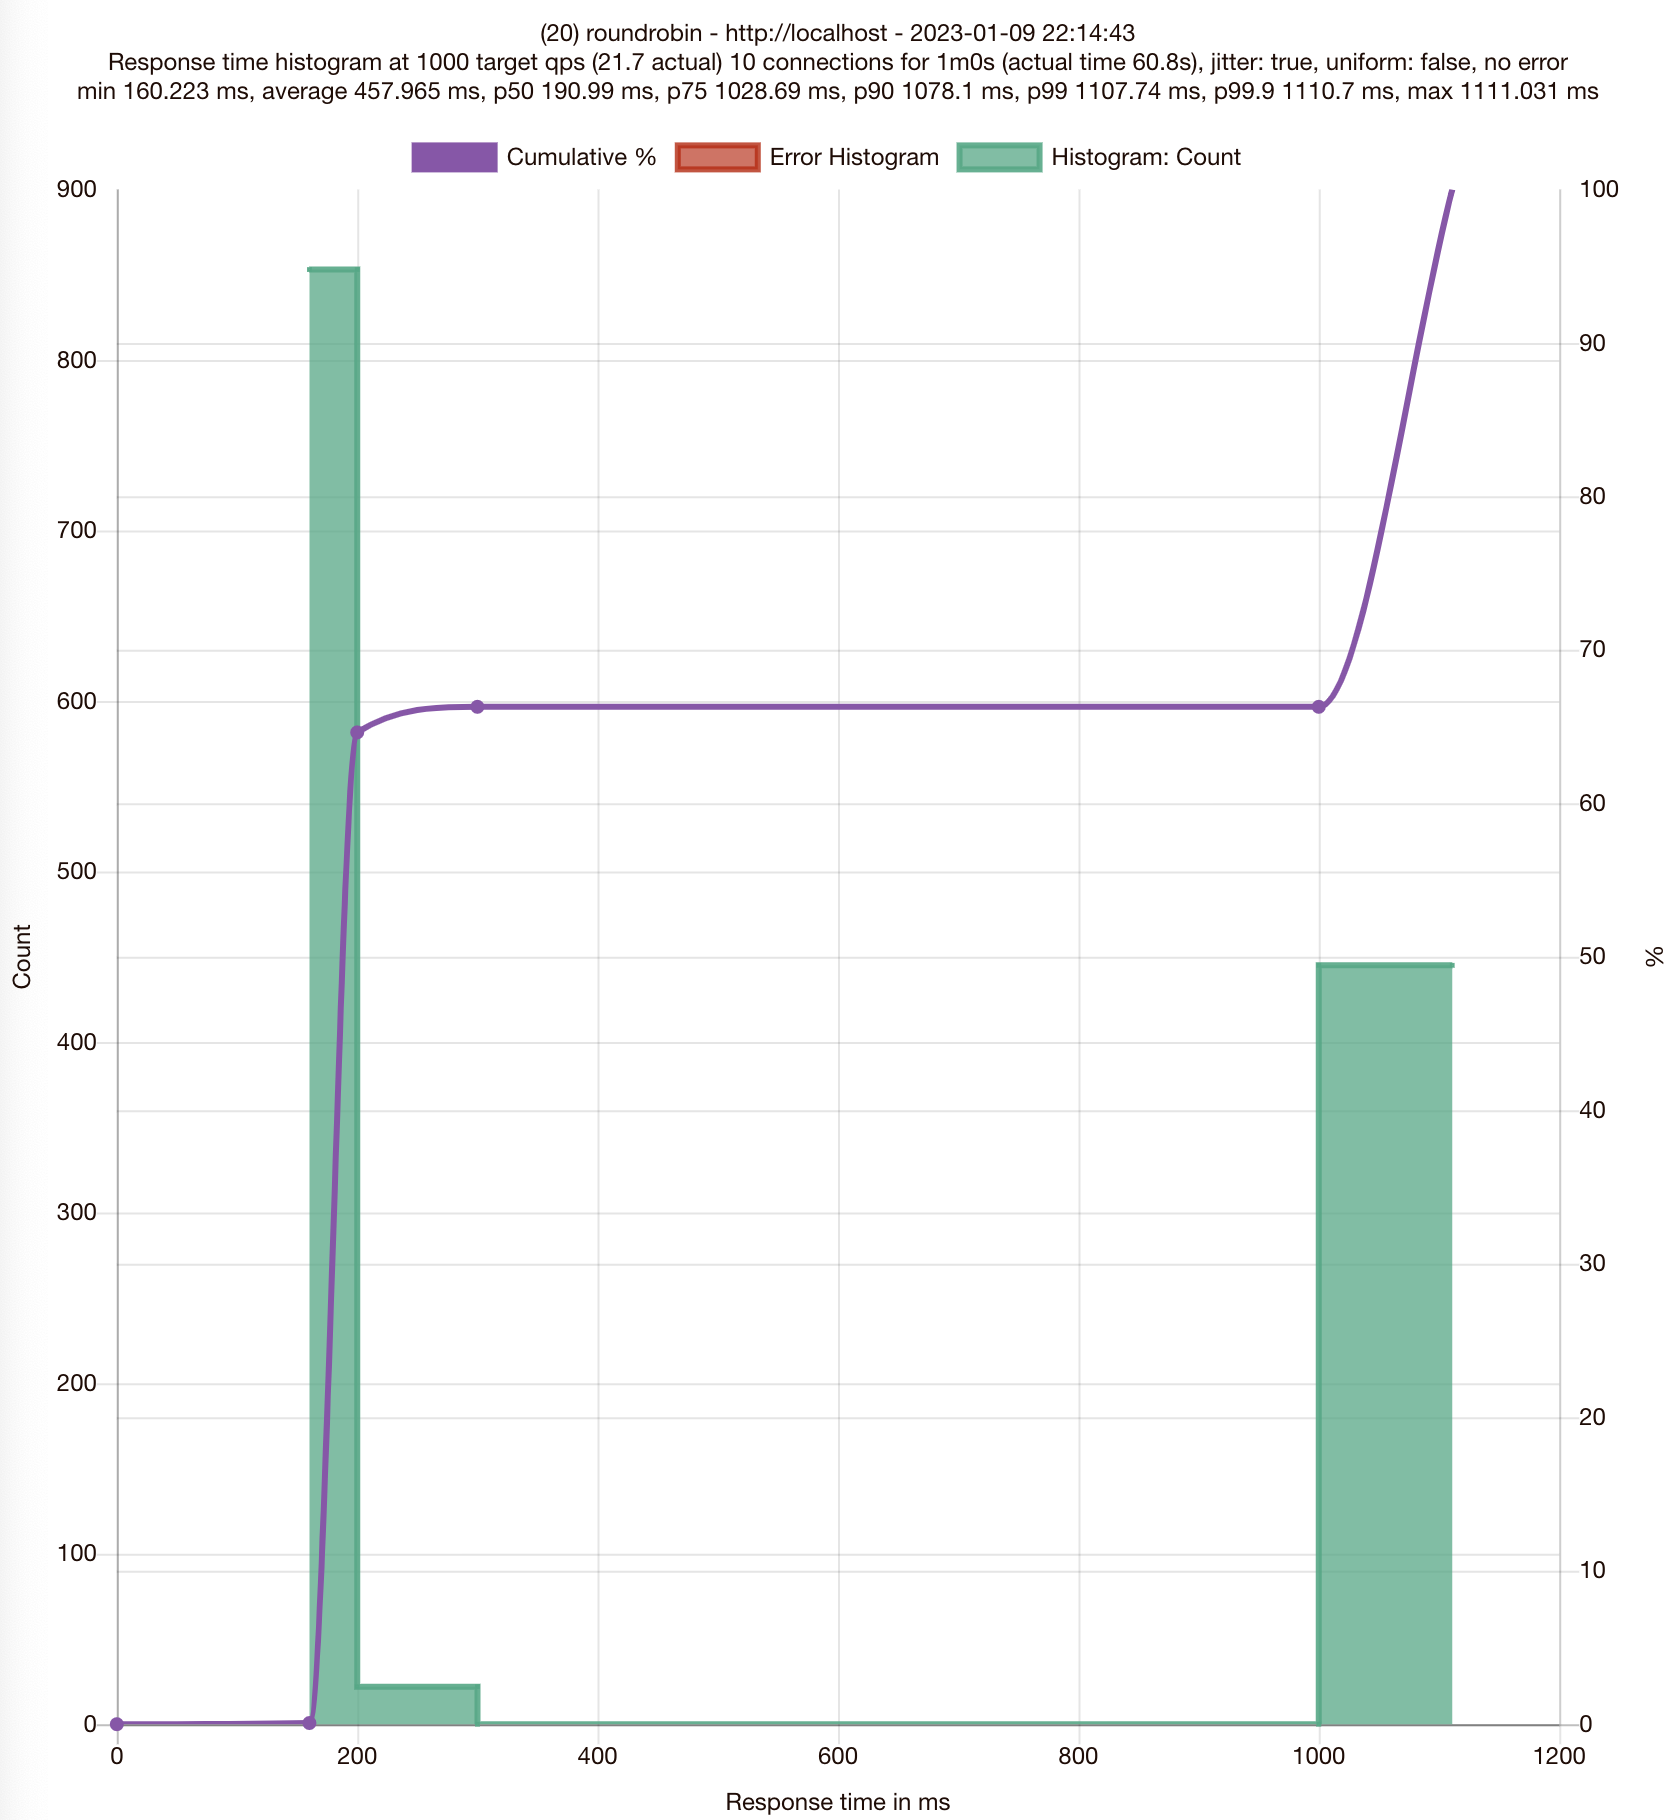
결과 (ROUND_ROBIN)
❊ 75분위수에서 응답이 1초 이상(1.02869) 걸립니다
..
# target 50% 0.190989
# target 75% 1.02869
# target 90% 1.0781
# target 99% 1.10774
# target 99.9% 1.1107
..
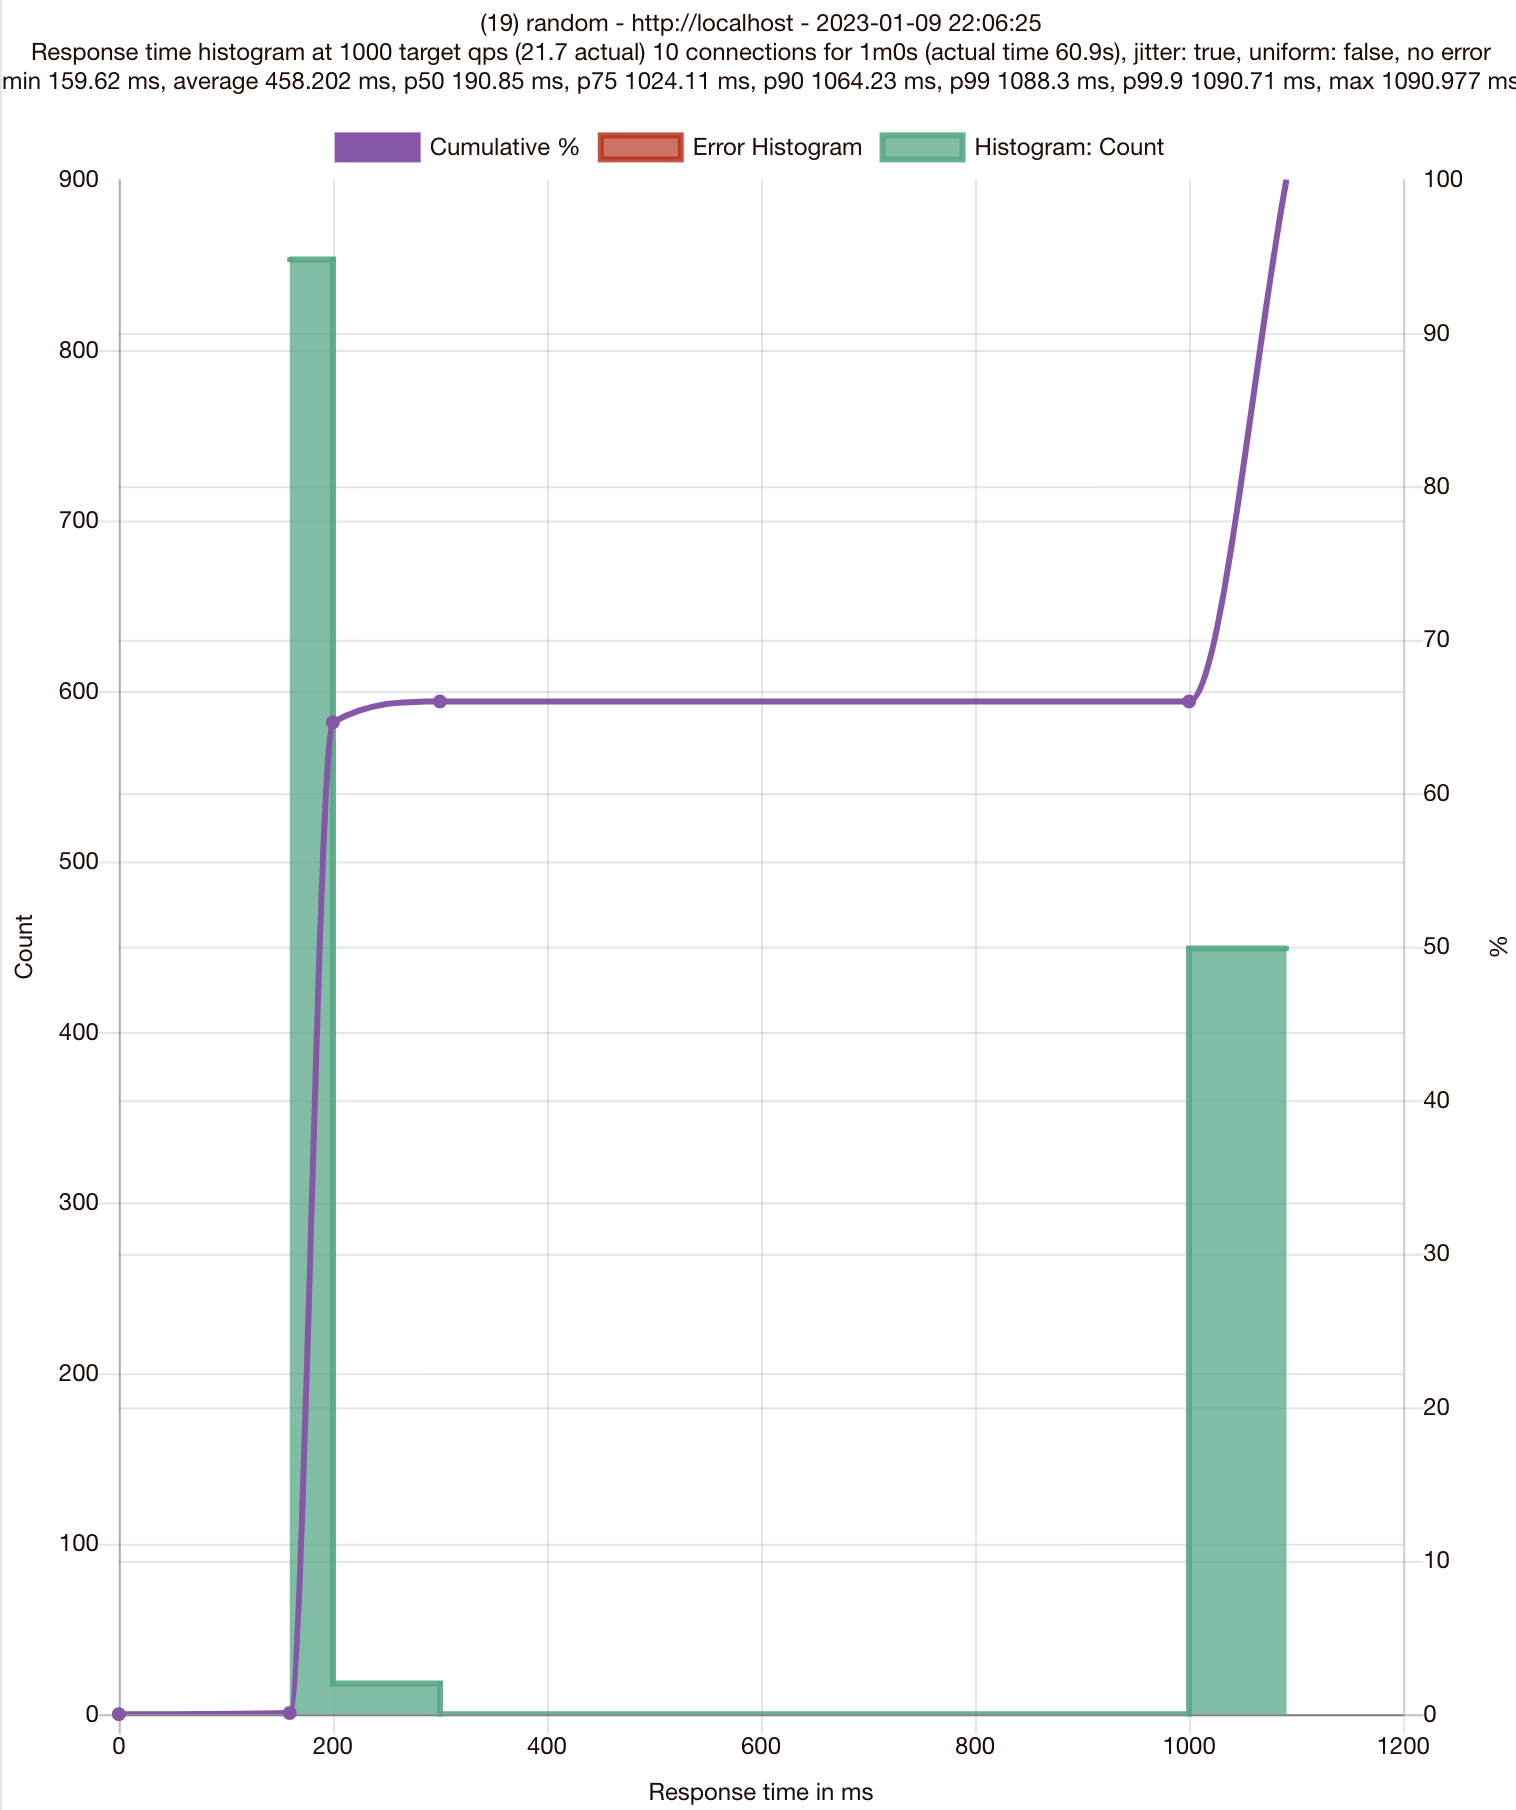
Strategy: Random
Random 알고리즘은 endpoint 결정을 “random” 하게 합니다.
DestinationRule 수정 ~ Load balancing 알고리즘을 RANDOM으로 바꿔 봅니다
# DestinationRule 스펙을 RANDOM으로 바꿉니다.
spec:
  host: simple-backend.istioinaction.svc.cluster.local
  trafficPolicy:
    loadBalancer:
      simple: RANDOM # modified from ROUND_ROBIN
kubectl apply -f ch6/simple-backend-dr-random.yaml -n istioinaction

## 확인
kubectl get destinationrule simple-backend-dr \
 -n istioinaction \
 -o jsonpath='{.spec.trafficPolicy.loadBalancer.simple}{"\n"}'
fortio 대시보드 : browser > http://localhost:8080/fortio (설정 동일)
- Title:
roundrobin→ random
결과 (RANDOM) - ROUND_ROBIN과 비슷한 결과를 보입니다
❊ 75분위수에서 응답이 1초 이상(1.02411) 걸립니다
..
# target 50% 0.190853
# target 75% 1.02411
# target 90% 1.06423
# target 99% 1.0883
# target 99.9% 1.09071
..
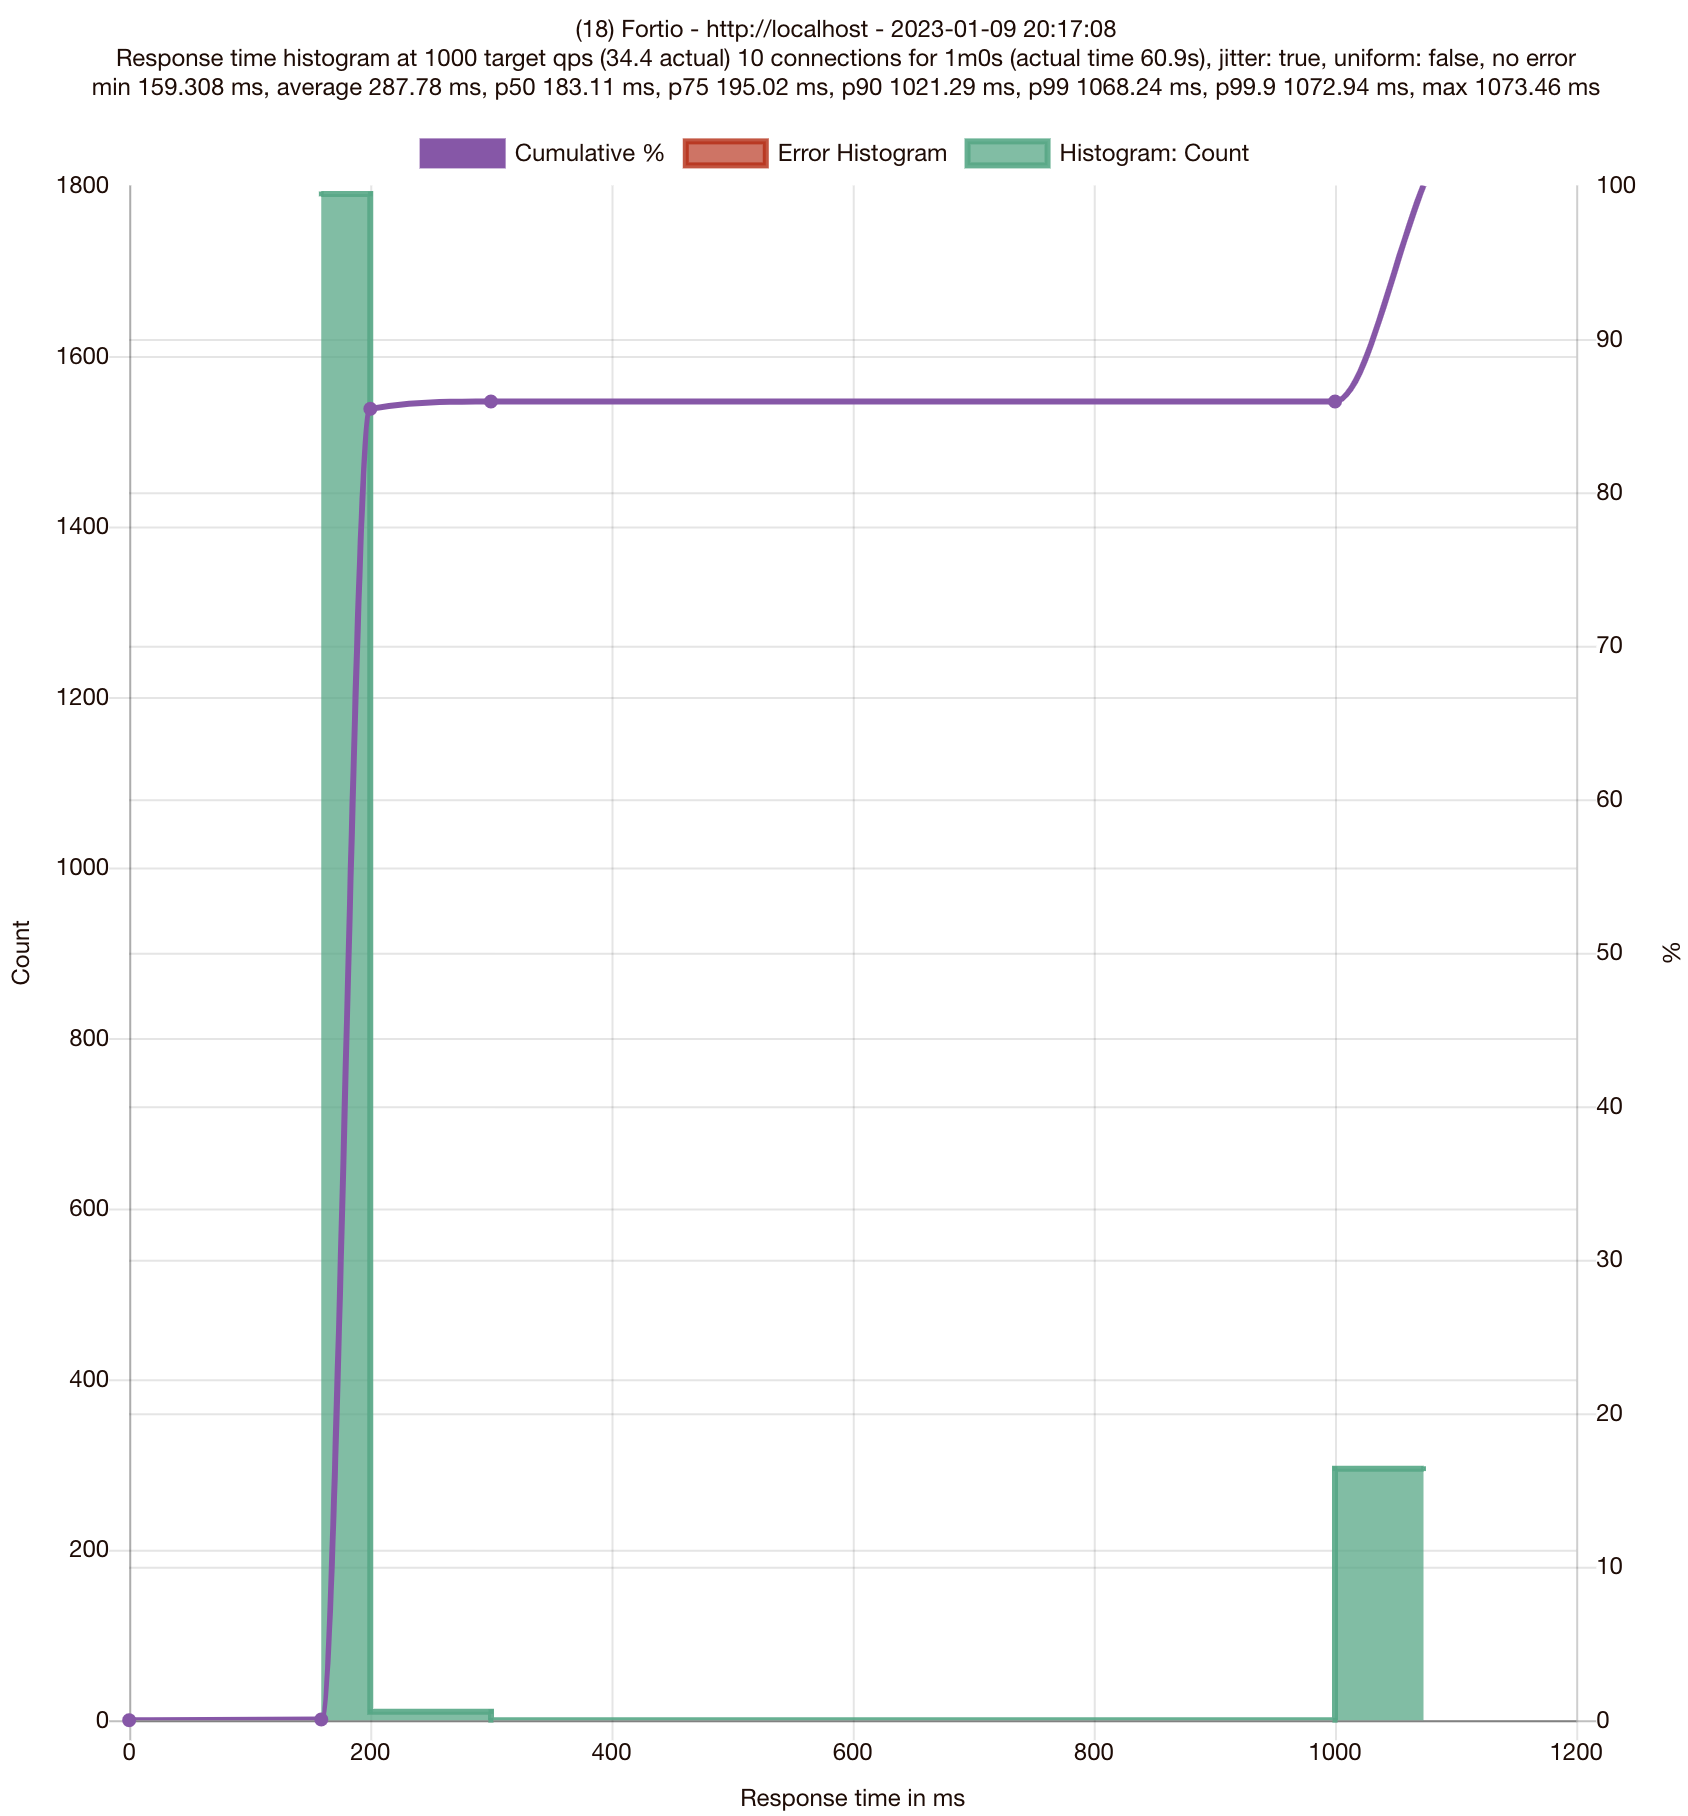
Strategy: Least connection
Least connection 알고리즘은 RR, RANDOM과 달리 endpoints 들의 상태를 보고 결정을 합니다. “커넥션이 가장 적은” endpoint 로 라우팅하는 알고리즘입니다.
DestinationRule 수정
# DestinationRule 스펙을 RANDOM으로 바꿉니다.
spec:
  host: simple-backend.istioinaction.svc.cluster.local
  trafficPolicy:
    loadBalancer:
      simple: LEAST_CONN # modified from RANDOM
kubectl apply -f ch6/simple-backend-dr-least-conn.yaml -n istioinaction

## 확인
kubectl get destinationrule simple-backend-dr \
 -n istioinaction \
 -o jsonpath='{.spec.trafficPolicy.loadBalancer.simple}{"\n"}'
fortio 대시보드 : browser > http://localhost:8080/fortio (설정 동일)
- Title:
roundrobin→ least_conn
결과 (LEAST_CONN) ~ ROUND_ROBIN, RANDOM 보다 성능이 더 좋습니다.
❊ 75분위수도 200ms(0.195024) 이내의 응답성능을 보입니다
..
# target 50% 0.183111
# target 75% 0.195024
# target 90% 1.02129
# target 99% 1.06824
# target 99.9% 1.07294
..
6.2.4 Understanding the different load-balancing algorithm
(좌) round robin (중) random (우) least connection
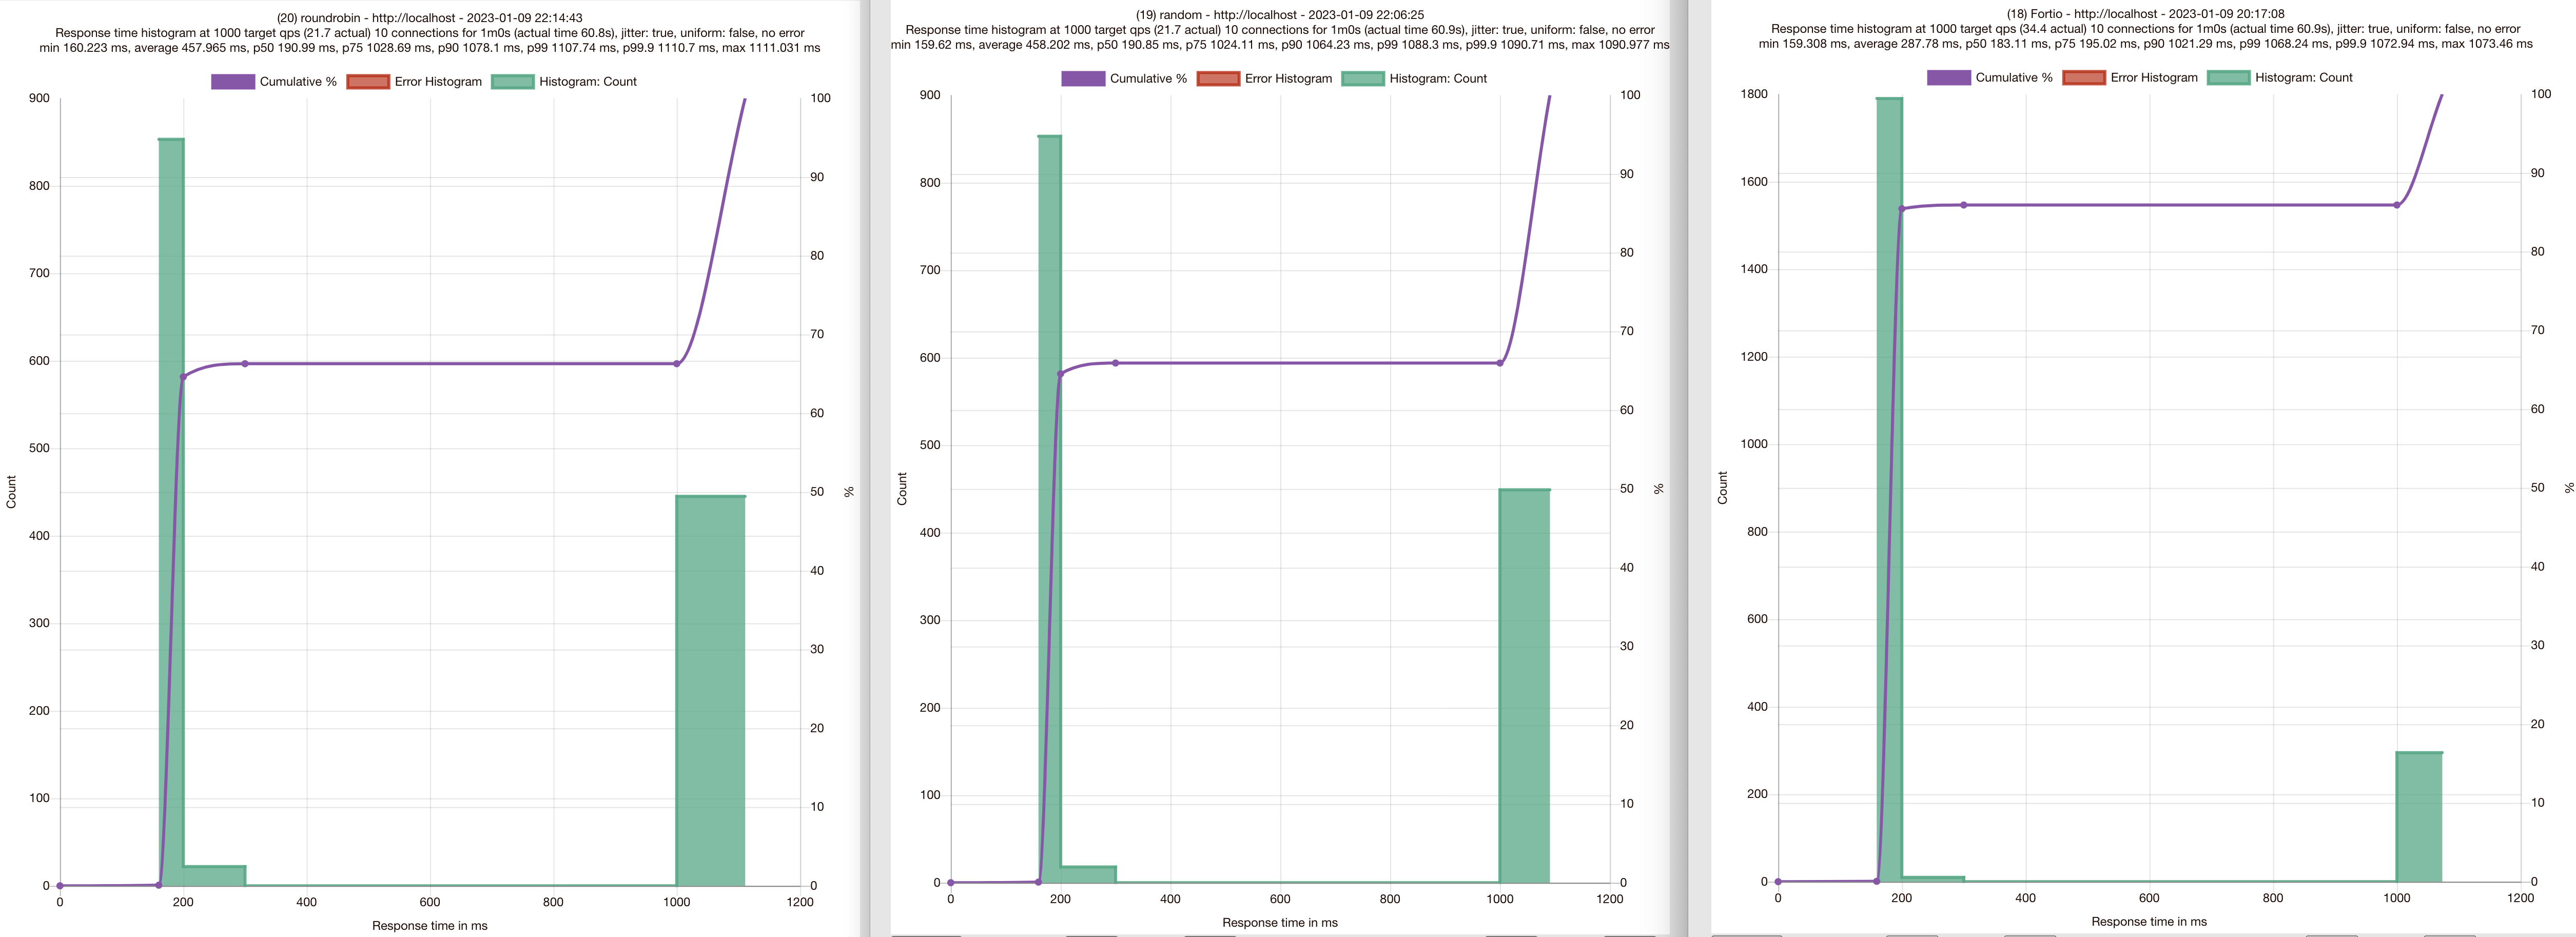
- 로드밸런싱 알고리즘에 따라 다른 결과를 보입니다
- 히스토그램과 분위수 모두 결과에서 차이가 보입니다.
- Least-connection (LEAST_CONN)이 RANDOM, ROUND_ROBIN 보다 더 나은 성능을 보여줍니다.
- RANDOM, ROUND_ROBIN은 엔드포인트 상태를 고려하지 않습니다.
RANDOM, ROUND_ROBIN 전략의 문제점은 로드밸런서 풀의 엔드포인트가 동일한 서비스와 리소스에 기반하더라도 일반적으로 균일하지 않다는 점입니다.
테스트에서도 시뮬레이션 해보았지만, 엔드포인트들 중에는 가비지컬렉션이나 리소스 경합으로 인해 지연이 발생하는 상황이 있을 수 있는데, ROUND_ROBIN이나 RANDOM 알고리즘에서는 이러한 런타임 상황을 고려할 수 없습니다 - Least-connection 로드밸런스는 엔드포인트의 Latency를 고려합니다.
엔드포인트로 요청을 보낼 때, queue depth, active requests 등을 모니터링하여 active requests가 가장 적은 엔드포인트를 선택합니다.
이런 알고리즘 유형을 사용하면, 이상동작을 보이는 엔드포인트로는 요청을 보내지 않고, 보다 빠르게 응답하는 엔드포인트를 선택할 수 있습니다.
(참고) “The power of two choices” ~ Envoy’s Least-request 로드밸런싱
- Envoy는 엔드포인트의 “request depth”를 추적합니다 (not connections)
- 엔드포인트들 중에서 랜덤하게 두 개를 골라서
- 둘 중에 “active requests”가 더 적은 endpoint를 선택합니다.
- Full Scan 대비해서 정확도는 떨어지지만 더 나은 성능을 위한 trade-off 입니다.
6.3 Locality-aware load balancing
- 컨트롤 플레인의 역할은 서비스의 토폴로지를 이해하고 토폴로지 진화(evolve)를 이해하는 것입니다.
- 전체적인 토폴로지를 이해함으로써 얻는 잇점은 서비스와 피어-서비스 로케이션 같은 휴리스틱에 기초한 라우팅과 로드밸런싱 결정을 자동으로 할 수 있습니다.
- Istio는 route 가중치를 제공하고 workload의 위치에 따라 routing 결정을 할 수 있는 로드밸런싱 타입을 제공합니다. (Locality-aware)
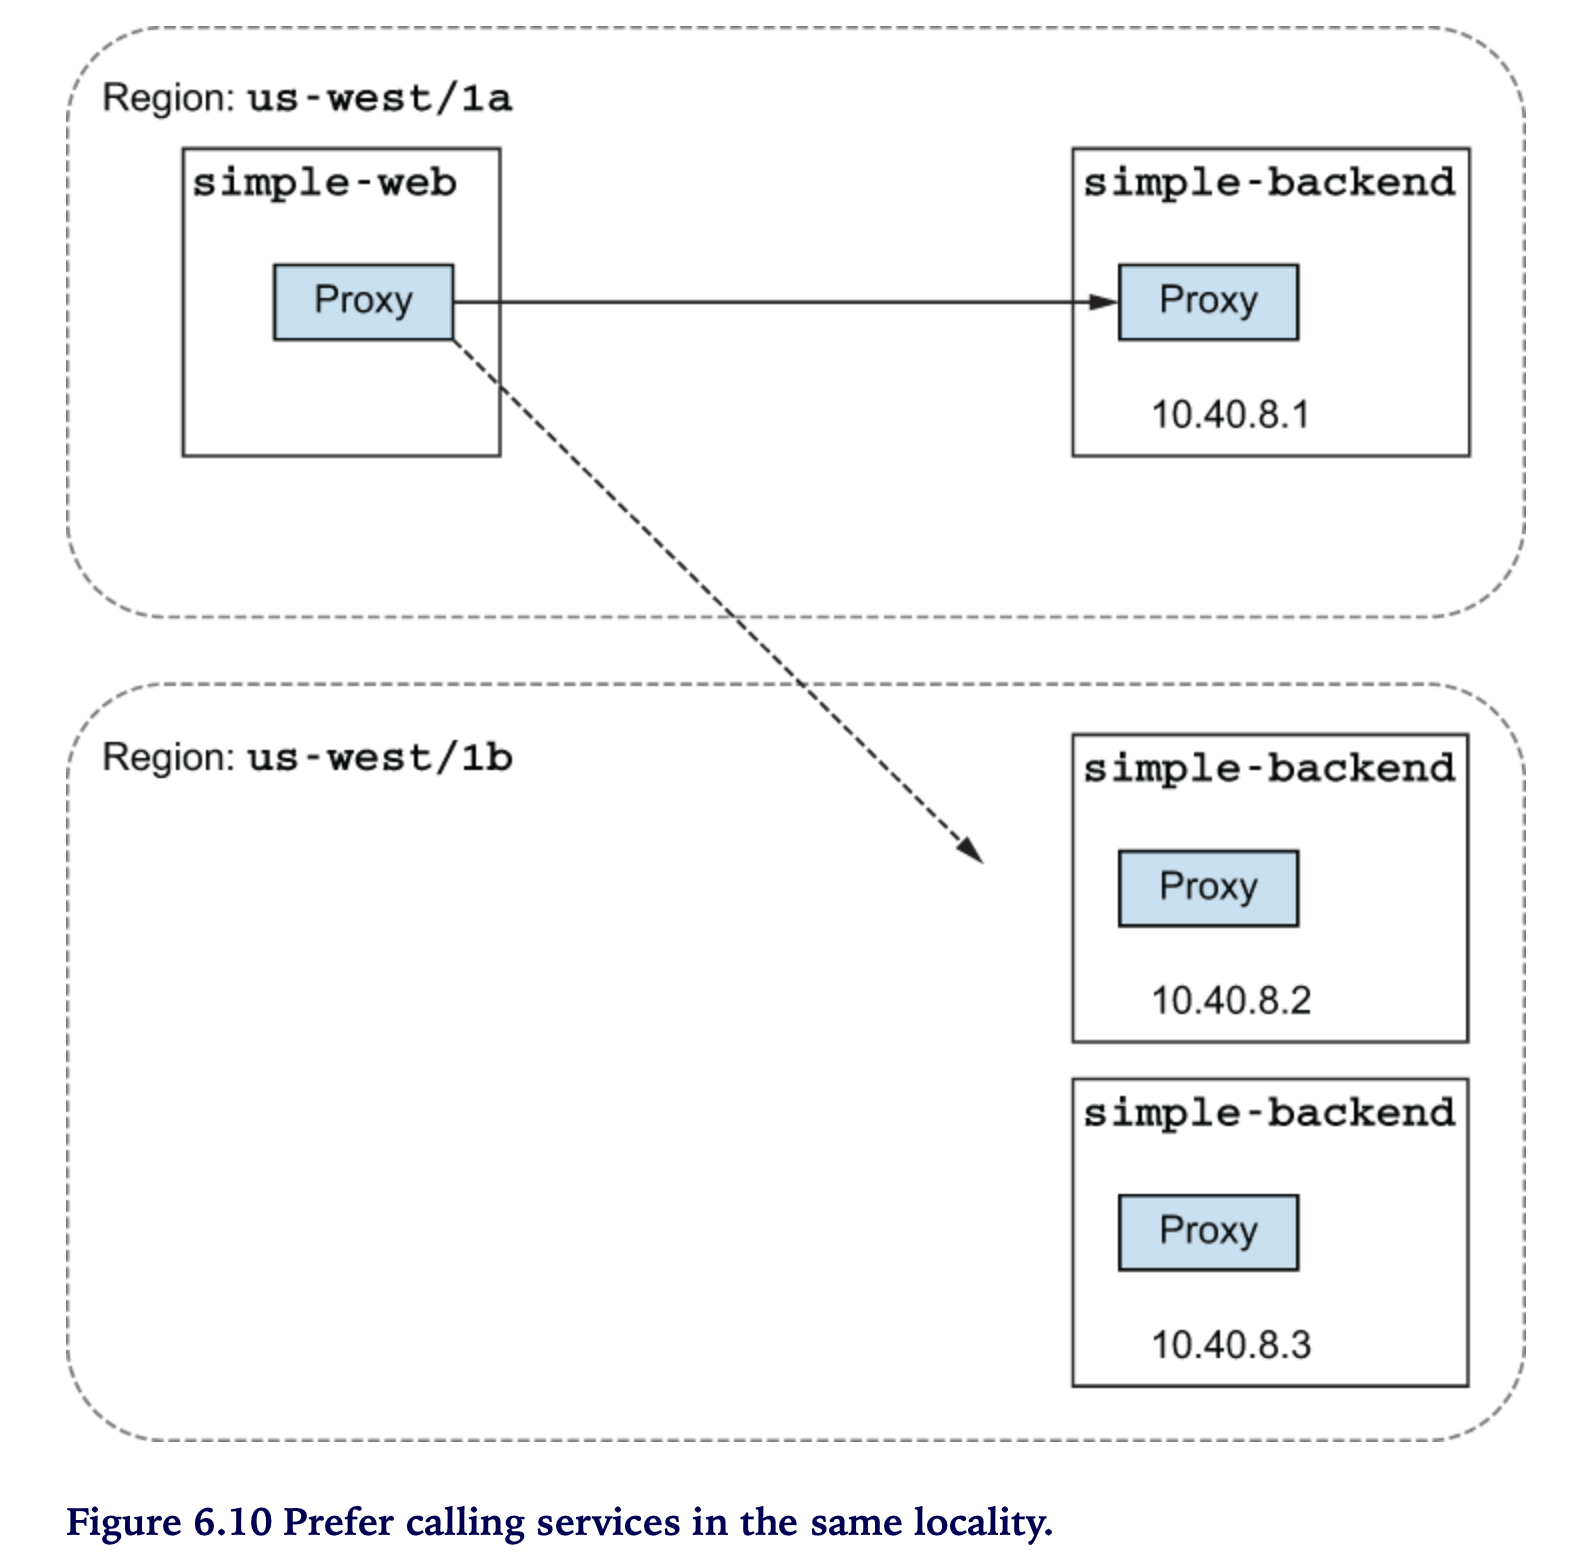
- Istio는 서비스가 위치한 region 이나 AZ (available zone) 를 인식하고 보다 가까운 서비스에 priority를 줄 수 있습니다.
- 예) simple-backend 가 여러 region (us-west, us-east, europe-west) 에 걸쳐 있다고 가정해 봅니다
- simple-web (us-west) 이 simple-backend를 호출할 때 simple-web과 동일한 us-west의 simple-backend로 호출하게 할 수 있습니다
-
만약 모든 endpoints (simple-backend) 를 동등하게 취급한다고 하면, zone/region 을 남나드는 요청이 발생할 수 있는데 이 경우 high latency를 경험하게 됩니다
6.3.1 Hands-on with locality load balancing
Locality Labeling
- Kubenetes 노드에 region, zone 정보를 레이블링 합니다.
예시)- failure-domain.beta.kubernetes.io/region or topology.kubernetes.io/region
- failure-domain.bata.kubernetes.io/zone or topology.kubernetes.io/zone
- Istio 가 노드 레이블을 토대로 Envoy의 로드밸런싱에 locality 정보로 사용합니다.
- 실습에서는 Istio에서 제공하는
istio-locality라는 Pod 레이블을 이용해서 진행합니다.
simple-web locality labeling
# cat ch6/simple-service-locality.yaml

apiVersion: apps/v1
kind: Deployment
metadata:
  labels:
    app: simple-web
  name: simple-web
spec:
  replicas: 1
  selector:
    matchLabels:
      app: simple-web
  template:
    metadata:
      labels:
        app: simple-web
        istio-locality: us-west1.us-west1-a   # <-- Locality Labeling
    spec:
      serviceAccountName: simple-web
      containers:
      - images: nicholasjackson/fake-service:v0.14.1
        imagePullPolicy: IfNotPresent
        name: simple-web
        ports:
        - containerPort: 8080
          name: http
          protocol: TCP
        securityContext:
          privileged: false
kubectl apply -f ch6/simple-service-locality.yaml \
-n istioinaction

## 확인
kubectl get deployment.apps/simple-web \
-n istioinaction \
-o jsonpath='{.spec.template.metadata.labels.istio-locality}{"\n"}'

us-west1.us-west1-a
simple-backend locality label 확인
## simple-backend-1 : us-west1-a  (same locality as simple-web)
kubectl get deployment.apps/simple-backend-1 \
-n istioinaction \
-o jsonpath='{.spec.template.metadata.labels.istio-locality}{"\n"}'

us-west1.us-west1-a

## simple-backend-2 : us-west1-b
kubectl get deployment.apps/simple-backend-2 \
-n istioinaction \
-o jsonpath='{.spec.template.metadata.labels.istio-locality}{"\n"}'

us-west1.us-west1-b
Istio 는 “Locality aware” 로드밸런싱이 기본으로 활성화되어 있습니다.
meshConfig.localityLbSetting.enabled: truehttps://karlstoney.com/2020/10/01/locality-aware-routing/
호출테스트 1
for in in {1..10}; do \
curl localhost \
-s -H "Host: simple-web.istioinaction.io" \
| jq ".upstream_calls[0].body"; done

"Hello from simple-backend-2"
"Hello from simple-backend-1"
"Hello from simple-backend-2"
"Hello from simple-backend-2"
"Hello from simple-backend-1"
"Hello from simple-backend-1"
"Hello from simple-backend-2"
"Hello from simple-backend-2"
"Hello from simple-backend-1"
"Hello from simple-backend-2"
Locality-aware 라우팅이 기본 활성화 되어 있다면
simple-web(us-west1-a)과 동일한 Locality 인 simple-backend-1만 응답해야 할 것 같은데요.
왜 simple-backend-1과 2 응답이 섞여 나올까요?
⇒ locality-aware 로드밸런싱이 동작하려면 “health checking”이 필요해요
Istio does not know which endpoints in the load-balancing pool are unhealthy and what heuristics to use to spill over into the next locality.
Outlier detection
- 엔드포인트가 정상(healthy)인지 동작을 감시합니다
- 엔드포인트 에러를 추적하고 비정상(unhealthy)인지 표시합니다
# cat ch6/simple-backend-dr-outlier.yaml

apiVersion: networking.istio.io/v1beta1
kind: DestinationRule
metadata:
  name: simple-backend-dr
spec:
  host: simple-backend.istioinaction.svc.cluster.local
  trafficPolicy:
    outlierDetection:
      consecutive5xxErrors: 1
      interval: 5s
      baseEjectionTime: 30s
kubectl apply -f ch6/simple-backend-dr-outlier.yaml \
-n istioinaction
호출테스트 2 - with outlierDetection
for in in {1..10}; do \
curl localhost \
-s -H "Host: simple-web.istioinaction.io" \
| jq ".upstream_calls[0].body"; done

"Hello from simple-backend-1"
"Hello from simple-backend-1"
"Hello from simple-backend-1"
"Hello from simple-backend-1"
"Hello from simple-backend-1"
"Hello from simple-backend-1"
"Hello from simple-backend-1"
"Hello from simple-backend-1"
"Hello from simple-backend-1"
"Hello from simple-backend-1"
호출 결과, Locality-aware 로드밸런싱 되어 simple-web과 동일 zone (us-west1-a) 인 simple-backend-1만 응답합니다.
이번에는, 오동작을 유발하는 simple-backend-1 을 배포하고 응답결과를 살펴봅시다.
kubectl apply -f ch6/simple-service-locality-failure.yaml \
-n istioinaction
설정의 주요부분만 살펴봅니다. 다음과 같이 HTTP 500 에러를 일정비율로 발생하도록 설정합니다.
##..중략
  env:
    - name: "ERROR_TYPE"
      value: "http_error"
    - name: "ERROR_RATE"
      value: "1"
    - name: "ERROR_CODE"
      value: "500"
##..중략
simple-backend-1- Pod 가 Running 상태로 완전히 배포된 후에 호출을 해보세요*
호출테스트 3 - unhealthy endpoints in same locality (OK) ~ simple-web가 다른 zone인 simple-backend-2 만 응답을 합니다.
for in in {1..10}; do \
curl localhost \
-s -H "Host: simple-web.istioinaction.io" \
| jq ".upstream_calls[0].body"; done

"Hello from simple-backend-2"
"Hello from simple-backend-2"
"Hello from simple-backend-2"
"Hello from simple-backend-2"
"Hello from simple-backend-2"
"Hello from simple-backend-2"
"Hello from simple-backend-2"
"Hello from simple-backend-2"
"Hello from simple-backend-2"
"Hello from simple-backend-2"
simple-backend-1 이 500 응답을 리턴하면 unhealthy 로 마킹되고, simple-web과 같은 locality 의 endpoints (simple-backend-1)가 unhealthy 이면 자동으로 simple-backend-2로 load-balancing 이 이루어집니다.
다음 실습을 위해 simple-backend-1 을 정상화 해둡시다
kubectl apply -f ch6/simple-service-locality.yaml -n istioinaction
6.3.2 More control over locality load balancing with weighted distribution
Locality weights ~ for peak or seasonal traffic
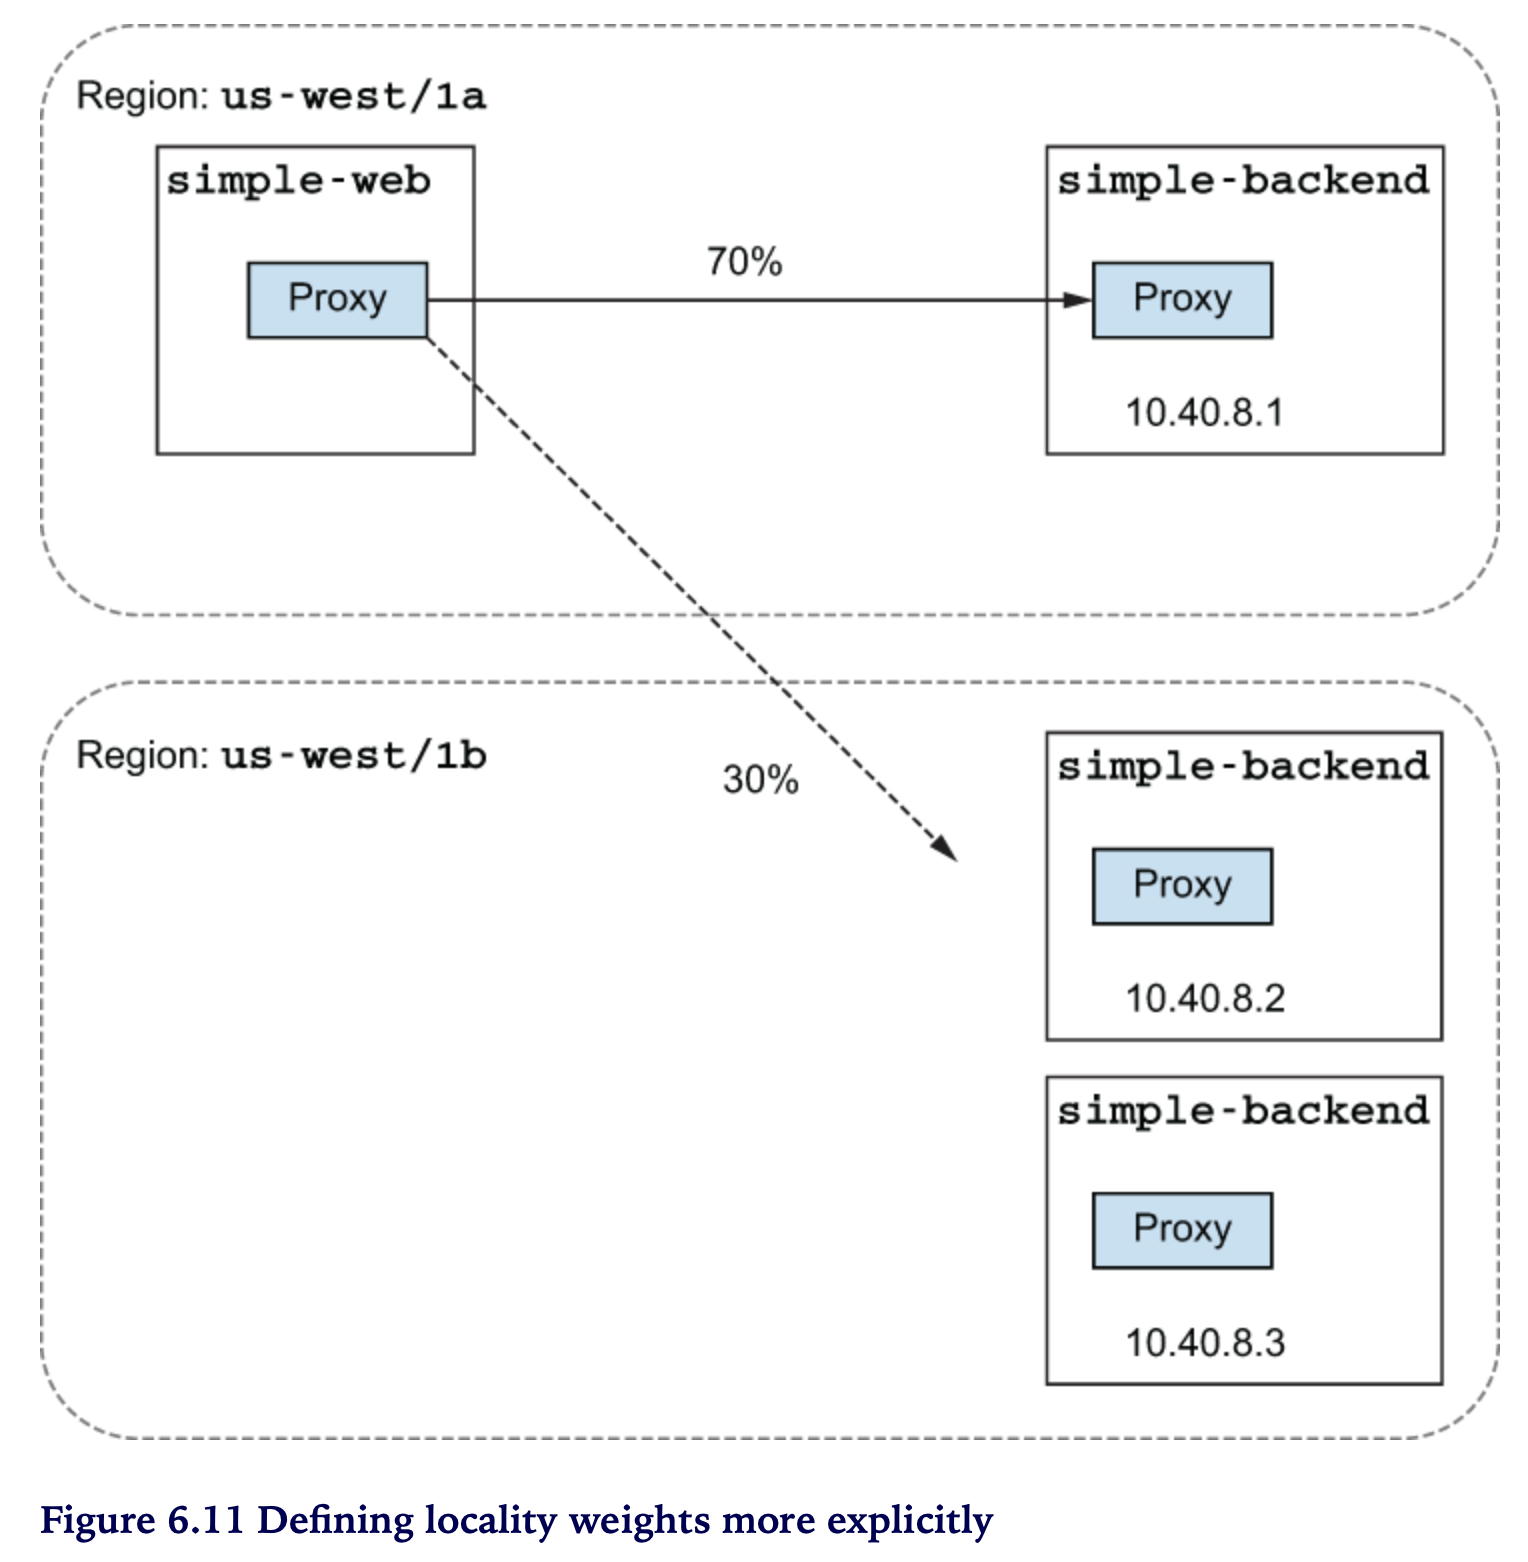
locality 에 가중치를 적용해 보자
# cat ch6/simple-backend-dr-outlier-locality.yaml

apiVersion: networking.istio.io/v1beta1
kind: DestinationRule
metadata:
  name: simple-backend-dr
spec:
  host: simple-backend.istioinaction.svc.cluster.local
  trafficPolicy:
    loadBalancer:
      localityLbSetting:
        distribute:
        - from: us-west1/us-west1-a/*
          to:
            "us-west1/us-west1-a/*": 70
            "us-west1/us-west1-b/*": 30
    connectionPool:
      http:
        http2MaxRequests: 10
        maxRequestsPerConnection: 10
    outlierDetection:
      consecutive5xxErrors: 1
      interval: 5s
      baseEjectionTime: 30s
      maxEjectionPercent: 100
kubectl apply -f ch6/simple-backend-dr-outlier-locality.yaml \
-n istioinaction
호출테스트 (OK) 1 - 7개, 2 - 3개 (*딱 떨어지지는 않음)
for in in {1..10}; do \
curl -s -H "Host: simple-web.istioinaction.io" localhost \
| jq ".upstream_calls[0].body"; done

"Hello from simple-backend-1"
"Hello from simple-backend-2"
"Hello from simple-backend-1"
"Hello from simple-backend-1"
"Hello from simple-backend-1"
"Hello from simple-backend-1"
"Hello from simple-backend-2"
"Hello from simple-backend-1"
"Hello from simple-backend-1"
"Hello from simple-backend-2"
Some of the requests were load-balanced, mostly to the closest locality but with some wiggle room to spill over to the next-closest locality. Note that this is not exactly the same as controlling the traffic explicitly, as we did in chapter 5. With traffic routing, we can control the traffic between difference subsets of our services, typically when there are different classes of service or versions of service within the overall group. In this case , we’re weighting the traffic based on the deployed topology of the services, independent of subsets. These (subsets and locality) are not mutually exclusive concepts: they can be layered so that the fine-grained traffic control and routing that we saw chapter 5 can be applied on top of the location-aware load balancing we explored in this section.
5장에서 다룬 다양한 traffic control, routing subsets 들은 location-aware 위에 적용될 수 있다. (location-aware가 우선함)
6.4 Transparent timeouts and retries
네트워크의 지연(Latency)과 실패(Failures)에 대한 처리
- Load balancing과 Locality로 이러한 문제를 완화하는 것을 보았습니다.
- 그런데 말입니다, 한없이 오래 걸리는 호출이나 간헐적인 실패들은 어떻게 다루어야 할까요?
이러한 처리가 “Transparent” 하다는 의미
- application 입장에서는 존재 자체를 모름 (투명해)
- application 에서 신경쓰지 않더라도 istio-proxy가 상황에 따라서 timeouts 와 retries 로 네트워크 이슈를 처리함
6.4.1 Timeouts
Generally, it makes sense to have larger timeouts at the edge (where traffic comes in) of an architecture and shorter (or more restrictive) timeouts for the layers deeper in the call graph.
통상, 밖 → 안, backend에 위치할 수록 timeout 을 짧게 설정합니다
실습 환경을 구성합니다
kubectl apply -f ch6/simple-web.yaml -n istioinaction;
kubectl apply -f ch6/simple-backend.yaml -n istioinaction;
kubectl delete destinationrule simple-backend-dr -n istioinaction;
호출테스트
for in in {1..10}; do time curl localhost \
-s -H "Host: simple-web.istioinaction.io" \
| jq .code; done

..
200

real	0m0.191s
user	0m0.030s
sys	0m0.010s
..
200

real	0m0.183s
user	0m0.027s
sys	0m0.008s
** simple-backend-1를 1초 delay로 응답하도록 배포 합니다.**
kubectl apply -f ch6/simple-backend-delayed.yaml \
-n istioinaction
호출테스트 ~ simple-backend-1로 로드밸런싱 될 경우 1초 이상 소요확인
for in in {1..10}; do time curl localhost \
-s -H "Host: simple-web.istioinaction.io" \
| jq .code; done

..
200

real	0m1.055s
user	0m0.030s
sys	0m0.013s
..
200

real	0m0.191s
user	0m0.032s
sys	0m0.013s
200
..
simple-backend 에 timeout 을 적용해 보겠습니다 ~ VirtualService
# cat ch6/simple-backend-vs-timeout.yaml
---
apiVersion: networking.istio.io/v1alpha3
kind: VirtualService
metadata:
  name: simple-backend-vs
spec:
  hosts:
  - simple-backend
  http:
  - route:
    - destination:
        host: simple-backend
    timeout: 0.5s
kubectl apply -f ch6/simple-backend-vs-timeout.yaml \
-n istioinaction
호출테스트 ~ 0.5s 이상 걸리는 호출은 타임아웃 발생 (500응답)
for in in {1..10}; do time curl localhost \
-s -H "Host: simple-web.istioinaction.io" \
| jq .code; done

..
200

real	0m0.207s
user	0m0.032s
sys	0m0.012s
..
500

real	0m0.557s
user	0m0.031s
sys	0m0.012s
..
6.4.2 Retries
언제 retry 가 필요할까
- 간헐적인 네트웍 실패
- 일반적인/예견된 실패
retry 시 고려할 것
- causing cascading failures
## 설정 초기화

kubectl apply -f ch6/simple-web.yaml -n istioinaction;
kubectl apply -f ch6/simple-backend.yaml -n istioinaction;
## 실습을 위해 retry 옵션 끄기

istioctl install --set profile=demo \
--set meshConfig.defaultHttpRetryPolicy.attempts=0
## istiod 로그 확인 - defaultHttpRetryPolicy 설정이 비어있음
# stern istiod- -n istio-system
..
istiod-fd94754fb-5jbr5 discovery     "defaultHttpRetryPolicy": {
istiod-fd94754fb-5jbr5 discovery
istiod-fd94754fb-5jbr5 discovery     }
..
에러 발생 시 retry
75% 확률로 failures (503) 를 발생하는 simple-backend-1 배포
## 주요 설정
# .. 중략 ..
  env:
  - name: ERROR_TYPE
    value: http_error
  - name: ERROR_RATE
    value: "0.75"
  - name: ERROR_CODE
    value: "503"
# .. 중략 ..
kubectl apply -f ch6/simple-backend-periodic-failure-503.yaml \
-n istioinaction
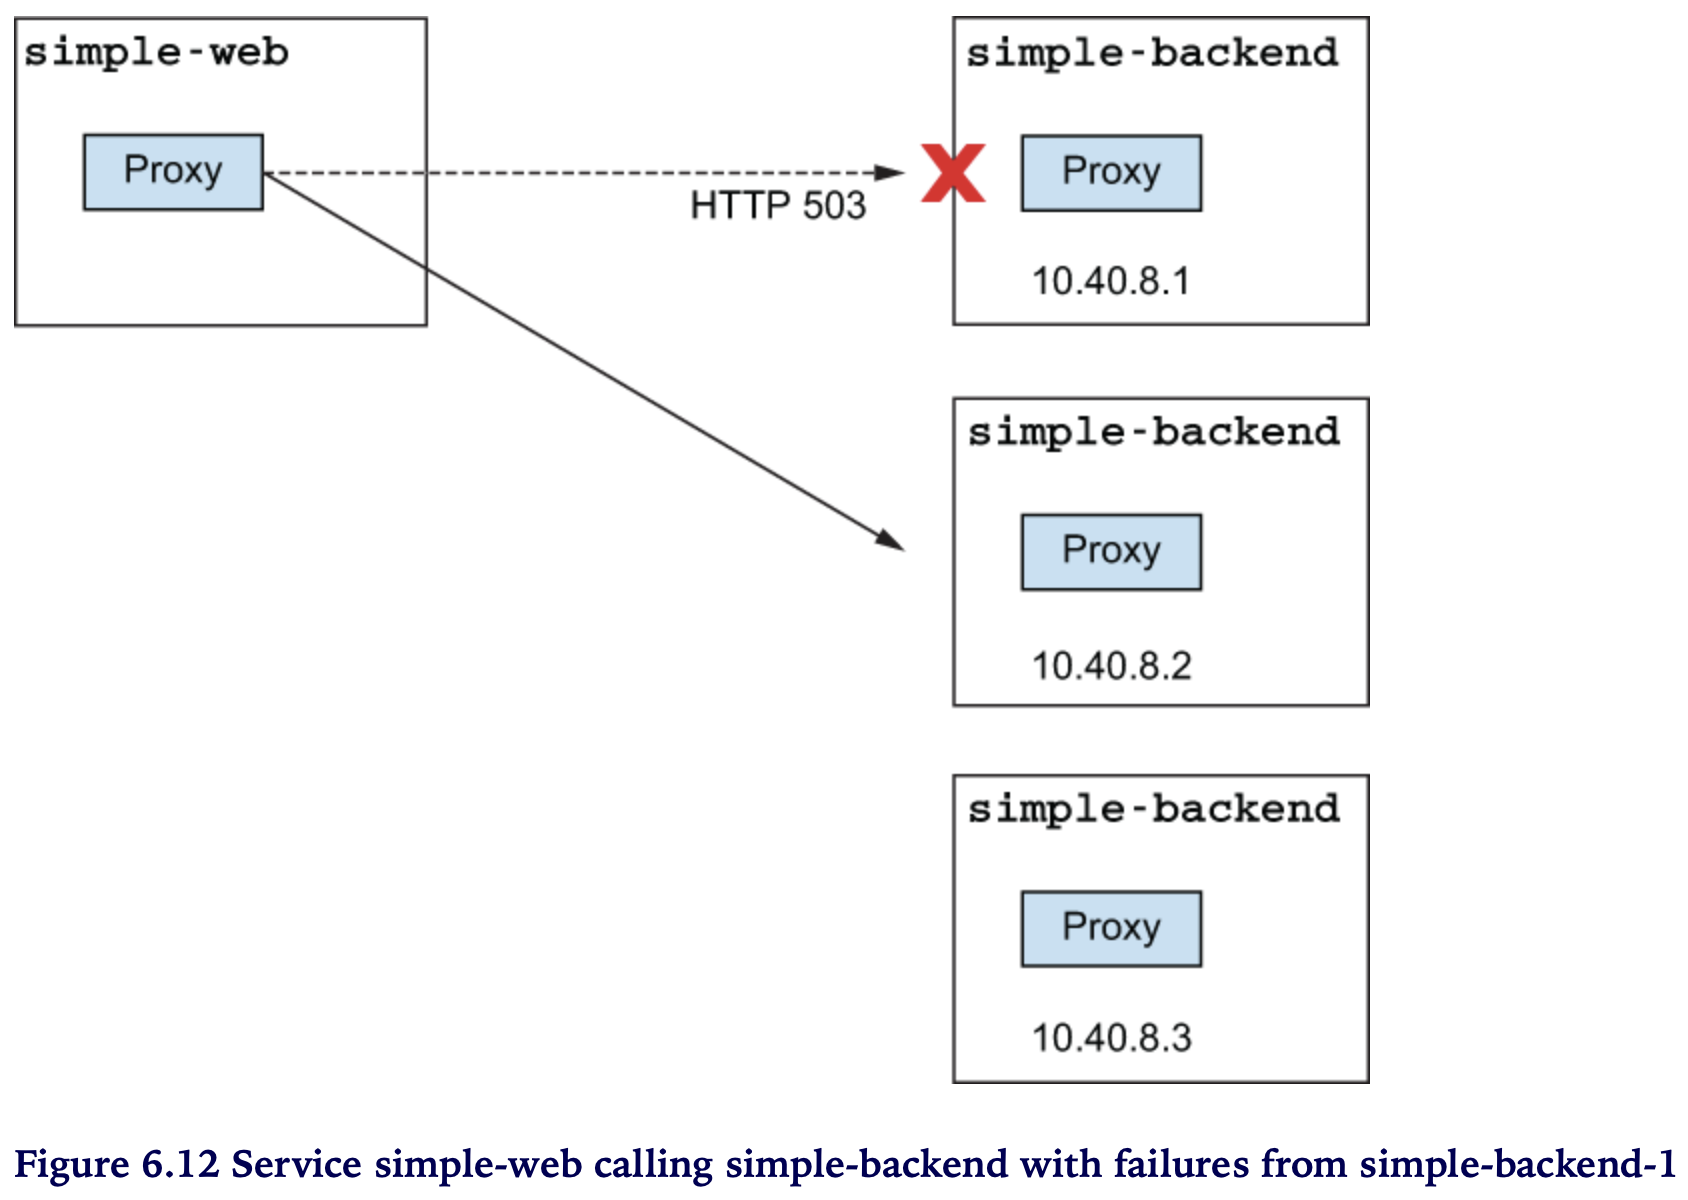
호출테스트 ~ simple-backend-1 호출 시 예상대로 failures (500) 발생
for in in {1..10}; do curl localhost \
-s -H "Host: simple-web.istioinaction.io" \
| jq .code; done

200
..
500
200
500
200
..
500
- simple-backend-1 —(503)—> simple-web —(500)—> client (curl)
simple-web 과 simple-backend-1 에서 503 확인
## simple-backend-1 에서 503 에러
simple-backend-1-.. istio-proxy [2023-03-31T02:01:23.419Z] "GET / HTTP/1.1" 503 - via_upstream - "-" 0 171 1 1 "172.17.0.1" "curl/7.86.0" "bf93746b-c0e6-937f-a338-1757d2462d81" "simple-backend:80" "172.17.0.7:8080" inbound|8080|| 127.0.0.6:38549 172.17.0.7:8080 172.17.0.1:0 outbound_.80_._.simple-backend.istioinaction.svc.cluster.local default

## simple-web 에서 503 응답 수신
simple-web-.. istio-proxy [2023-03-31T02:01:23.418Z] "GET / HTTP/1.1" 503 - via_upstream - "-" 0 171 1 1 "172.17.0.1" "curl/7.86.0" "bf93746b-c0e6-937f-a338-1757d2462d81" "simple-backend:80" "172.17.0.7:8080" outbound|80||simple-backend.istioinaction.svc.cluster.local 172.17.0.4:60206 10.103.139.156:80 172.17.0.1:0 - -
VirtualService 에 retries 를 설정해 보자
# cat ch6/simple-backend-enable-retry.yaml
---
apiVersion: networking.istio.io/v1alpha3
kind: VirtualService
metadata:
  name: simple-backend-vs
spec:
  hosts:
  - simple-backend
  http:
  - route:
    - destination:
        host: simple-backend
    retries:
      attempts: 2
## 설정 적용
kubectl apply -f ch6/simple-backend-enable-retry.yaml \
-n istioinaction
## 설정 확인
# istioctl pc route deploy/simple-web.istioinaction -o json

..

"route": {
  "cluster": "outbound|80||simple-backend.istioinaction.svc.cluster.local",
  "timeout": "0s",
  "retryPolicy": {
    "retryOn": "connect-failure,refused-stream,unavailable,cancelled,retriable-status-codes",
    "numRetries": 2,

..
호출테스트 ~ 모든 호출 성공 (all 200)
for in in {1..10}; do curl localhost \
-s -H "Host: simple-web.istioinaction.io" \
| jq .code; done

200
..
- simple-backend-1 —(503, retry)—> simple-backend-2 –> simple-web
아래와 같이 로그 상에서 에러가 발생하지만 retry 를 통해 client는 정상응답을 받음
## 503 에러 확인
..
simple-backend-1-.. simple-backend 2023-01-10T13:23:54.581Z [INFO]  error_injector: Injecting error: request_count=12 error_percentage=0.75 error_type=http_error
..
simple-backend-1-.. istio-proxy [2023-01-10T13:25:33.716Z] "GET / HTTP/1.1" 503 - via_upstream - "-" 0 171 1 1 "172.17.0.1" "curl/7.84.0" "a3e2e246-377b-9482-826b-125105f78228" "simple-backend:80" "172.17.0.9:8080" inbound|8080|| 127.0.0.6:53469 172.17.0.9:8080 172.17.0.1:0 outbound_.80_._.simple-backend.istioinaction.svc.cluster.local default
Istio retry 활성 시 기본정책은 503 에러에 대해서는 retry를 허용함
⇒ 503 이외의 다른 에러 발생 시에도 retry 가 동작하는지 확인해 보겠습니다
## “500 에러”를 리턴하는 simple-backend-1 배포
kubectl apply -f ch6/simple-backend-periodic-failure-500.yaml \
-n istioinaction

# 확인 - 이번에는 에러코드가 500 입니다
- name: ERROR_CODE
  value: "500"
호출테스트 ~ 500 에러 발생
ERROR_CODE를 수정 (503->500) 하였더니 Retry가 동작하지 않습니다
for in in {1..10}; do curl localhost \
-s -H "Host: simple-web.istioinaction.io" \
| jq .code; done

200
..
500
200
..
500
200
500 에러도 retry 하도록 VirtualService를 수정해 보아요
# cat ch6/simple-backend-vs-retry-500.yaml
---
apiVersion: networking.istio.io/v1alpha3
kind: VirtualService
metadata:
  name: simple-backend-vs
spec:
  hosts:
  - simple-backend
  http:
  - route:
    - destination:
        host: simple-backend
    retries:
      attempts: 2
      retryOn: 5xx
kubectl apply -f ch6/simple-backend-vs-retry-500.yaml \
-n istioinaction
호출테스트 ~ retryOn: 5xx (all 200)
for in in {1..10}; do curl localhost \
-s -H "Host: simple-web.istioinaction.io" \
| jq .code; done

200
..
(참고) x-envoy-retry-on
5xx, gateway-error, reset, connect-failure, envoy-ratelimited, retriable-4xx, refused-stream, retriable-status-codes, retriable-headers, http3-post-connect-failure
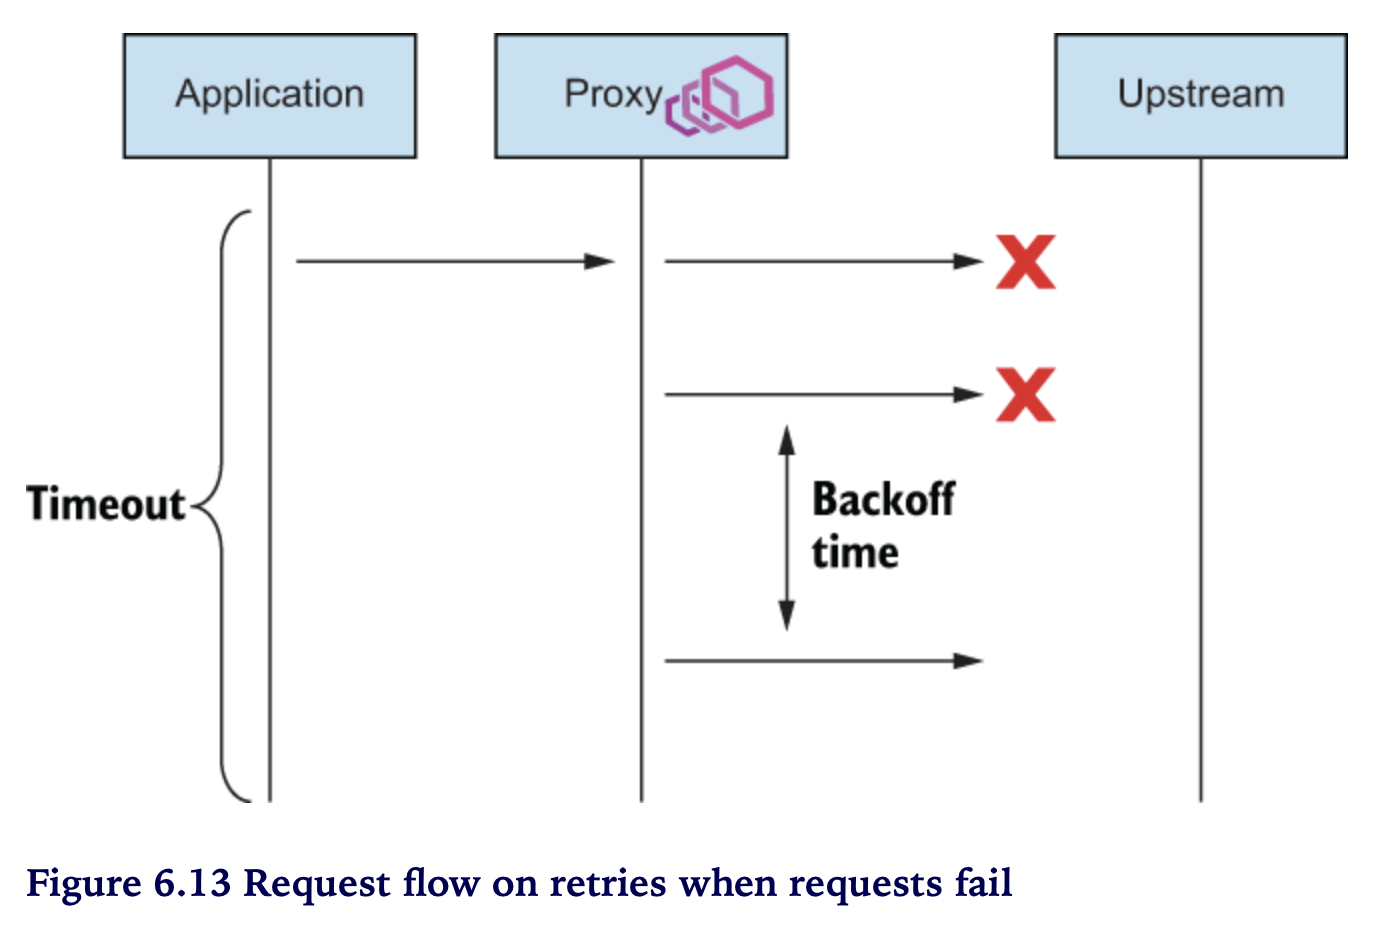
RETRIES IN TERMS OF TIMEOUTS
perTryTimeout
- 재시도라는게 마냥할 수 있는게 아님
- 요청과 응답에 대한 전체(overall) timeout, 즉 주어진 시간 범위 안에서 고려돼야 함
-
retry 시도 횟수만큼 소요된 시간이 overall timeout 안에 들어와야 함
perTryTimeout * attempts < overall timeout
backoff
- retry 간격
- 재시도 횟수가 늘어날 수록 retry 간격이 길어짐
-
delay between retries, retry를 준비/대기 하는 시간도 고려해야 함
perTryTimeout * attempts + backoffTime * (attempts-1) < overall timeout
HOW IT WORKS
- VirtualService 의
attempts필드 : retry 횟수 예) 2 - 최초 시도 포함 max 3번 호출 - backoff time : 25ms (default)
retry 기본 설정 문제 - “Thundering herd”
- call depth 가 깊을 수록 위험
- edge 부터 구간별로 retries가 누적됨
- 이 경우 가장 안쪽 구간은 엄청난 retry requests 가 누적됨 아래 예시에서는 retry 요청이 각 구간별로 2배씩 증가하여 Service 5에는 2^5 = 32 요청이 발생
Thundering herd 방지 대책
- (방안1) edge / intermidate 단의 retry 제한 (1 or none), 되도록 retry는 call stack 가장 안쪽에서만 제한적으로 사용
- (방안2) overall retry budget (rate-limit) ~ Istio API는 제공안함
- (방안3) 동일 locality 내 retries (default)
retryRemoteLocalities옵션으로 다른 locality 로 retries 가능 outlier detection 필요
6.4.3 Advanced retries
- 자동 retry ⇒ 간헐적인 네트워크 실패로 부터 서비스를 탄력적으로 해줌
- 상황별 retry 파라메터 튜닝
- Istio 확장(Extension) API (EnvoyFilter) ~ retriable status code, backoff retry time
408 에러코드를 발생하는 simple-backend-1을 배포
kubectl apply -f ch6/simple-backend-periodic-failure-408.yaml \
-n istioinaction

..
- name: ERROR_CODE
  value: "408"
..
호출테스트 ~ 408 에러는 retryOn: 5xx 에 포함되지 않으므로 에러를 리턴함
for in in {1..10}; do curl localhost \
-s -H "Host: simple-web.istioinaction.io" \
| jq .code; done

200
..
500
200
..
500
## 408 에러가 로그(simple-backend-1) 상에서도 확인됨
simple-backend-1-7f5cf8998d-8q9md istio-proxy [2023-01-11T06:16:29.071Z] "GET / HTTP/1.1" 408 - via_upstream - "-" 0 172 1 1 "172.17.0.1" "curl/7.84.0" "7a03bdc2-d261-9ce4-8e68-7fca718b91df" "simple-backend:80" "172.17.0.11:8080" inbound|8080|| 127.0.0.6:60711 172.17.0.11:8080 172.17.0.1:0 outbound_.80_._.simple-backend.istioinaction.svc.cluster.local default
408 에러도 retry 하도록 설정해 보겠습니다.
408 에러의 경우는 Istio API에서 지원하는 Envoy 설정 범위 밖입니다.
이런 경우를 위해서 Istio extension API를 통해서 Envoy 설정을 할 수 있는데요.
EnvoyFilter 를 사용하여 Retry 에러코드(retriable_status_codes), backoff 간격(retry_back_off.base_interval)을 수정해 보겠습니다.
# cat ch6/simple-backend-ef-retry-status-codes.yaml
---
apiVersion: networking.istio.io/v1alpha3
kind: EnvoyFilter
metadata:
  name: simple-backend-retry-status-codes
  namespace: istioinaction
spec:
  workloadSelector:
    labels:
      app: simple-web
  configPatches:
  - applyTo: HTTP_ROUTE
    match:
      context: SIDECAR-OUTBOUND
      routeConfiguration:
        vhost:
          name: "simple-backend.istioinaction.svc.cluster.local:80"
    patch:
      operation: MERGE
      value:
        route:
          retry_policy:
            retry_back_off:
              base_interval: 50ms
            retriable_status_codes:
            - 408
            - 400
## EnvoyFilter 적용
kubectl apply -f ch6/simple-backend-ef-retry-status-codes.yaml \
-n istioinaction
VirtualService 에도 재시도 할 대상 코드 “retryOn” 항목에 retriable-status-codes 를 추가합니다.
# cat ch6/simple-backend-vs-retry-on.yaml
---
apiVersion: networking.istio.io/v1alpha3
kind: VirtualService
metadata:
  name: simple-backend-vs
spec:
  hosts:
  - simple-backend
  http:
  - route:
    - destination:
        host: simple-backend
    retries:
      attempts: 2
      retryOn: 5xx,retriable-status-codes
kubectl apply -f ch6/simple-backend-vs-retry-on.yaml \
-n istioinaction

# kubectl get vs simple-backend-vs -o yaml
..
retryOn: 5xx,retriable-status-codes
..
호출테스트 ~ 응답결과가 모두 200 입니다 (408에러 시 retry 를 통해 성공)
for in in {1..10}; do curl localhost \
-s -H "Host: simple-web.istioinaction.io" \
| jq .code; done

200
..
simple-backend-1 로그에 408 에러 발생 (retry를 통해 200 응답을 리턴함을 알수 있어요)
simple-backend-1-7f5cf8998d-8q9md istio-proxy [2023-01-11T06:28:48.740Z] "GET / HTTP/1.1" 408 - via_upstream - "-" 0 172 3 3 "172.17.0.1" "curl/7.84.0" "7cc7a62f-8f46-9298-9e46-fac4c10f5ffd" "simple-backend:80" "172.17.0.11:8080" inbound|8080|| 127.0.0.6:60711 172.17.0.11:8080 172.17.0.1:0 outbound_.80_._.simple-backend.istioinaction.svc.cluster.local default

simple-backend-1-7f5cf8998d-8q9md istio-proxy [2023-01-11T06:28:49.511Z] "GET / HTTP/1.1" 408 - via_upstream - "-" 0 172 1 1 "172.17.0.1" "curl/7.84.0" "8a772e89-3ac7-91bb-a5f0-6bb202b39058" "simple-backend:80" "172.17.0.11:8080" inbound|8080|| 127.0.0.6:55897 172.17.0.11:8080 172.17.0.1:0 outbound_.80_._.simple-backend.istioinaction.svc.cluster.local default
💡이처럼 EvnoyFilter 를 이용하면 Istio 에서 설정할 수 없는 Envoy 옵션들도 수정할 수 있습니다
REQUEST HEDGING
- Hedging == fencing , 가두리치다
- 요청을 보낸 노드의 응답이 길어질 경우(timed-out), 똑같은 요청을 다른 노드로 보내는 기법입니다
- 주목할 점은 retry와 달리 timed-out 요청을 취소하지 않고 후속 요청과 경쟁(race)시킵니다
- 즉, 두 요청 중에 먼저 도착한 응답을 사용합니다
- request hedging 은 tail latency를 개선하는 방법으로 언급되기도 하는데요
- tail latency 에 포함되는 요청 비중이 높을 경우 request 부하가 커질 수 있으므로 trade-off를 잘 따져보아야 합니다
- 그리고, 요청이 병렬적으로 발생하기 때문에, “멱등성” 보장 등 제약사항도 고려해야 합니다.
Request Hedging 역시 EnvoyFilter 를 통해 설정합니다.
## 설정 예시 (Hedging 은 따로 실습은 수행하지 않습니다)
# cat ch6/simple-backend-ef-retry-hedge.yaml
---
apiVersion: networking.istio.io/v1alpha3
kind: EnvoyFilter
metadata:
  name: simple-backend-retry-hedge
  namespace: istioinaction
spec:
  workloadSelector:
    labels:
      app: simple-web
  configPatches:
  - applyTo: VIRTUAL_HOST
    match:
      context: SIDECAR_OUTBOUND
      routeConfiguration:
        vhost:
          name: "simple-backend.istioinaction.svc.cluster.local:80"
    patch:
      operation: MERGE
      value:
        hedge_policy:
          hedge_on_per_try_timeout: true
타임아웃과 Retry, 간단하지 않죠?
서비스에서 이 둘에 대한 정책을 세우는 것은 둘이 잘 엮여서 (chained) 동작할 수 있도록 고려해야 하므로 쉬운 일이 아닙니다.
잘못 설정할 경우 시스템 아키텍처 상 좋지 않은 결과를 초래하거나 증폭할 수 있고 시스템의 부하를 가중시키고 연쇄적인 실패를 야기할 수 있습니다.
Resilient 아키텍처 구축의 마지막 퍼즐은 다함께 “Skipping Retry” 하는 것입니다.
retry 하는 대신에 “fail fast” 하는 것이죠.
부하를 가중하는 대신에 일정시간 동안 “Limit Load” 함으로써 upstream 시스템이 회복할 시간을 벌어주는 전략입니다.
Circuit Breaking 을 소개합니다.
6.5 Circuit breaking with Istio
- 연쇄적인 장애전파를 막기위한 방법으로
- Unhealthy 시스템으로의 트래픽을 제한함으로써 부하가중을 막아 회복을 돕습니다.
- Istio 에 정확히 Circuit breaker 라는 이름의 설정은 없지만
- 백엔드 서비스로의 부하를 제한하는 방법, Circuit breaker 로써 효율적으로 작동할 수 있는 두가지 방법을 제공합니다
- 방법1. 커넥션/요청수 제한 ~ 커넥션 및 요청이 limit 초과 시 fail fast 전략
- 방법2. 이상동작 엔드포인트 제거 ~ 로드밸런싱 풀의 엔드포인트를 감시하여 이상동작(misbehaving)이 감지되면 제거(eviction)
6.5.1 Guarding against slow services with connection-pool control
초기화
## destinationrule 삭제
kubectl delete destinationrule --all \
-n istioinaction
## simple-backend-2 제거
kubectl scale deploy simple-backend-2 --replicas=0 \
-n istioinaction
Slow service 배포 ~ 응답지연(1초)을 발생하는 simple-backend-1
kubectl apply -f ch6/simple-backend-delayed.yaml \
-n istioinaction

## 1초 딜레이
# kubectl get deploy simple-backend-1 -o yaml -n istio-inaction
..
{
  "name": "TIMING_50_PERCENTILE",
  "value": "1000ms"
},
호출 테스트 ~ 1초 지연이 잘 적용되었는지 확인 합니다.
fortio load -H "Host: simple-web.istioinaction.io" \
-quiet -jitter -t 30s -c 1 -qps 1 http://localhost/

..
# target 50% 1.02632
# target 75% 1.03316
# target 90% 1.03726
# target 99% 1.03972
# target 99.9% 1.03996
..
Code 200 : 30 (100.0 %)
All done 30 calls (plus 1 warmup) 1025.836 ms avg, 1.0 qps
30초 동안 쓰레드 하나(1 conn.)로 초당 1건 (qps=1) 씩 호출합니다
- -c 1 : one connection
- -qps 1 : one request per second
Now, we can begin testing Istio’s connection-limiting circuit breaking.
DestinationRule 설정 - max 커넥션 및 , 커넥션당 max요청수, 동시요청수를 모두 1로 제한합니다.
# cat ch6/simple-backend-dr-conn-limit.yaml
---
apiVersion: networking.istio.io/v1beta1
kind: DestinationRule
metadata:
  name: simple-backend-dr
spec:
  host: simple-backend.istioinaction.svc.cluster.local
  trafficPolicy:
    connectionPool:
      tcp:
        maxConnections: 1  # *Total number of connections*
      http:
        http1MaxPendingRequests: 1  # *Queued requests*
        maxRequestsPerConnection: 1 # *Requests per connection*
        maxRetries: 1
        http2MaxRequests: 1  # *Maximum concurrent requests to all hosts*
the circuit-breaking thresholds
maxConnections~ threshold of “connection overflow” istio 정의 ~ Maximum number of HTTP1/TCP connections to a destination host. envoy 정의 ~ The maximum number of connections that Envoy will make to the upstream cluster. **connection overflow 는maxConnections를 초과하는 것을 의미함 istio-proxy (Envoy) 는 이에 대한 metrics 를 제공함http1MaxPendingRequests~ the allowable number of requests that are pending (queueing) or connectionlesshttp2MaxRequests~ max concurrent (parallel) requests in a cluster
## DestinationRule 적용 (connection-limiting)
kubectl apply -f ch6/simple-backend-dr-conn-limit.yaml \
-n istioinaction
호출테스트 ~ 앞의 테스트와 동일 조건 (1 conn, 1 qps)
fortio load -H "Host: simple-web.istioinaction.io" \
-quiet -jitter -t 30s -c 1 -qps 1 http://localhost/

..
Code 200 : 30 (100.0 %)
All done 30 calls (plus 1 warmup) 1031.166 ms avg, 1.0 qps
호출테스트 ~ 커넥션수와 qps를 2로 늘림 (2 conn, 2 qps) ⇒ 에러 발생 (25건)
fortio load --allow-initial-errors -H "Host: simple-web.istioinaction.io" \
-quiet -jitter -t 30s -c 2 -qps 2 http://localhost/

..
# target 50% 1.21429
# target 75% 2.01023
# target 90% 2.03888
# target 99% 2.05608
# target 99.9% 2.0578
Error cases : count 25 avg 0.053226087 +/- 0.1917 min 0.006351083 max 0.9918135 sum 1.33065217
..
Code 200 : 31 (55.4 %)
Code 500 : 25 (44.6 %)
All done 56 calls (plus 2 warmup) 975.611 ms avg, 1.8 qps
-
(참고) 아래와 같이 fortio 실행이 실패하는 경우
--allow-initial-errors옵션 추가Aborting because of error 500 for http://localhost/: "HTTP/1.1 500 Internal Server Error date: Fri, 13 Jan 2023 05:25:58 GMT content-length: 685 content-type: text/plain; charset=utf-8 x-envoy-upstream-service-time: 13 server: istio-envoy { "name": "simple-web", "uri": "/", "type": "HTTP", "ip_addresses": [ "172.17.0.10" ], "start_time": "2023-01-13T05:25:58.174688", "end_time": "2023-01-13T05:25:58.185688", "duration": "11ms", "body": "Hello from simple-web!!!", "upstream_calls": [ { "uri": "http://simple-backend:80/", "headers": { "Content-Length": "81", "Content-Type": "text/plain", "Date": "Fri, 13 Jan 2023 05:25:57 GMT", "Server": "envoy", "X-Envoy-Overloaded": "true" }, "code": 503, "error": "Error processing upstream request: http://simple-backend:80/, expected code 200, got 503" } ], "code": 500 }
그런데 말입니다 … 이것이 진짜 에러인지, Circuit breaking 된 것인지 아리송 합니다
Circuit breaking 동작여부를 어떻게 확인할 수 있을까요 ?
simple-web > istio-proxy 의 statistics 를 활성화 합니다.
(1) sidecar.istio.io/statsInclusionPrefixes 어노테이션 설정
## 명세 적용 (statsInclusionPrefixes)
kubectl apply -f ch6/simple-web-stats-incl.yaml \
-n istioinaction

## 적용 확인
kubectl get deployment simple-web -n istioinaction \
-o jsonpath='{.spec.template.metadata.annotations}{"\n"}'

{"sidecar.istio.io/statsInclusionPrefixes":"cluster.outbound|80||simple-backend.istioinaction.svc.cluster.local"}
(2) 정확한 확인을 위해 istio-proxy stats 카운터 초기화
kubectl exec -it deploy/simple-web -c istio-proxy \
-- curl -X POST localhost:15000/reset_counters
호출테스트 ~ 에러(500) 발생이 확인됩니다. Circuit Breaking 동작을 확인해 볼까요
fortio load -H "Host: simple-web.istioinaction.io" \
--allow-initial-errors -quiet -jitter -t 30s -c 2 -qps 2 \
http://localhost/

..
Code 200 : 32 (57.1 %)
Code 500 : 24 (42.9 %)
All done 56 calls (plus 2 warmup) 989.485 ms avg, 1.7 qps
확인 ~ simple-web > istio-proxy 의 stats 조회
kubectl exec -it deploy/simple-web -c istio-proxy \
 -- curl localhost:15000/stats \
   | grep simple-backend | grep overflow

..
.. .upstream_cx_overflow: 62
.. .upstream_cx_pool_overflow: 0
.. .upstream_rq_pending_overflow: 24
.. .upstream_rq_retry_overflow: 0
- upstream_cx_overflow ~
maxConnections초과 - upstream_rq_pending_overflow ~
http1MaxPendingRequests초과
http2MaxRequests (parallel requests) 를 늘리면 어떻게 될까?
http2MaxRequests 조정: 1 → 2, “동시요청 처리개수”를 늘림
kubectl patch destinationrule simple-backend-dr \
-n istioinaction --type merge --patch \
'{"spec": {"trafficPolicy": {"connectionPool": {"http": {"http2MaxRequests": 2}}}}}'
정확한 확인을 위해 istio-proxy stats 카운터 초기화
kubectl exec -it deploy/simple-web -c istio-proxy \
-- curl -X POST localhost:15000/reset_counters
호출테스트 ~ 이전 테스트 대비 에러 카운트가 확 줄음 (24 → 4)
fortio load -H "Host: simple-web.istioinaction.io" \
--allow-initial-errors -quiet -jitter -t 30s -c 2 -qps 2 \
http://localhost/

..
Code 200 : 33 (94.3 %)
Code 500 : 2 (5.7 %)
All done 35 calls (plus 2 warmup) 1774.252 ms avg, 1.1 qps
## stats 확인 (simple-web)
kubectl exec -it deploy/simple-web -c istio-proxy \
 -- curl localhost:15000/stats \
   | grep simple-backend | grep overflow

..
.. .upstream_cx_overflow: 38
.. .upstream_cx_pool_overflow: 0
.. .upstream_rq_pending_overflow: 3
.. .upstream_rq_retry_overflow: 0
이전대비 upstream_cx_overflow (maxConnection 오버플로)와 upstream_rq_pending_overflow (큐 오버플로우) 건 수가 줄었습니다
이번에는 http1MaxPendingRequests : 1 → 2, “queuing” 개수를 늘립니다
kubectl patch destinationrule simple-backend-dr \
-n istioinaction --type merge --patch \
'{"spec": {"trafficPolicy": {"connectionPool": {"http": {"http1MaxPendingRequests": 2}}}}}'
## stats 초기화
kubectl exec -it deploy/simple-web -c istio-proxy \
-- curl -X POST localhost:15000/reset_counters
호출테스트 ~ 요청 모두 성공
fortio load -H "Host: simple-web.istioinaction.io" \
--allow-initial-errors -quiet -jitter -t 30s -c 2 -qps 2 \
http://localhost/

..
# target 50% 2.0249
# target 75% 2.04276
# target 90% 2.05348
# target 99% 2.05991
# target 99.9% 2.06055
Error cases : count 0 avg 0 +/- 0 min 0 max 0 sum 0
..
Code 200 : 33 (100.0 %)

All done 33 calls (plus 2 warmup) 1888.619 ms avg, 1.0 qps
확인 ~ simple-web > istio-proxy 의 stats 조회 ⇒ “upstream.rq_pending_overflow: 0 (없음)”
## stats 확인
kubectl exec -it deploy/simple-web -c istio-proxy \
 -- curl localhost:15000/stats \
   | grep simple-backend | grep overflow

..
.. .upstream_cx_overflow: 42
.. .upstream_cx_pool_overflow: 0
.. .upstream_rq_pending_overflow: 0
.. .upstream_rq_retry_overflow: 0
지금까지, connection-limit 을 조정하여 모든 요청이 200 OK 되도록 튜닝을 해보았습니다
앞의 실습과정에서 요청이 실패하는 경우를 보았는데요. 그런데, 해당 요청실패가 Circuit Breaking으로 인한 것인지, 어플리케이션 문제인지 어떻게 확인할 수 있을까요 ?
Istio 에서는 Circuit Breaking 에 의해 차단된 요청을 구분해 주기 위해 응답 헤더에 “x-envoy-overloaded”: “true” 를 포함시켜 줍니다.
6.5.2 Guarding against unhealthy services with outlier detection
초기화
앞서 사용한 connection-limiting, delay, retry 설정 등을 제거합니다.
환경 초기화
kubectl delete destinationrule --all -n istioinaction
kubectl delete vs simple-backend-vs -n istioinaction

## disable retries (default)
istioctl install --set profile=demo \
--set meshConfig.defaultHttpRetryPolicy.attempts=0
앱 초기화
kubectl apply -f ch6/simple-backend.yaml \
-n istioinaction

kubectl apply -f ch6/simple-web-stats-incl.yaml \
-n istioinaction
호출테스트 ~ 모두 성공
fortio load -H "Host: simple-web.istioinaction.io" \
--allow-initial-errors -quiet -jitter -t 30s \
-c 10 -qps 20 \
http://localhost/

..
Code 200 : 600 (100.0 %)
All done 600 calls (plus 10 warmup) 175.755 ms avg, 19.9 qps
이번 섹션 실습을 위한 “unhealthy service” 배포
kubectl apply -n istioinaction \
-f ch6/simple-backend-periodic-failure-500.yaml

# kubectl deploy simple-backend-1 -o yaml
..
- name: "ERROR_TYPE"
  value: "http_error"
- name: "ERROR_RATE"
  value: "0.75"
- name: "ERROR_CODE"
  value: "500"
..
호출테스트 ~ 실패 건 발생
fortio load -H "Host: simple-web.istioinaction.io" \
--allow-initial-errors -quiet -jitter -t 30s \
-c 10 -qps 20 \
http://localhost/

..
Code 200 : 332 (55.3 %)
Code 500 : 268 (44.7 %)
All done 600 calls (plus 10 warmup) 115.011 ms avg, 19.9 qps
simple-backend-1 (unhealthy service) 로 전송된 요청은 모두 실패합니다
unhealthy service 로 확인이 되면 요청을 막을 수는 없을까요 ? (어차피 실패할 거니까요). 노드 장애로 판단되면 load balancing pool 에서 제거하여 요청이 정상노드로 갈 수 있도록 해보겠습니다
Outlier Detection
DestinationRule 에서 Outlier Detection 설정을 제공합니다
apiVersion: networking.istio.io/v1beta1
kind: DestinationRule
metatdata:
  name: simple-backend-dr
spec:
  host: simple-backend.istioinaction.svc.cluster.local
  trafficPolicy:
    outlierDetection:
      consecutive5xxErrors: 1
      interval: 5s
      baseEjectionTime: 5s
      maxEjectionPercent: 100
consecutive5xxErrors: 연속적인 에러 횟수 thresholdinterval: eject 판단 주기baseEjectionTime: ejectionTime = n *baseEjectionTime
n = eject 횟수maxEjectionPercent: 전체 노드 중 ejection 허용 비율
kubectl apply -f ch6/simple-backend-dr-outlier-5s.yaml \
-n istioinaction
카운터 리셋
kubectl exec -it deploy/simple-web -c istio-proxy \
-- curl -X POST localhost:15000/reset_counters
호출테스트
fortio load -H "Host: simple-web.istioinaction.io" \
--allow-initial-errors -quiet -jitter -t 30s \
-c 10 -qps 20 \
http://localhost/
결과 : 500 응답횟수 268 → 19 로 줄었음
..
Code 200 : 581 (96.8 %)
Code 500 : 19 (3.2 %)
All done 600 calls (plus 10 warmup) 185.949 ms avg, 19.9 qps
아래 그림처럼 에러 발생 시 pool에서 문제가 된 노드를 eject 하기 때문에 이후 요청은 정상적인 노드에서 처리함
ejection 여부를 istio-proxy의 stats 을 통해서 확인할 수 있음
# kubectl exec -it deploy/simple-web -c istio-proxy -- curl -X POST localhost:15000/stats | grep simple-backend | grep outlier

.outlier_detection.ejections_active: 0
.outlier_detection.ejections_consecutive_5xx: 3
.outlier_detection.ejections_detected_consecutive_5xx: 3
.outlier_detection.ejections_detected_consecutive_gateway_failure: 0
.outlier_detection.ejections_detected_consecutive_local_origin_failure: 0
.outlier_detection.ejections_detected_failure_percentage: 0
.outlier_detection.ejections_detected_local_origin_failure_percentage: 0
.outlier_detection.ejections_detected_local_origin_success_rate: 0
.outlier_detection.ejections_detected_success_rate: 0
.outlier_detection.ejections_enforced_consecutive_5xx: 3
.outlier_detection.ejections_enforced_consecutive_gateway_failure: 0
.outlier_detection.ejections_enforced_consecutive_local_origin_failure: 0
.outlier_detection.ejections_enforced_failure_percentage: 0
.outlier_detection.ejections_enforced_local_origin_failure_percentage: 0
.outlier_detection.ejections_enforced_local_origin_success_rate: 0
.outlier_detection.ejections_enforced_success_rate: 0
.outlier_detection.ejections_enforced_total: 3
.outlier_detection.ejections_overflow: 0
.outlier_detection.ejections_success_rate: 0
.outlier_detection.ejections_total: 3
500 에러를 많이 줄이긴 하였지만 더 줄일 수는 없을까요? 있습니다. 바로 retry 입니다.
# cat ch6/simple-backend-vs-retry-500.yaml
---
apiVersion: networking.istio.io/v1alpha3
kind: VirtualService
metadata:
  name: simple-backend-vs
spec:
  hosts:
  - simple-backend
  http:
  - route:
    - destination:
        host: simple-backend
    retries:
      attempts: 2
      retryOn: 5xx
kubectl apply -f ch6/simple-backend-vs-retry-500.yaml \
-n istioinaction
호출테스트 > 카운터 리셋
kubectl exec -it deploy/simple-web -c istio-proxy \
-- curl -X POST localhost:15000/reset_counters
호출
fortio load -H "Host: simple-web.istioinaction.io" \
--allow-initial-errors -quiet -jitter -t 30s \
-c 10 -qps 20 \
http://localhost/
결과 ~ 모든 요청 응답 성공
..
Code 200 : 600 (100.0 %)
All done 600 calls (plus 10 warmup) 212.102 ms avg, 19.9 qps
istio-proxy 상에서 ejection은 발생했지만 retry 되었습니다
..
.outlier_detection.ejections_total: 3
Summary
- Resilience 란? 장애나 실패로 부터 얼마나 빨리 회복하느냐
- Resilience 를 위한 load balancing, timeouts, retries, circuit break 와 같은 fetures 들이 존재
- load balancing 은 traffic 을 잘 분배하는 것.
- 분배 주체 ? server-side vs client-side
- 분배 방식 ? RR vs Random vs Least Conn.
- timeouts 은 정해진 시간 만큼만 기다리는 것.
- 얼마나 기다리나 ? 무기한 vs 유기한
- retries 는 실패 시에 다시 시도 하는 것.
- circuit break 는 문제 발생 시에 traffic 을 차단하는 것.
- 이러한 기법들은 시스템 상황에 비추어 trade-off 를 잘 따져봐야 함
- Resilience를 어디서 처리할 것인가 ? application 안 vs 밖
- application 에서 처리
- application 외부에서 처리
- client-side “proxy”
- proxy ? (proxy vs route ?) proxy - “additional functions” for specific goals
- proxy 가 resilience를 위한 function들을 처리
- Client-side load balancing
- Server side ? SPoF
- Locality-aware load balancing
- Transparent timeouts and retries
- Circuit breaking